|
The Add folder structure dialog allows you to import all documents with supported extensions from a specified folder and its subfolders, and to specify the export path rule for these documents. Note: If you modify the export path rules in the Options dialog, they will apply only to those projects that are created in the future.
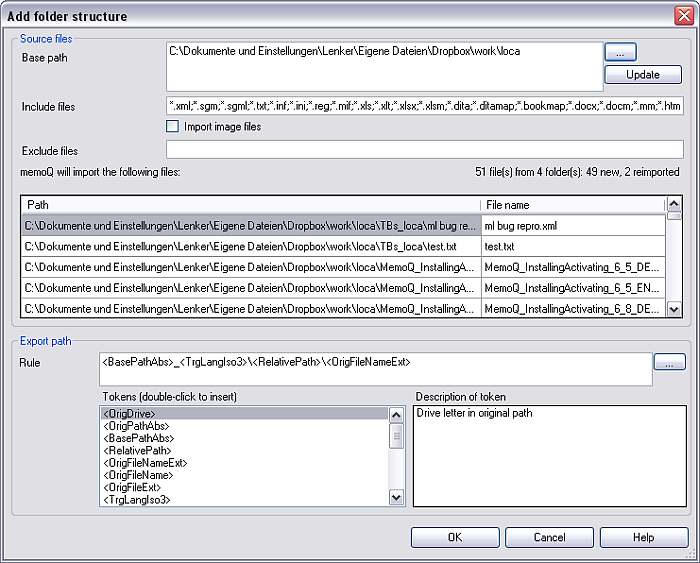
How to beginYou can invoke the Add folder structure dialog by choosing Import Folder Structure on the Documents ribbon tab, or in the Translation documents dialog of the New memoQ project wizard. StructureThe Add folder structure dialog consists of •the Source files section for browsing for the folder and its subfolders you want to import all documents with supported extensions, •the Export path section for specifying the export path rule for these documents. You have to fill in both sections to start importing the files at once.
Source files section: •Base path: This field indicates the path of the folder and its subfolders you want to import all documents with supported extensions. This field is read-only. To change the path, click the ... button, and browse for the new path. In the case of changes, click the Update button. •Include files: Select the file types to import into memoQ. You can use the * character as a wildcard, so if you want to import all files that contain EN in the name, use *EN*.*. •Import image files: Check this check box to import images from the documents that needs to be localized. •Exclude files: Select the file types you do not want to import into memoQ. You can use the * character as a wildcard, so if you want to import all files that contain EN in the name, use *EN*.*. •Update: Refreshes the file list if the Base path changes. •memoQ will import the following files: This pane lists all the documents with supported extensions that will be imported from the folder characterized by the root path, and from all its subfolders: oPath: This column indicates the relative path of the documents that will be imported. If a document comes from the folder characterized by the root path, the column labeled Path will be empty. If it comes from a subfolder one level down, the column labeled Path will show a single item etc. oFile name: This column indicates the name of each document that will be imported. Export path section: The extended view consists of the shrinked view, and an section for loading one of the already stored export path rules and for storing new ones. •Rule: Use this field to edit and display export path rules. You can write the path using backslashes with fixed strings and/or with tokens. You can also use the ... button to browse for the target folder structure. You have to add also the file names and expressions to the path. The default rule memoQ uses for exporting documents that are imported from a folder and from all its subfolders is the following: <BasePathAbs>_<TrgLangIso3>\<RelativePath>\<OrigFileNameExt> This means that during the export, the documents are saved into the very same folder they came from and with names consisting of the three-letter target language code, the path within the base folder, and the original file name. •Tokens (double-click to insert): Use this pane to insert a token from the list after the current cursor position in the Export path rule field. •Description of token: This field indicates the description of the token selected in the Tokens pane. UseAfter you specified the settings for the source files and the export path, click OK. The Document import options dialog appears. Here you can change the document filter and the configuration. NavigationClick OK to import the documents from the specified location at once with the selected settings. Click Close to close the dialog without any changes made. |