|
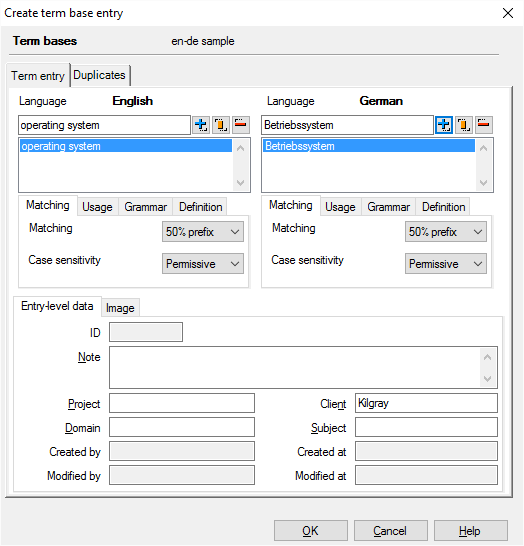
Using this command, you can add a new term pair into the primary and other term bases directly from the translation document. You can add terms both to local and remote term bases, unless the term base is read only. Term bases, unlike translation memories, can be multilingual, but during translation, you can only add entries in the project's languages. To speed up the creation of the new entry, you can select a part of the text in the source segment and a part of the text in the target segment, and they automatically appear in the relevant fields. The Create term base entry dialog has 2 tabs: the Term entry where you enter your terms, and the Duplicates tab. How to beginYou can invoke the Create term base entry dialog from the term base editor by choosing Create term base entry in the context menu appearing after you right-click the selected term, by pressing Ctrl+E after selecting the entry. Alternatively, you can also invoke the dialog on the Translation ribbon tab: in the Store section, choose Add Term. Add the term, enter meta-information. memoQ automatically checks for duplicates when you want to enter a new term to a memoQ term base. Checking for duplicates is not working if you want to add a term to a qTerm term base. On the Term Bases ribbon tab, you have several commands for term base ranking and setting a term base as target for new terms: •Set As Target For New Terms: Ranks this term base highest, and all your new terms are added to this term base. This term base is displayed in bold in the list. Use Ctrl+Q (Quick Add). When you invoke Ctrl+E for the first time, you can add another term base where your terms should be added to when you press Ctrl+Q. However, Ctrl+Q will list you the term bases you can add your term to, but you can only add the new term to one term base. •Raise Rank / Lower Rank: Allows you to rank your term bases in the project. Depending on the rank, you see the term base hits in the Translation results pane. Mixing memoQ and qTerm term bases:When you added a term to your memoQ term base, and then you would like to add this term to the qTerm term base of your client too, click the Create in qTerm link. The Edit qTerm entry dialog appears. If you do it vice versa, then the Create in memoQ link is visible. This will close the Edit qTerm entry dialog and open the Create term base entry dialog. The links are only visible if you have mixed term bases (memoQ and qTerm) in your project. If the term base that you have set as target for new terms (which is not necessarily the term base that you ranked first in your project) is a memoQ term base, then the Create term base entry dialog appears when you press Ctrl+E for the first time. After that, whenever you press Ctrl+E or Ctrl+Q the term base where you last saved an entry is displayed. If you last saved an entry in a memoQ term base and you press Ctrl+E, the Create term base entry dialog appears. If you last saved your entry in a qTerm term base, and you press Ctrl+E, the Edit qTerm entry dialog appears. memoQ remembers the last invoked dialog when you press Ctrl+E. Note: memoQ searches for duplicates in memoQ term bases, but not in qTerm term bases when you add new terms. You can add terms from different types of projects: local projects, local projects created from a package (the package can come from local or online projects), checked out online projects. Editing an entryThe editing interface is either empty when you start the process, or pre-filled with the term base entry if you have selected it on the source and/or the target side.
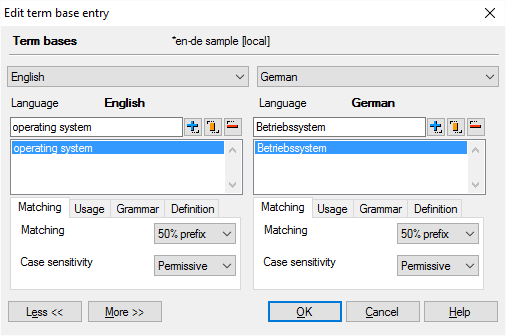
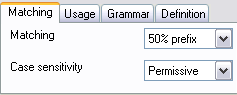
By default, the terms are stored in the term base which you set as target for new terms. But you can also select the term base(s) you want to enter the term in from the Term bases drop-down list. This drop-down list contains all the term bases added to the project, and you can select one or more by enabling the checkbox next to their names. memoQ will add the new term to the selected term bases. If you want to add definitions and notes to the terms, press the More>> button to extend the dialog. Type the source term in the Lemma box on the left, and the target term in the Lemma box on the right. •Matching: Use this drop-down list to set the applicable prefix matching sensitivity of the selected term base entry. You can choose from the following options: oFuzzy: Use this value to get hits independently of prefix or suffix matching. In case of German, for instance, you have "Mutter" in your term base. With the Fuzzy setting, it also finds "Mütter". German has a lot of composita like "Festplattenspeicherplatz". When your term base contains "Festplatte" and "speicher", it will be highlighted in the source cell containing the word "Festplattenspeicherplatz". o50% prefix: Use this value to set the prefix matching sensitivity of the selected term base entry to permissive. This is the default setting. In case of project memoQ will find both project and projects, but it will not find projectapplication. oExact: Use this value to set the prefix matching to insensitive. In case of project memoQ will find project but it will not find projects and projectapplication oCustom: Use this value to allow wildcards in the term base. Use the pipe (|) to specify the beginning of a variable part in a word, or use the asterisk (*) to specify that anything can come after the last character. If your term is Wassert|urm, memoQ will find Wasserturm and Wassertürme but it will not find Wasserschutz. You can enter several words with pipes and asterisks. For example, bankovn|í operac|e will retrieve bankovních operací and bankovními operacemi as well.If you enter at least one pipe or asterisk in the term, this setting will automatically switch to Custom. Multi-word terms where the first word changes are perfectly legitimate: When you have a multi-word term where the first word (or more than one words) can change, you can use the asterisk and the pipe in those words as well. Use the Custom matching option, and enter the source terms like in the examples: 'bankovn|í operac|e' will match 'bankovních operací' or 'bankovními operacemi'; 'passage|s à la valise' will match 'passage à la valise' or 'passages à la valise'. •Case sensitivity: Use this drop-down list to set the case sensitivity of the selected term base entry. You can choose from the following options: oYes: Use this value to set the case sensitivity of the selected term base entry to sensitive. Either the term contains small caps, capital letters or both, later it will be offered as a translation result only if the same word, strictly typed in the very same way, occurs in the source document. For example, if you create a new term base entry for the name Will, it is worth setting its case sensitivity to 'Yes' as you probably do not want it as a translation result every time a segment is written in future tense. oPermissive: Use this value to set case sensitivity to No for small caps and Yes for capital letters in the source text. This is the default setting; it means, for example, that you enter the word it and its translation to the term base, and memoQ will offer this translation when it, It or IT appears in the source text. However, if the source text contains IT as the shortening for Information Technology, you do not need to check the large number of hits containing the word it or It as memoQ will only present translation results that contain the abbreviation in very same way. oNo: Use this value to set the case sensitivity of the selected term base entry to insensitive. No matter how the term is typed in the source text, the results will include the same term written either in small caps or in capital letters, or both. Case is simply not relevant with this setting. •Forbidden term: Check this check box to set the selected term to forbidden. If a source term is set to forbidden, it will not appear on the Translation results pane. If a target term is set to forbidden, it will appear on the Translation results pane in black. Note: The following description covers the extended view because all options appear there. List of term versionsThe list of term versions shows all source and target language versions of an entry, but you can only edit the selected source and target entry in the editing interface. Click the term you want to edit or navigate to it using the arrow buttons and edit it in the editing interface. • • • Entry-level data interfaceFor every language, you can specify entry-level data for the term. Every term can have a single note, no matter how many language versions it has. Enter or correct a definition in the appropriate definition field and click the Add button or the Change button to insert the changes into the term base. Matching tab:
Here you can set the applicable matching sensitivity of the selected term base entries. The way you should use this section is the same as it was described in connection with the simple view of this dialog. •Matching: Use this drop-down list to set the applicable prefix matching sensitivity of the selected term base entry. You can choose from the following options: oFuzzy: Use this value to get hits independently of prefix or suffix matching. In case of German, for instance, you have "Mutter" in your term base. With the Fuzzy setting, it also finds "Mütter". German has a lot of composita like "Festplattenspeicherplatz". When your term base contains "Festplatte" and "speicher", it will be highlighted in the source cell containing the word "Festplattenspeicherplatz o50% prefix: Use this value to set the prefix matching sensitivity of the selected term base entry to permissive. This is the default setting. In case of project memoQ will find both project and projects, but it will not find projectapplication. oExact: Use this value to set the prefix matching to insensitive. In case of project memoQ will find project but it will not find projects and projectapplication oCustom: Use this value to allow wildcards in the term base. Use the pipe (|) to specify the beginning of a variable part in a word, or use the asterisk (*) to specify that anything can come after the last character. If your term is Wassert|urm, memoQ will find Wasserturm and Wassertürme but it will not find Wasserschutz. You can enter several words with pipes and asterisks. For example bankovn|í operac|automate will retrieve bankovních operací and bankovními operacemi as well.If you enter at least one pipe or asterisk in the term, this setting will automatically switch to Custom.. •Case sensitivity: Use this drop-down list to set the case sensitivity of the selected term base entry. You can choose from the following options: oYes: Use this value to set the case sensitivity of the selected term base entry to sensitive. Either the term contains small caps, capital letters or both, later it will be offered as a translation result only if the same word, strictly typed in the very same way, occurs in the source document. For example, if you create a new term base entry for the name Will, it is worth setting its case sensitivity to 'Yes' as you probably do not want it as a translation result every time a segment is written in future tense. oPermissive: Use this value to set case sensitivity to No for small caps and Yes for capital letters in the source text. This is the default setting; it means, for example, that you enter the word it and its translation to the term base, and memoQ will offer this translation when it, It or IT appears in the source text. However, if the source text contains IT as the shortening for Information Technology, you do not need to check the large number of hits containing the word it or It as memoQ will only present translation results that contain the abbreviation in very same way. oNo: Use this value to set the case sensitivity of the selected term base entry to insensitive. No matter how the term is typed in the source text, the results will include the same term written either in small caps or in capital letters, or both. Case is simply not relevant with this setting. Usage tab:
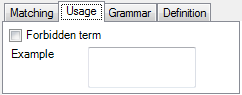
Here you can set the selected term base entry as forbidden and give an example. •Forbidden term: Check this check box to set the selected term entry to forbidden. If a source term is set to forbidden, it will not appear on the Translation results pane. If a target term is set to forbidden, it will appear on the Translation results pane in black. •Example: Use this field to give an example. Grammar tab:
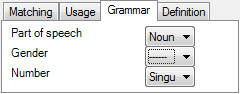
Here you can set the grammatical properties of the selected term base entry. •Part of speech: Use this drop-down list to set the part of speech of the selected term base entry. o------: Use this value if you do not want to set the part of speech of the selected term base entry. oNoun: Use this value to set the part of speech of the selected term base entry to noun. oAdjective: Use this value to set the part of speech of the selected term base entry to adjective. oAdverb: Use this value to set the part of speech of the selected term base entry to adverb. oVerb: Use this value to set the part of speech of the selected term base entry to verb. oOther: Use this value if the part of speech of the selected term base entry is none of the above. •Gender: Use this drop-down list to set the gender of the selected term base entry. o------: Use this value if you do not want to set the gender of the selected term base entry. oMasculine: Use this value to set the gender of the selected term base entry to masculine. oFeminine: Use this value to set the gender of the selected term base entry to feminine. oNeuter: Use this value to set the gender of the selected term base entry to neutral. •Number: Use this drop-down list to set the number of the selected term base entry. o------: Use this value if you do not want to set the number of the selected term base entry. oSingular: Use this value to set the number of the selected term base entry to singular. oPlural: Use this value to set the number of the selected term base entry to plural. Definition tab:
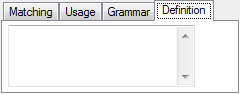
Here you can add a definition to the selected term base entry. •Definition: Use this field to add a definition to the selected term base entry. Meta-Information and ImageEntry-level data tab:
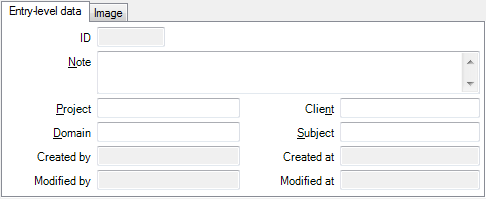
The following individual meta-information are available for the entries: •ID: This is the unique identifier of the entry in the term base. You cannot edit this field. •Note: Use this field to write a note. •Project: Use this field to indicate the translation project identifier where the entry was created. You can edit this field. •Domain: This is the domain of the term base entry. You can edit this field. •Created by: This is the user name of the person who created the entry. •Modified by: This is the user name of the person who created or last modified the entry. If the entry was modified, the Created by field shows a different name. •Client: This is the client the term base entry was created for. You can edit this field. •Subject: This is the subject of the term base. You can edit this field. •Created at: This is the date and time when the entry was created. •Modified at: This is the date and time when the entry was created or last modified. If the entry was modified, the Created at field shows a different date and time. The creation and modification dates, IDs and authors are updated automatically, but the Subject, Domain and Note can be changed in the corresponding fields. Image tab:
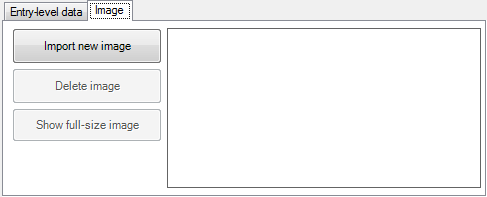
Here you can add an image to or remove the image from the selected term base entry. •Import new image: Click this button to import a new image for the selected term base entry. •Delete image: Click this button to remove the image from the selected term base entry. •Show full-size image: Click this button for a full-size display of the image of the selected term base entry. In case of remote term bases, downloading images may increase lookup times and slow down the translation process in general. NavigationClick OK to create the term base entry. Clicking Cancel will close the dialog without creating a term base entry. |