|
There are several project phases which you can automate: •After project creation and initial import of documents is finished •Before documents are imported/reimported •After documents are imported/reimported •After project is finished (wrap up) You can only define this workflow automation within project templates. If you define an online project template, you can also automate: •FirstAccept succeeded/failed •Project launched •User started working on a document •Document translation received from Asia Online/failed with Asia Online •Document delivered by translator/reviewer 1/reviewer 2 •Document completed workflow •Document removed •All documents are delivered by the translator/reviewer 1/ reviewer 2 •All documents completed workflow •All documents of a language completed workflow •User has delivered all documents Note: While automated actions are running, you – and possibly other users – will not be able to run long tasks such as pre-translation, statistics, X-translation, and confirmation of several segments at a time.
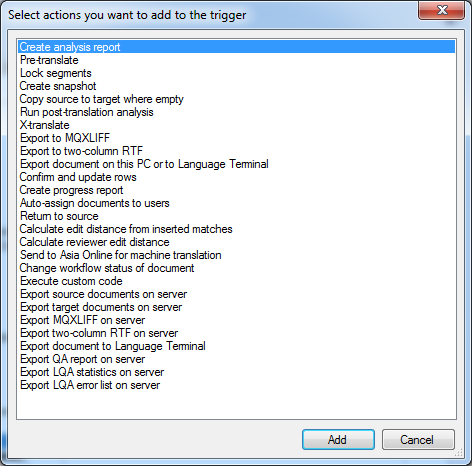
How to beginInvoke the Resource console from the Application menu or selecting the corresponding icon on the Quick Access Toolbar. Choose Project templates. Create a new template or edit an existing template. OptionsIn the automated actions pane, you can automate actions for the above mentioned project phases. •After project creation and initial import: Click the Plus button and select the actions: create report, pre-translate, lock segments, create snapshot, copy source to target where empty. •After documents are imported/reimported: Click the Plus button and select the actions: create report, pre-translate, lock segments, create snapshot, copy source to target where empty, x-translate, Export to two-column RTF. •Before documents are imported/reimported: Click the Plus button and select the actions: create report, run post translation analysis. Note: If you reimport documents, the post translation analysis is run and the report is created before the reimport of the document. •After project is finished: Click the Plus button and select the actions: export to memoQ XLIFF, export document, confirm and update rows, delete working TMS. All available actions for automated steps:
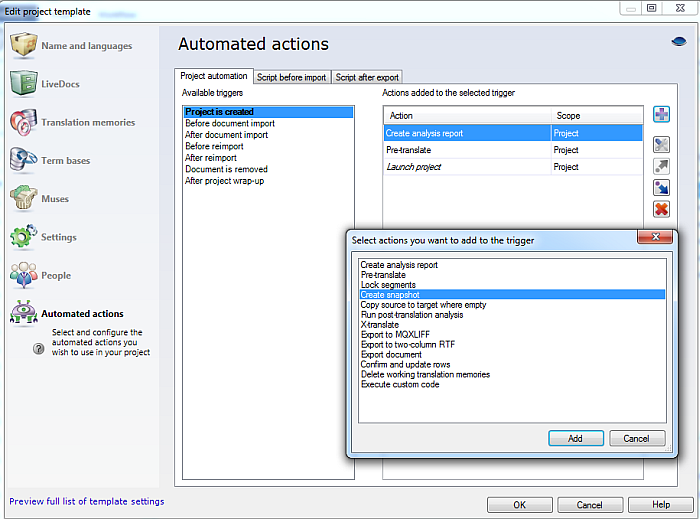
If you perform a batch import of more than one document, all steps will be executed once the batch import finished (i.e. statistics are created for all imported documents together). If you add documents one by one, all automated steps will be invoked every time you add a new document. The same applies for the reimport of documents. Set the scope for each action. Select either Project to perform the action on project level, or Document to perform the action on document level. Select an action from the Available triggers list. Then click the Plus button ( Click the Settings button (
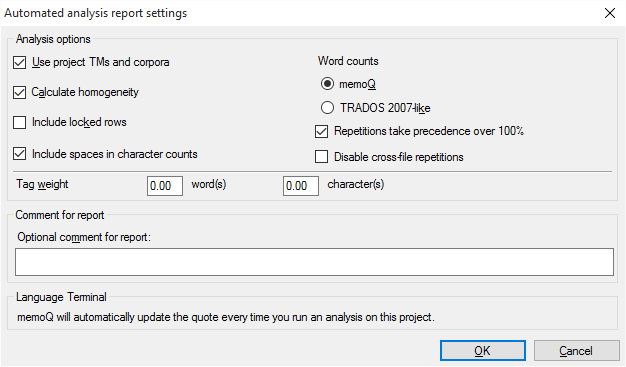
Further information for each setting of an action can be found in the Help. For creating an analysis report, you find the options explained in the Statistics dialog or in the Create an analysis report topic. Click the •creating a report: The analysis options Use project TM and corpora, Calculate homogeneity, Include locked rows, Include spaces in character counts, and Word counts are available. You can also define a Tag weight, and leave a comment. See also: Statistics •pre-translation: Define the match range for pre-translation, the segment status after pre-translation (for example: locked) and include Statistics. •segment locking: Define to automatically lock or unlock segments for all rows or only rows from Translator confirmed, Reviewer 1 confirmed or Reviewer 2 confirmed status, repetitions, non-repetitions or pre-translated rows. You can also lock rows in a different language (e.g. your source text is English but contains French words, then you can lock rows that are in French). •x-translate settings: X-translate documents based on the previous document version. automate this step, and define the X-translation settingsfor it in the project template. •confirm and update rows: Define which rows should be confirmed and updated into the TM. •leave a comment for the snapshot, •copy source to target where empty, •auto-assign users in an online project template, •calculate edit distance statistics, •delete a working translation memory (for instance your project is finished, and you no longer need the working TM, memoQ can automatically delete it); •launch a project, •put up documents for FirstAccept, •run post-translation analysis, •create a progress report, •and the settings for exporting your documents (final files or bilingual files such as memoQ XLIFF and Two-column RTF) Note: If there are no further settings for an action, the Settings button is grayed out. Click the
Online project specifics (where template based project creation fails) When you create an online project using a template and a resource, that you indicated to be used in the template, is missing. This can happen because you reorganized resources, removed or renamed a TM, etc. In this case, online project creation fails. Note: If resources are missing and you create a local project from a template, then the project creation will not fail. If you as the project manager have limited permissions on the memoQ server, and you use a project template to create an online project that has resources, where you have no permissions for, the project creation will also fail. This can be the case if you are in the lightweight PM group as project manager. If you have specified user assignment in a project template and a user is e.g. leaving the company and her memoQ user account on the memoQ server was deleted, then the project creation from this template fails. You have to remove the no longer existing user from the template to use this template again for project creation. If you have created a local project from a template with users assigned, and you now publish this project to your memoQ server. Now a user name is ambiguous on the memoQ server, means matching several memoQ server users (this can happen if the same user exists as a native memoQ user and is synchronized from AD/SAM), then project creation fails. You need to clarify the user names involved, i.e. make them unambiguous. Note: The Progress window when you run any of the above scenarios will not close. It provides you with information, e.g. missing translation memory. Note: If you create an online project using the Web PM, project creation will also fail (missing user, missing resource, etc. in the specified template).
See also: •Create a project using a project template |