|
When you prepare a project for team translation, some questions may remain unanswered. memoQ offers a transparent way to communicate with other team members using instant messaging (chat window) and discussions. memoQ's discussion feature replaces e-mail communication for query management. This way the company is able to build a knowledge base, another important resource that shortens the learning curve of translators. Note: The Communication tab for project level comments/topics is only available in online projects. Note: In memoQ, you can leave comments for documents, projects or term bases. These comments are referred to as discussions (topics) in memoQWeb. How to beginCheck out a local copy of an online project. Only in the checked out copy of an online project, you can invoke the Communication tab by choosing Open Communication Window from the memoQ application menu. The tab opens automatically if you open an online project. The tab consists of two sections: Chat window and Discussions window. The two sections can work independently, so the discussion you are reading may even reside on a different server than the chat server.
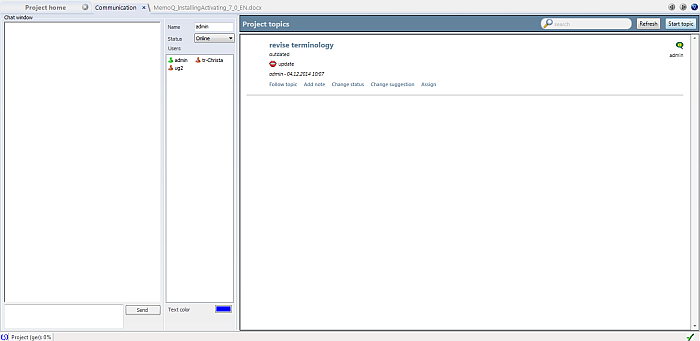
Instant messagingChat window section •Server: This field indicates the name of the server and the online project. •Reconnect: Click this button to reestablish the connection with the server. •Send: Click this button to send a chat message to the others working on the online project. oTo send a message, choose the addressee from the Users pane, enter the message into the message box, and click the Send button. oTo send a message to everyone in the project, do not choose anyone from the Users pane, just enter the message into the message box, and click the Send button. •Name: This field indicates your own user name, which is actually your server login name. •Status: Use this drop-down list to change your own user status. oOnline: This drop-down list element indicates that the user is online. oOffline: This drop-down list element indicates that the user is offline. oAway: This drop-down list element indicates that the user is not at the computer. Note: If you are online but do not do anything for a long time, your status will automatically turn to Away until you return to work. oDo not disturb: This drop-down list item indicates that the user is busy and do not want to accept calls. This setting turns message warnings off. •Users: This pane lists the users active in the project. The user names appearing are actually the server login name of the users. Next to each user you see a status icon, showing the status of the user. •Text color: Use this color selector to change the color of the text. Messages that you receive appear in the Communication tab when you have it as the active tab. If you are working on a different tab, part of the message appears in the lower right corner of the window, warning you that you received a new message, unless your status is Do not disturb. Project topicsImportant: If you cannot see project topics, only a Discussions disabled message in a large grey box, that is because discussions are disabled either for you or on the entire server. You are excluded from discussions if you are member of a group that is excluded from discussions. If you believe you receive this message in error, and you should be able to access discussions, contact the server administrator. Topics are restricted to the users assigned to the current online project. You can start a discussion (a topic) for the project. You can also search topics here, add a note, change the status of a topic or assign the topic to a user. Project topics section: •Refresh: Click this button to see the most recent topics. If you have a lot of topics, not all are displayed. Enter a keyword in the Search box, then click Refresh to refresh the list of topics with your search results. •Start topic: Click this button to open the Start a discussion dialog:
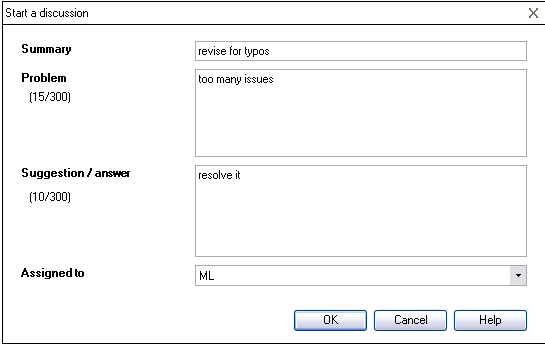
Enter a summary text in the Summary field. State the problem in the Problem field. Give a suggestion in the Suggestion / answer field. Assign it to a person from the Assigned to drop-down list. Click OK to create the project topic. Click Cancel to cancel the topic creation. Note: When you create a topic from within the Communication tab, the topic is always related to the project as a whole. Note: The permission for a topic is derived from the online project via membership. When you create a topic, you get admin permission for this newly created topic. Important: What you cannot do with topics from the memoQ client: change permissions, view change history, editing an existing topic or an existing note (you can only edit the Suggestion / answer field), setting the topic to close, deleting individual notes (only entire topics). Topic options
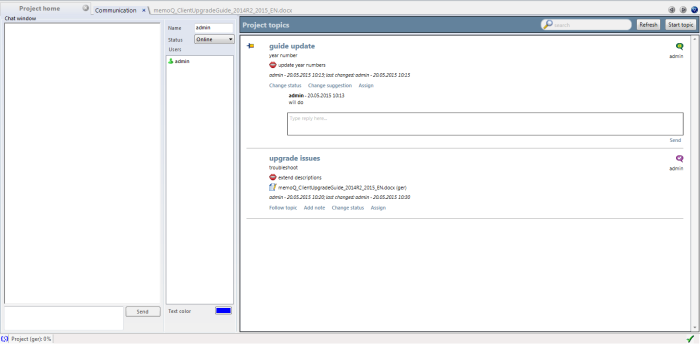
After you created topics, you have several options: •Follow topic: You can follow a topic, you are automatically following a topic when you created the topic, when you add a note or make any other changes. You receive e-mail notifications about topic changes. You cannot unfollow a topic. •View discussion: All topics are listed in one view. Click the View topic link to see all the notes related to the topic. You can also enter a note, then click the Send link. The note will then be added to the topic. •Add note: When a topic has not yet a note, this link is visible. Click the link, and add a note. After you added a note, the Add link is not shown anymore. •Change status: Click this link to change the status of a topic to Open, Resolved or Closed. Resolved and Closed status is only available when you have administrator rights. Then you can set the topic to Resolved. The topic will then get a green check mark next to it. If the topic is not set to resolved, it has the red star icon next to it ( •Change suggestion: This link is available when the topic is assigned to you and open. Click this link to open a text box where you can enter a suggestion. Click OK to insert your suggestion. Click Cancel to cancel the suggestion dialog. The text box is limited to 300 characters. •Assign: When you have administrator rights or when the topic is currently assigned to you, then this link is available. Click Assign, to assign the topic to another user. Select a user from the Assign topic to drop-down list, then click OK to assign this user to the topic.
Sticky/unsticky topics
When you have the permission (administrators and project manager), you can make a topic sticky or unsticky. Next to the topic name appears the Make sticky icon: Note: Next to the topic you also have a bin icon to delete a topic.
See also: |