|
Step 1: Creating an empty project on the memoQ server
1.On the Project ribbon tab, choose Manage projects. The Manage projects dialog appears.
Alternatively, you can click New Project (on the Project ribbon), and from the drop-down menu, choose New Online Project. 2.In the Server URL box, select or type the address of your memoQ server. This will be the server where you create the project. 3.memoQ might prompt you for a user name and a password. Type a user name and a password that is the member of the Administrators group on the memoQ server. 4.memoQ displays a list of projects that are already stored on that server. 5.Below the list of projects, click the Create online project link. The New memoQ project wizard starts. 6.In the first dialog, type a name for the project. Optionally, you can also enter meta-information such as Project, Client, Domain, Subject, and Description. After you enter these details, click Next. 7.In the second dialog, select the languages for the project. You can choose one source language and many target languages. Choose the source language from the Source language drop-down list. 8.To add a target language to the project, click the name of the language in the language list on the left, and then click the Add selected command below the list. The name of the selected language appears in the Target languages list (on the right side of the dialog). You can also double-click the name of each language. Tip: You can also start typing the name of the language in the Filter list box. The wizard will restrict the list to those languages where the name contains the characters you typed in. For example, if you type 'glish', the left side of the dialog will list the English language (and its sublanguages) only.
9.When you finished selecting the languages, click Next. In the next dialog of the wizard (Workflow settings), you can control the confidentiality and quality measures they check out along with this project. Decide whether you want to allow package creation or not. 10.In the next dialog (Checkout and communication options), choose how you want to store the documents, and if you want to allow the team members to communicate with each other. Details of checkout options
▪Create offline copies of TMs and TBs at checkout: If this is selected, memoQ will create a local copy of all server-based translation memories and term bases that are included in the project. This option is turned off by default. If you turn it on, you enable the team members to work completely offline: because they will have a local copy of all resources in the project, they can work at full speed when they have no connection to the memoQ server. ▪Users can join and split segment: This is turned on by default. However, if you have fixed the segmentation in the documents before loading them in the project (or assigning them to translators), and you do not want the team members to change it, you might want to turn off this option. ▪Include skeleton for final export in local copy of documents: This is turned on by default. Team members can export the translation on their computers in the same form as the original source documents. However, if you are concerned about the time it takes to download the documents, you might want to turn off this option. Users will have to download a smaller amount of data: they will be able to access the contents of the project more quickly. On the other hand, they will not be able to export the formatted translation. ▪Include preview files in local copy of documents: This is turned on by default. Team members can see the real-time preview of the documents they are working on. However, if you are concerned about the time it takes to download the documents, you might want to turn off this option. Users will have to download a smaller amount of data: they will be able to access the contents of the project more quickly. On the other hand, they will not be see the real-time preview, which might be crucial in certain projects. Caution: The lack of real-time preview can have a negative impact on the quality of translations. Be very careful when you turn off this option.
|
11.After reviewing – and, eventually, changing – these options, click Finish. memoQ will create an empty project on the server.
|
|
Step 2: Loading documents and adding resources
1.After you create the project, it appears on the project list in the Manage projects dialog. Click the name of the project, then click the Manage command below the list. The memoQ online project dialog appears. This dialog looks essentially the same as the Project home tab in a local project – but every change you make to the project happens on the server. In the case of larger changes, memoQ will wait for you to confirm the changes – and then it applies the changes on the server. 2.Add documents to the project: click Translations. The Translations pane appears, where you can use commands like Import, Import with options... . to import new documents into your project. You can do everything as in a local project, with one exception: you cannot create or manage views. When you add documents, memoQ first imports the documents locally. Then the tick mark button in the upper left corner of the memoQ online project window becomes red. This means that you made changes to your project that you need to confirm. Click this button. memoQ uploads the newly added documents to the server. When memoQ finishes uploading the changes, the tick mark button becomes green again.
1.Add resources to the project. You can add all three types of "heavy" resources such as LiveDocs corpora, translation memories, and term bases. You can choose from resources that already exist on your memoQ server, or you can create new ones. When you create a new LiveDocs corpus, a new translation memory, or a new term base, it will automatically be created on the server. Caution: If your project has multiple target languages, you need to choose a target language before you can add a new translation memory to the project. To choose a target language, use the Target language drop-down list in the top right corner of the memoQ online project window. You need to add translation memories separately for each taret language.
Note: After you create a resource, or you add a resource to your project, you might need to click the tick mark button in the top left corner again to upload the changes to the server. memoQ indicates when this is necessary: the tick mark button becomes red. When the tick mark button is green, all recent changes are uploaded to the server.
4.Use the Settings pane to set up quality assurance (QA) options, segmentation rules, e-mail notifications etc. |
Step 3: Assigning users to documents, and distributing the project
1.First, you need to add users to the project. In the memoQ online project window, click Overview. In the Overview pane, click Users. memoQ displays the list of users who work on the project. 2.To add one or more users, click Add user on the Project users tab of the People pane. The Add users to project dialog appears. Select the users you want to add to the project, then click OK. Tip: To select one user, click the user name. To select multiple users, press and hold down Ctrl, and click the names of the users that you want to add to the project.
Tip: You can also create new users on the server from the Add users to project dialog: click the Create new user link. The User properties dialog appears where you can enter the details of the user. When you create a new user, he will appear on the list in the Add users to project dialog, and he will be selected – along with those that you have already selected.
Details of user options in the Users tab
▪To remove a user from the list, check the check box next to a user name, then click the Remove selected users button. ▪You can set the project-wide role of the user using the check boxes next to each user name. If you click the Project manager check box for a user, memoQ will grant the user project manager privileges. If you check the Terminologist check box, the user will have terminologist privileges. This gives these users extra permissions over the resources in the project – as long as the user is member of the project team, and the resource is included in the project. ▪The Desktop (translator pro) license check box next to each user controls whether or not the user is granted a mobile license from the server. This can be CAL or ELM, depending on the configuration of the server. When the user checks out the project, memoQ checks if the current edition permits the user to work with online projects. If the user is not permitted to connect to an online project, memoQ will obtain a mobile license from the memoQ server. The license will be valid until the deadline of the project expires. Note: When a user accesses the project through memoQWeb, memoQ server will always use a license. This license can be a regular mobile (CAL/ELM) license, or a web license, which is available for memoQWeb servers in memoQ 2015 (7.8.100) and later.
|
3.To assign each document to a user, navigate back to the Translations pane: click the Translations icon. The Translations pane appears. There are three drop-down lists next to each document: this means you can assign users to each document in three roles: Translator, Reviewer 1, and Reviewer 2. In the drop-down lists, you can choose from users you have added to the project.
4.Choose at least one user for all documents. Normally, you would assign each document to a translator at least. If you want to set up a reviewing workflow, assign every document to a reviewer. Tip: If you have one reviewer only, assign the documents to users in the Reviewer 2 role, and leave the Reviewer 1 drop-down lists empty. memoQ always assumes that Reviewer 2 is the authoritative one: if a user in the Reviewer 2 role confirms a segment, its status will become Proofread instead of Confirmed.
Important: If you assign a document to a user, do not forget to set a deadline for the assignment. You can set a deadline in the date/time field next to the drop-down list for the project role. memoQ will enforce the deadline in more than one ways: for example, memoQ will deactivate the licenses that you grant users along with the project when the deadline expires.
5.Once you assigned every document to a translator and optionally to one or two reviewers, navigate back to the Overview pane again: click the Overview icon. 6.In the People pane, click the Assignment checks tab that indicate if there are any documents that are not assigned to a user in a specific role. Normally, you would check if all documents are assigned to a translator at least. If they are, this is how the Assignment checks tab shows: 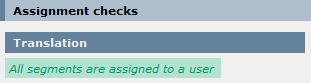
7.If the e-mail notifications are set up properly, now you can distribute the project. In the History pane, click the Project history tab, then click the Distribute project link. The memoQ server will send an e-mail to all participants with details and instructions about checking out the project. Tip: On the History tab, memoQ tracks all events that affect one or more documents. If you click Collapse/expand under Project history, memoQ lists all past document actions, namely, changes in the status of each document, assignment changes, and deadline changes. On the Notification history tab, memoQ lists all notifications that were sent out by the memoQ server.
|
|