|
The Edit auto-translation rules dialog allows you to make changes to the selected set of auto-translation rules. You can also edit remote sets of auto-translation rules if you have sufficient privileges, however, one set may only be edited by one person at a time. How to beginSelect the Auto-translation rules tab in the Settings pane of Project home or the Auto-translation rules pane of the Resource console. In the list, select the desired rule set, and clicking the Edit link below the list. The auto-translation rules can be edited on four tabs, Auto-translation rules, Custom lists, Translation pairs, and Conversions. Auto-translation rules tab
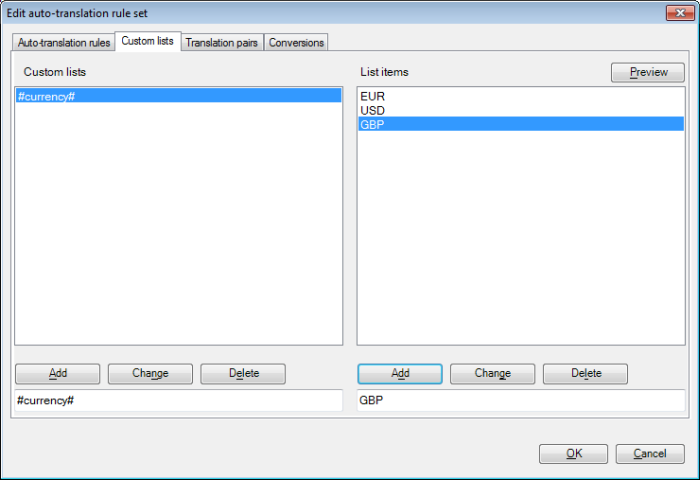
This tab allows you to see and edit the rules used for auto-translation of specific phrases, such as numbers, dates, or currencies. Use regular expressions to define the rules. The tab has two sections, Auto-translation rules on the left and Replace-order rules on the right. Each of these sections contains a list showing the current rules and a text field that is used to enter new rules or modify the existing ones. Auto-translation rules section: •Add: Click this button to add an auto-translation rule after entering it to the text field below the list. •Change: Click this button to modify an auto-translation rule after selecting it in the list and editing it in the text field below. •Delete: Click this button to delete an auto-translation rule after selecting it in the list. Replace-order rules section: This section always shows just one rule at a time, the one that corresponds to the auto-translation rule currently selected in the Auto-translation rules section. Each replace-order rule is an indispensable counterpart of an auto-translation rule because they are "search-for" and "replace-with" expressions. Replacing variable parts: When you auto-translate something, you do not know exactly what it will be. This is why you write up a regular expression: a single regular expression can match thousands of different character sequences. For example, [0-9]+ matches a number, or more precisely, a sequence of digits, no matter how long. If you need to repeat this in the replace-order rule, first put it in parentheses on the left side: ([0-9]+). These are the variable groups. In the replace-order rule, you can refer to these by their number: to insert the first such group, write $1, to insert the second, write $2 and so on. For more details, see the Replacing and reordering section in the Regular expressions topic. •Add: Click this button to add a replace-order rule after entering it to the text field below the list. •Change: Click this button to modify a replace-order rule after selecting it in the list and editing it in the text field below. •Delete: Click this button to delete a replace-order rule after selecting it in the list. •Preview: Click this button to open the Auto-translation preview dialog, which shows how a few sample sentences are segmented and what auto-translation does if the current auto-translation rules are applied. Custom lists tabThis tab allows you to see and edit custom lists. Customs lists are a customizable extension of regular expressions used to define auto-translation rules on the Auto-translation rules tab.
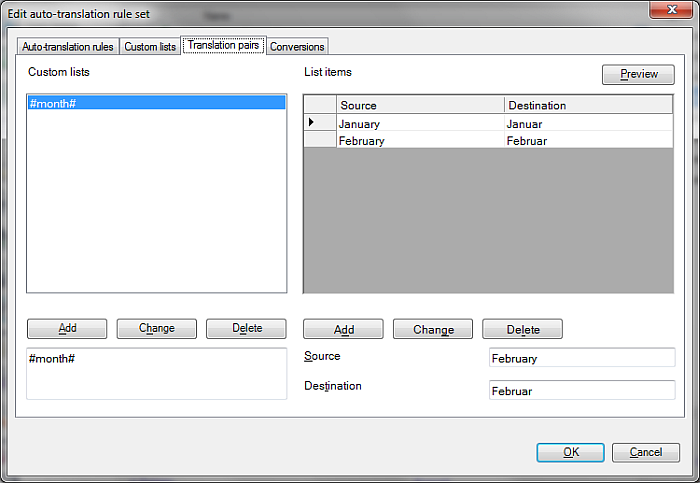
The tab has two sections, Custom lists on the left and List items on the right. Each of these sections contains a list and a text field. Custom lists section: In this section, the list shows the existing custom lists, while the text field below is used to enter a new custom list or modify an existing one. •Add: Click this button to add a custom list after entering its name to the text field below the list. •Change: Click this button to modify a custom list after selecting it in the list and editing it in the text field below. •Delete: Click this button to delete a custom list after selecting it in the list. List items section: In this section, the list shows the existing custom list items corresponding to the custom list currently selected in the Custom lists section, while the text field below is used to enter a new item or modify an existing one. A set of list items includes all possible values of the given custom list. Custom lists give a common name to a set of phrases. The name of the custom list can be used in regular expression specifying auto-translation rules or replace-order rules. •Add: Click this button to add a list item after entering it to the text field below the list. •Change: Click this button to modify a list item after selecting it in the list and editing it in the text field below. •Delete: Click this button to delete a list item after selecting it in the list. •Preview: Click this button to open the Auto-translation preview dialog, which shows how a few sample sentences are segmented and what auto-translation does if the current auto-translation rules are applied. Translation pairs tabThis tab allows you to manage translation pairs. Translation pairs are lists of pairs of source and target expressions that are used for direct automatic translations of specific words. Translation pairs can typically be used for translating names of months, days, names of measurement units etc.
The tab has two sections, a list of translation pairs on the left and list items on the right. The first section contains a list showing the existing custom lists of translation pairs and a text field below, which is used to enter a new list of translation pair or modify an existing one. Custom lists section: In this section, the list shows the existing custom lists, while the text field below is used to enter a new custom list or modify an existing one. •Add: Click this button to add a list of translation pairs after entering its name to the text field below the list. •Change: Click this button to modify a list of translation pairs after selecting it in the list and editing it in the text field below. •Delete: Click this button to delete a list of translation pairs after selecting it in the list. List items section: In this section, the list shows the existing custom translation pair list items corresponding to the custom list currently selected in the Custom lists section, while the two text fields below are used to enter a new item or modify an existing one. A set of list items includes all possible values of the given custom list. •Add: Click this button to add a list item after entering the source and target expressions in the Source and Destination text fields below the list. •Change: Click this button to modify an item after selecting it in the list and editing it in the text fields below. •Delete: Click this button to delete an item after selecting it in the list. •Preview: Click this button to open the Auto-translation preview dialog, which shows how a few sample sentences are segmented and what auto-translation does if the current auto-translation rules are applied. Note: The name of the Custom lists and the name of the Translation pairs cannot be identical. Please choose different names for both lists. Conversions tabThis tab allows you to manage conversions. You can create mathematical formulas here which enable memoQ to convert units of measurement used in the source language to the units used in the target language. The conversion rule is equivalent with the following mathematical formula: Destination = Source × Scale + Offset.
Note: During conversion, the measurements will be rounded to two decimal places. The tab has two sections, a list of existing conversion rules on the top and a set of text fields below the list, used to enter a new conversion rule or modify an existing one. •Source: Use this field to specify the name of the unit in the source language. •Destination: Use this field to specify the name of the unit in the target language. •Scale: Use this field to specify the number by which the source numeric value is to be multiplied to produce the target value (of course, it can be a decimal number smaller than 1). •Offset: Use this field to specify an offset, i.e. a constant number, which is added to the source numeric value to produce the target value (of course, it can be a negative number). •Source unit before value: Use this check box to specify if the sequence of the number and the unit in the target language is the same as in the source language. •Destination unit before value: Use this check box to specify if the sequence of the number and the unit in the target language is the opposite as in the source language. •Example: This field visualizes the formula to help you check it. Conversion rules section: Use it to add, modify, or delete a conversion formula. •Add: Click this button to add a conversion formula after entering the Source and Destination units and Scale and Offset values, and checking the Source order or Destination order check box. •Change: Click this button to modify a formula after selecting it in the list and editing it in the text fields below. •Delete: Click this button to delete a formula after selecting it in the list. •Preview: Click this button to open the Auto-translation preview dialog, which shows how sample text is segmented and what auto-translation does if the current auto-translation rules are applied. NavigationClick OK to close the Edit auto-translation rules dialog, saving all changes. Clicking Cancel will close the dialog without saving changes. |