|
Use this dialog to configure project templates for your projects. Project templates are light resources. You can make changes to this resource in the Project templates pane of the Resource console. How to beginYou can invoke the Project templates dialog from the Resource console, by selecting the template you wish to edit, and clicking the Edit command. Or click the Create new link to create a new project template, then click the Edit link to set up the project template. Note: Click the eye icon in the upper right corner to show/hide local or online properties. Note: When you go to the memoQ application menu > New Project or on the Project ribbon tab, you see the recently used templates. Click on a template name to edit this template. Cannot edit built-in templates: You cannot edit the two built-in templates (One TM and one TB per language pair, One TM per client template). These are default templates. To edit one of them, make a copy of it first: In Resource Console, select the template, and click Clone. Names and languages pane
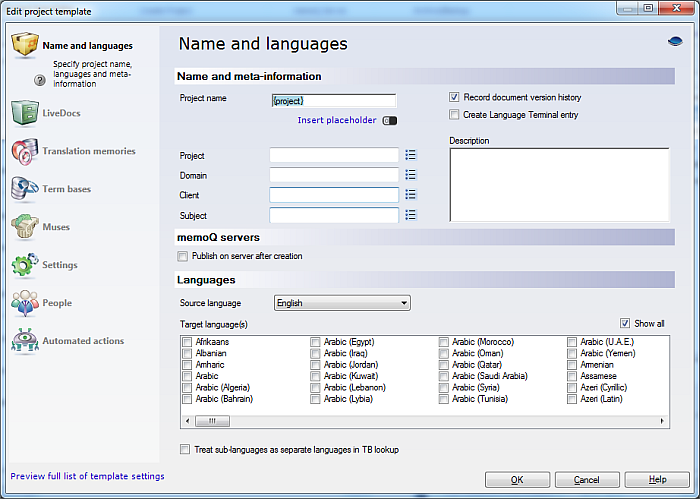
Name and meta-information section: The Project name field contains the name of a project. It can be left empty or you can enter a naming rule with variables (placeholders). Click the Insert placeholders link to select and use placeholders for project names. The Record document version history check box is checked by default. Its behavior is the same as the option in the New memoQ project wizard. Check the Create Language Terminal entry check box to connect your project to Language Terminal. Enter meta-information for Project, Domain, Client, and Subject. You can also set predefined values for these meta-information. Click the Example for Project (the dialog is the same for the Domain, Subject and Client meta-information fields): After you clicked the
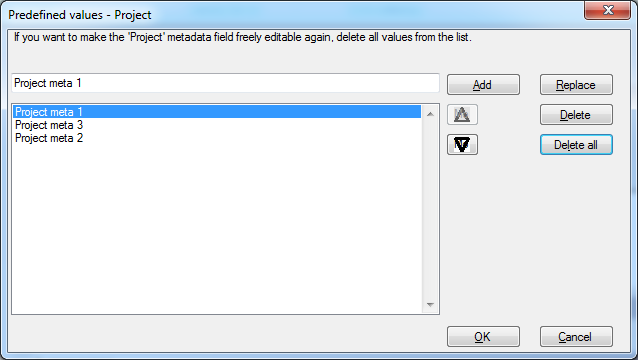
Create a value list. Type the project value in the text field, then click Add. The project value appears in the list below. Enter another value, click Add again. Use the arrow keys to rank the project values. Select a value, then click Replace to replace this value. Or click Delete to delete the selected value. Click Delete all to delete all entered values. Click OK to save all values and to apply them to the project template. Different templates can have different meta-information values. Note: If you use predefined values, you can no longer freely enter text in these meta-information fields on project creation. You have to choose a predefined value from the drop-down lists. Note: If you previously entered free text e.g. for a project name in the Project field, then these values are automatically added to the predefined values list. Using predefined values helps you to just pick a value from the drop-down list when you create a project from a template. You avoid typos and the values cannot be overwritten with free text throughout the life cycle of the project. You can also make sure that these values are used in all projects that use this template. You or another project manager must choose one of the values from the meta-information drop-down lists on project creation. You can edit the predefined values. Click the Compatibility Note: If you add predefined values in the latest memoQ version (7.5.50 and higher), you cannot edit these values in previous memoQ versions. If your project template had no predefined values in previous memoQ versions, you can add predefined values for the meta-information fields. However, you cannot edit this template in a previous memoQ version anymore. If you created a project from a template with predefined meta-information values, you can open this project in a previous memoQ version. The meta-information fields are compatible. Important: If you have checked the Create Language Terminal entry check box, the values from Language Terminal are selectable from the meta-information drop-down lists. However, if you have predefined values, then these predefined values have precedence over Language Terminal values. You cannot use LT values in this case. Enter a description in the Description field. memoQ servers section: If you check the Publish on server after creation check box, memoQ invokes a server publishing dialog once you created the project. This process starts after you imported all files and all automated actions associated with the import have taken place. Languages section: Choose a source language from the Source language drop-down list. In the Target language(s) list, check the check boxes of those languages that you need as your target language(s). Check the Treat sublanguages as separate languages in TB lookup check box to make the TB lookup sublanguage sensitive. Important: If you run memoQ in the translator pro edition, the option to publish to server after creation is not available. You can also only add one target language. Language detection in projects when not specified in templates: If you do not choose a source and target languages, and create a project, memoQ remembers the language settings in the New project wizard. memoQ offers languages if the chosen template does not contain any source and target language. Likewise, memoQ tries to guess the source language of the project from the import documents (if you have specified any). The dialog in the New project wizard displays the setting in this order: 1. The last remembered settings (including the template) are in the dialog when it opens first. 2. If the detected source language is not the same as the last remembered, memoQ displays the detected (and also remove it from the list of target languages if necessary). 3. If you choose a template, and the template contains language settings, these will overwrite whatever was there in the dialog. 4. If you choose another template, and the chosen template contains no language settings, the language settings already in the dialog are kept. Online project settings pane (if you have a memoQ project manager edition, and as remote resource)
This tab is available for online projects. However, you can also open the settings in a local template in clicking on the eye icon in the upper right corner:
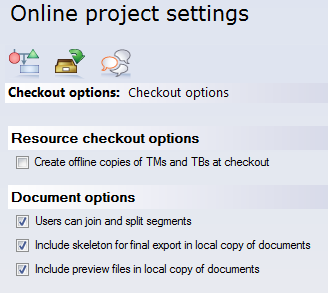
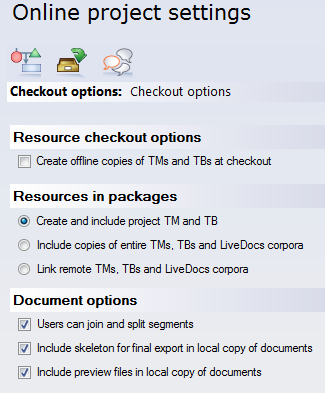
On the 2nd tab, choose the document options:
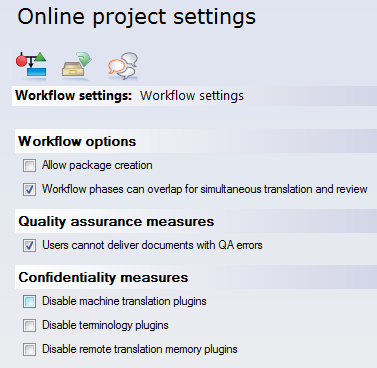
If you check the Workflow phases can overlap for simultaneous translation and review, the Resources in packages section is not visible on the Checkout options tab. And if you allow the package creation, select the options for the resources in the packages:
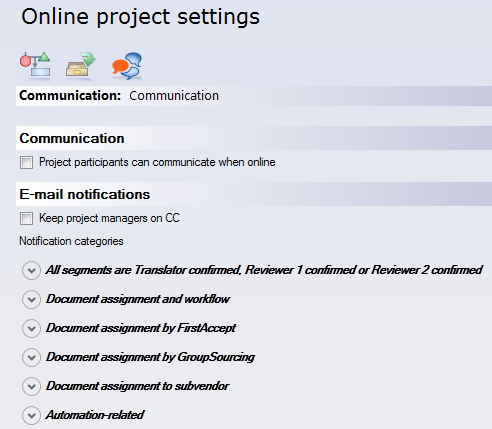
On the 3rd tab, choose the communication options:
See also: Communication settings LiveDocs pane
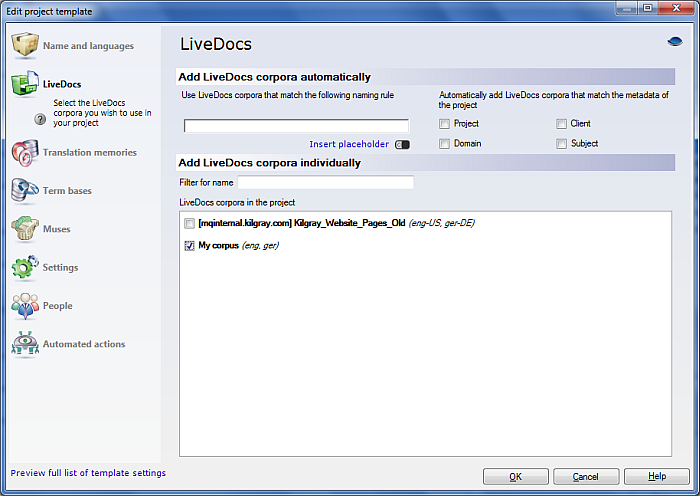
Add LiveDocs corpora automatically section: Similar to the placeholders for the project name, you can insert placeholder for naming your LiveDocs corpus. If you add a rule to the template, and the corpus with that name does not exist, memoQ will create the corpus. You can automatically add LiveDocs to a corpus when they match meta-information. Check the Project, Domain, Client, Subject check boxes (you can check all or individually) to match meta-information and to automatically add these translations to the corpus. Add LiveDocs corpora individually section: Enter a corpus name in the Filter for name field to filter your corpora list. In the LiveDocs in the project list, all available corpora are listed. Check the check box next to the name of a corpus to use it in the template. Translation memories pane
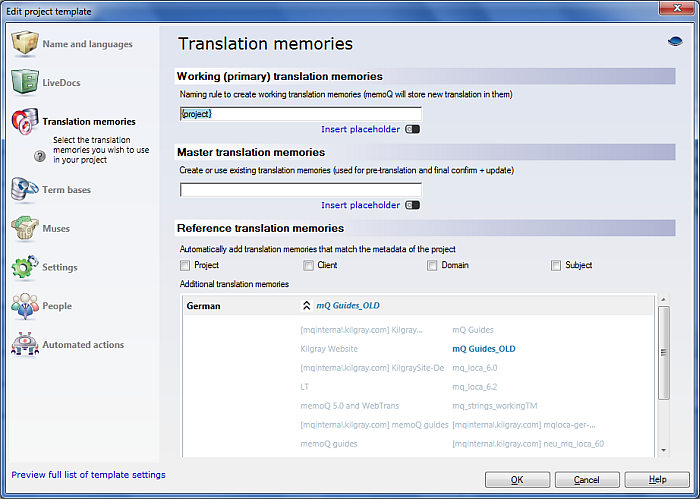
Each project can have a working (primary) and a master TM. The working TM and master TM might be the same TM. In the Working (primary) translation memories section, you can create a working TM for all your target languages of the project at once. Enter a naming rule in clicking the Insert placeholder link. In the Master translation memories section, create or use existing translation memories. Master TMs are used for pre-translation and the confirm and update row operation. In the Reference translation memories section, select the additional translation memories for the template. Check the Project, Client, Domain, Subject check boxes to automatically add TMs as reference based on the meta-information. In the Additional translation memories list, click the arrow icon for each target language to display the available TMs. Click the name of a TM to add it. It turns into blue letters, and appears in red next to the arrow. Term bases pane
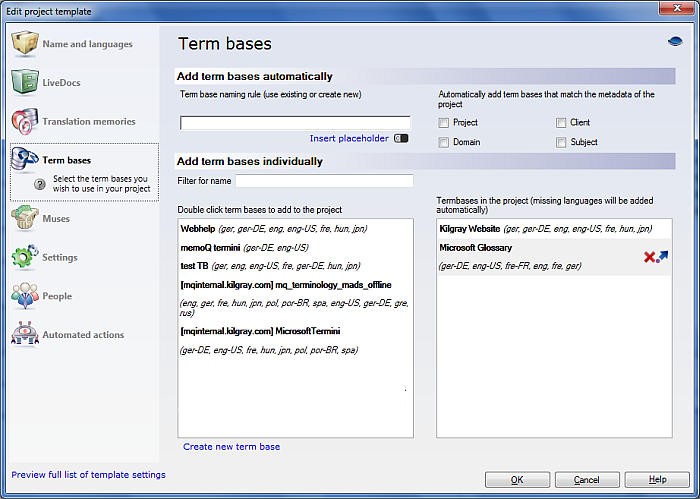
Add term bases automatically section: You can enter a naming rule with variables (placeholders). Click the Insert placeholders link to select and use placeholders for project names. You can automatically add term bases that match meta-information. Check the Project, Domain, Client, Subject check boxes (you can check all or individually) to match meta-information and to automatically add these translations to the corpus. Add term bases individually section: Enter a term base name in the Filter for name field to filter your term bases list. On the left side, all term bases are listed. Double click a term base name, or move the cursor over a term base name. The plus icon gets visible. Click the plus icon to add the term base to the template. This term base is then listed on the right side (Term bases in the project (missing languages will be added automatically)). When you hover over a term base, you see a red cross to remove a term base from the template. Use the arrows to rank a term base higher or lower. Click the Create new term base link to create a new term base. Muses pane
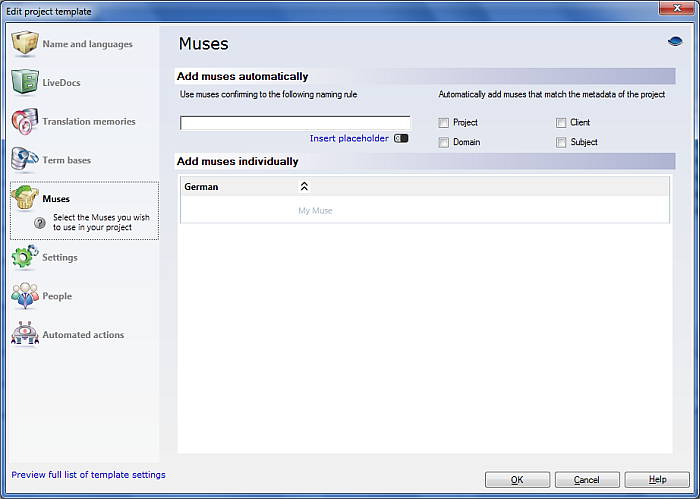
Muses are local resources. This pane is only available for local project templates, not in remote ones. Muse settings are discarded in online project templates, also when you publish a project template to a memoQ server. Add Muses automatically, this is similar as for LiveDocs corpora. Add Muses individually. Click the arrow icon to display all available Muses. Click the name of a Muse. The Muse name turns into blue letters, and appears in red next to the arrow. Settings pane
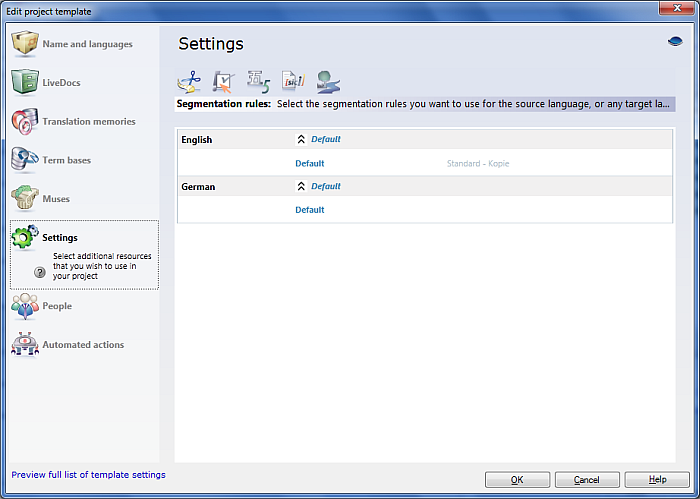
In the Settings pane, you can select your segmentation rules, QA settings, Auto-translation rules and language dependent resources. Click each icon to get to the individual settings. Click the arrow icon to display all available resources. Click the name of a resource. The resource name turns into blue letters, and appears in red next to the arrow. Language dependent settings are: TM settings, LiveDocs settings, LQA settings, font substitution settings, export path rules, non-translatable lists and filter configurations.
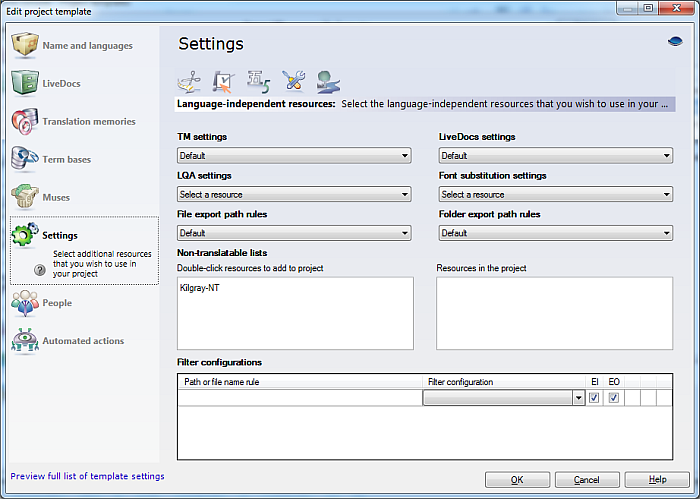
Select the language dependent settings from the corresponding drop-down lists. For Non-translatable lists, hover over a list until you see the plus icon, click the plus icon to add the list to the Resources in the project list. Or double click a Non-translatable list to add it to the Resources in the project list. Remove a non-translatable list in clicking the red cross icon. For the filter configurations, specify the file name or path in the Path or file name rule column. Select a filter in the Filter configuration column from a list of existing filter configurations (default filters are not displayed in the Filter configuration list). The rightmost column, which has no header, contains the commands for moving the selected row up/down. These commands are only available when the row is selected. The order of the rules is important, as memoQ stops after the first filter match. Example for entering filter configurations: Enter *.docx in the Path or file name rule, choose a DOCX filter in the Filter configuration drop-down list. Or enter a path for example c:\users\work, choose a DOCX filter from the Filter configuration drop-down list to import all DOCX files from this location using this filter configuration. Enter a path like c:\users\translate, and choose an Excel filter. Whatever is under path "work" gets the DOCX filter, and whatever document is under c:\users\translate, gets the selected Excel filter on document import. You can also enter *\work to indicate a path. Or *\customername\*.docx to import all DOCX files from this location, and *\customername\*.xlsx to import all XLSX files from the same location. Note: The Settings are only available when you have specified the source and target language(s). Note: Include or exclude the import of embedded images and objects. Check the EI (= Embedded Images) check box next to a filter configuration to import images. Check the EO (= Embedded Objects) check box next to a filter configuration to import embedded objects in MS Office X formats. Click the red X next to a filter configuration to remove this filter configuration from your template. Note: When you use an online project template, then all default light resources have read-only permissions. Note: If you use memoQ in the translator pro edition, this tab will look different. Since there is only one target language possible, the settings page is displayed as picklists. Note: If you use the content connectors and you create a project that is connected to your content source, click the last icon to display the content source connection options. You can enable the reimport of changed files and the removal of deleted files from the project. Template wins over content connector: When you use this template to create a content-connected project, memoQ will use the filter configurations in the template, and not the ones in the content source. When you create a content-connected project from a template, memoQ will ignore the filter configurations that were set up in the content connector. People pane (in local project templates)
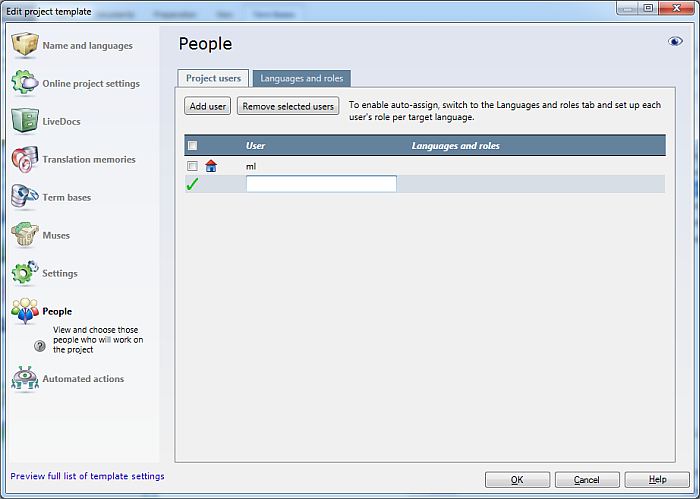
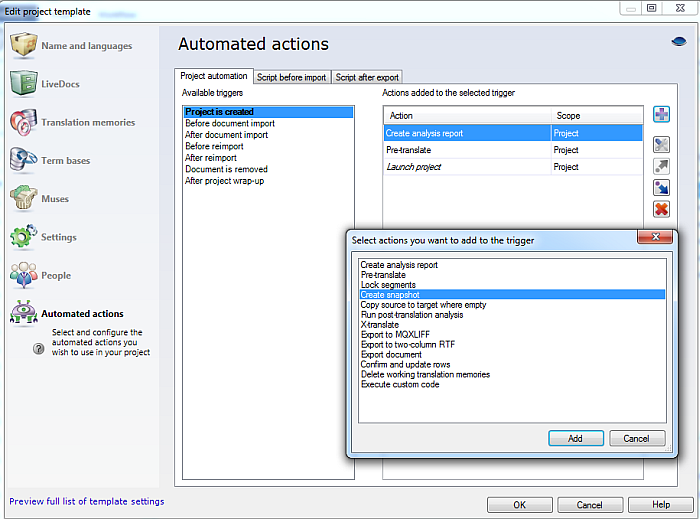
If you have selected a memoQ server in the Server URL text box of the Resource console, you get a list of all available users on the memoQ server. The user list will only contain a filtered list of users by language pair. But you can show other users from the memoQ server and Language Terminal. See also: memoQ online project - People If you have selected My Computer in the Server URL text box of the Resource console, you can enter any user name in the Translator, Reviewer 1 and Reviewer 2 fields for each target language. The target language is automatically listed according to your selection in the Name and languages pane. Click the Add user button to add a user or several in their user roles. Check the check box next to a user name, then click the Remove selected users to remove a user from the template. Reviewer 1 and 2 are added to the project in the Terminologist role, if you do not fill in these roles. You can only assign one user per target language. In the Add users in role section for online project templates, click a user role (Translator, Reviewer 1, Reviewer 2 or None) radio button to add the selected users to the Languages and Roles tab. You then do not need to go to the Languages and Roles tab, and add users to their roles. If you choose None, then the user is added to your project, but in no role. To remove a user from the list, select a user in checking the check box next to her name, then click the Remove selected user button. When you remove a user from the project, all documents assigned to that user will no longer be assigned to anyone. Automated actions paneYour workflow can include steps that memoQ runs automatically when your project is created, or when documents are imported, reimported, exported, removed, or when the entire project is cleaned up.
Select an action from the Available triggers list. Then click the Plus button ( Click the Settings button ( Click the Preview full list of template settings link to display a summary of all your template settings. Click the eye icon in the upper right corner to display all settings. The closed eye icon turns into an open eye icon. Then all possible actions/options are displayed. Note: Since memoQ 2015, you can also perform automated tasks based on scripts. Read more here. Note: While an automated task is running on documents, you – and possibly other users – may not be able to run pre-translation, statistics, X-translation, or confirm and update rows.
See also: |