|
Using this command, you can clean your term base from duplicate entries. You may have generated duplicates in creating a project with the language combination English and German, but you import terminology into your term base which has English-US and German-Germany. How to beginIn the Term bases pane of Project home, select a term base, then click the Edit button on the Term Bases ribbon tab. The term base opens in editing mode. On the Term Base Editor ribbon tab, and click Show Duplicates:
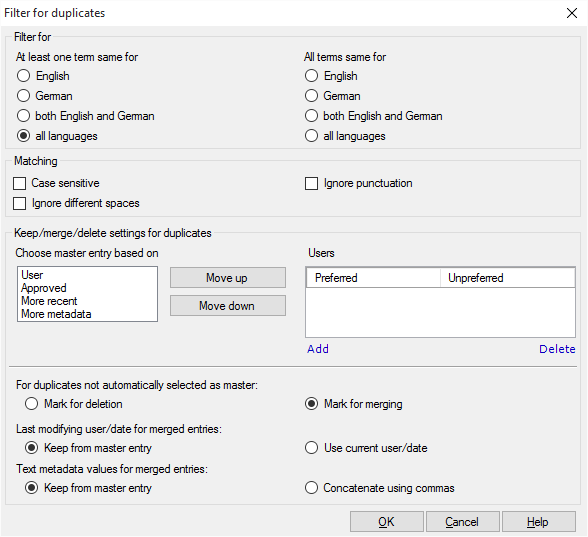
The Filter for duplicates dialog appears:
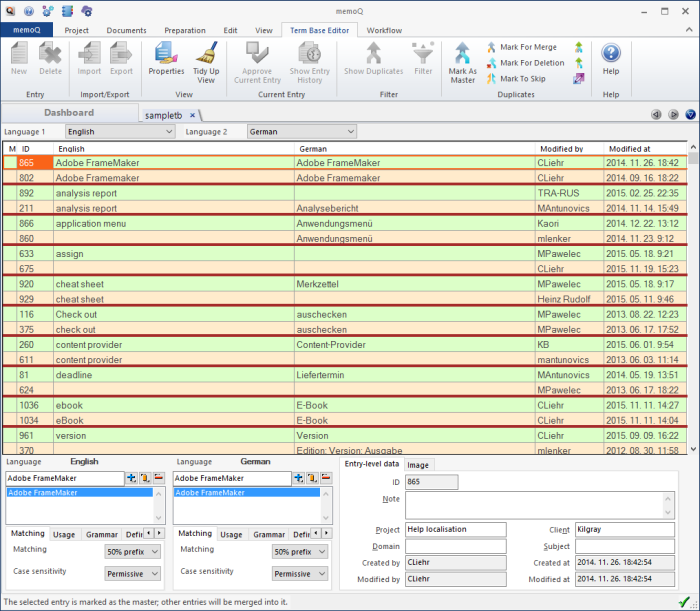
OptionsFilter for section: Depending on your language selection in the term base editor, the Filter for section displays these languages. You must select 2 languages to filter your term base for duplicates. If the source is present at least twice, it is indicated in the term base after filtering. Filter for at least one term same for: •Language 1 which is in our example screenshot English •Language 2 which is in our example screenshot German •both languages or •all languages to filter for all languages in your term base. Filter for all terms same for: •Language 1 which is in our example screenshot English •Language 2 which is in our example screenshot German •both languages or •all languages to filter for all languages in your term base. Matching section: Define further criteria for the duplicate search (here you define of what is your master entry, a master entry is the one into which the other entries are merged): •Check the Case sensitive check box to search for duplicates observing the writing. •Check the Ignore whitespace difference check box to ignore whitespaces in your search (e.g. termbase and term base). •Check the Ignore punctuation check box to ignore punctuation in your search (e.g. background task and back-ground task). Keep/merge/delete settings for duplicates section: In this section, you can specify what to do after the duplicates were found in your term base. You can delete, merge or keep them. From the Choose master entry based on list, choose the master entry based on: User, Approved, More recent, More metadata. For example, your master entry can be defined by a certain user who entered terms into your term base or the most recent entry. Use the Move up and Move down buttons to move the priority of these criteria. Click for example Approved, and then the Move up button to move up this criterion in the duplicate search. In the Users list, you can set up users as your preferred ones. Click the Add link to add a preferred user, e.g. your terminologist or the person to approve new terms. You can also do the opposite: add a user as unpreferred. Then the search incorporates the preferred users first. Click the Delete link to delete a preferred or unpreferred user from this list. After you specified the search criteria for the duplicate search, indicate what to do with the duplicates: •For duplicates not automatically selected as master: Choose either the Mark for deletion radio button or the Mark for merging radio button. If a term is not indicated as your master term, you can merge it with the master term or delete it from your term base. •Last modifying user/date for merged entries: Choose the Keep from master entry radio button or the Use current user/date radio button. When you merge an entry, you can keep the master entry or the last modified entry (by a user and date). •Text metadata values from merged entries: Choose the Keep from master entry radio button or the Concatenate using commas radio button. If you choose to keep metadata from master entry, then the metadata from the term you want to merge the master entry with will be lost. If you choose to concatenate, then the metadata from the master entry and the duplicate are merged, and separated by a comma. NavigationClick OK to filter your term base for duplicates. Clicking Cancel will close the dialog without making changes. This is how memoQ displays the list of duplicates. You can simply run the Merge Selection command to merge each group into a single entry (100 groups into 100 entries, for example), or you can mark each group for a different action (keep a master entry, delete a superfluous entry, merge the entries, or do nothing), and then run the Merge Selection command to perform the selected action for each entry (the action can then be different for each entry).
To merge one entry (one group of repetitions), place the cursor in the group, and press Ctrl+Enter. To merge every group in the list, press Ctrl+Alt+Enter. The following commands for merging are available on the right lower hand side of the TB editor: •Merge Current [Ctrl+Enter]: Merges the entries in the group where the cursor is. •Merge Selection [Ctrl+Alt+Enter]: Merges entries within every group in the list, except for those duplicate groups where the user chose a different action (mark master entry, or delete an entry). With those duplicate groups, memoQ will run the action that was marked, instead of merging. Every duplicate group will turn into an entry. (memoQ will not merge groups with each other, if there were 100 duplicate groups, they will be replaced with 100 entries.) •Mark As Master [Ctrl+Space]: If you want to keep one entry in a duplicate group, but drop the other one(s), place the cursor on the entry you want to keep, and click this command. The Mark commands are useful if you need a different action for each duplicate group. The other entries will be dropped when the user presses Ctrl+Alt+Enter (or uses the Merge Selection command) after every entry is marked. •Mark For Merge [Ctrl+Alt+Space]: Marks the current duplicate group for merging, but does not perform the merge. The merge will happen when the user presses Ctrl+Alt+Enter (or uses the Merge Selection command) after every entry is marked. •Mark For Deletion [Ctrl+D]: If you want to delete an entry from a duplicate group, but keep the other one(s), place the cursor on the entry you want to delete, and click this command. The entry will be deleted when the user presses Ctrl+Alt+Enter (or uses the Merge Selection command) after every entry is marked. •Mark To Skip [Ctrl+Shift+Space]: If you use this command on a duplicate entry, memoQ will not touch these entries when running the Merge command at the end. Use the links or shortcuts at the bottom right. When you perform an individual merge, an entry merge dialog is displayed so that you can preview and edit the merged entry. Click the Remember these settings for the next merge check box at the bottom of this dialog, and memoQ will remember your merge settings. Click OK to confirm the merge and close this dialog, the entries merged are hidden into the master entry. The new merged entry and any skipped entries remain. You need to mark one entry as the master entry when you do an individual merge. For example, select an entry, then press Ctrl+Space to mark this entry as master. Click the Back To Normal Edit Mode button to leave the duplicate filtering and to return to the normal term base editing. Note: If the entry has a language which is not yet defined in the merged entry, then the language is added to the merged entry and the language-level metadata is copied to the merged entry. Background colors for the entry types/actions: •master: light pastel green •marked for merge: light peach •marked for deletion: light gray •marked to skip: normal white
See also: Check for duplicates in your TB while you add new terms to your term base |