|
Extract images to be localized, and automatically include the localized images in your translated documents. Save time for editing translated documents. Images behave like a special type of document. memoQ supports the following formats: BMP, GIF, JPEG, EXIF, PNG and TIFF. Important: You can import images that the Microsoft Bitmap image library supports. The EMF format is for example not supported. You have 3 places in memoQ for settings whether you want to import images or not: Option 1: Open a memoQ project. Choose Import > Import folder structure button on the Documents ribbon tab to invoke the Add folder structure dialog: In this dialog, below the Include files text box, enable the Import embedded images check box. Option 2: When you import your documents using the Import with options button, you have an option to import images in the New documents section:
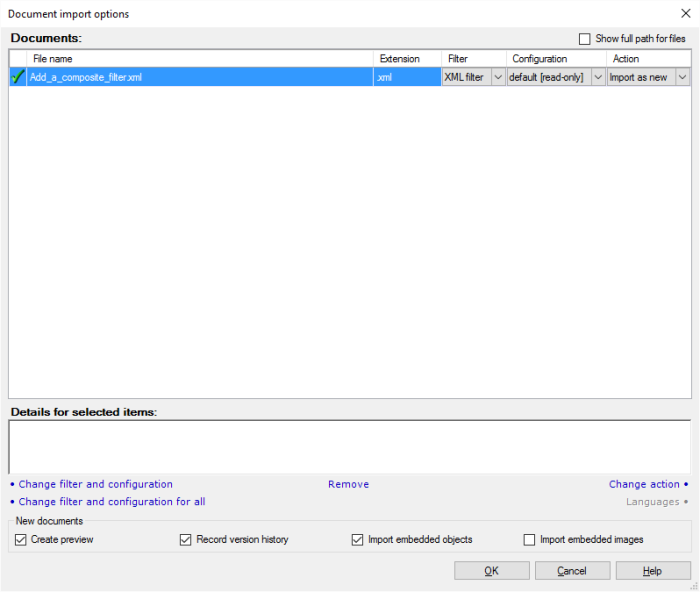
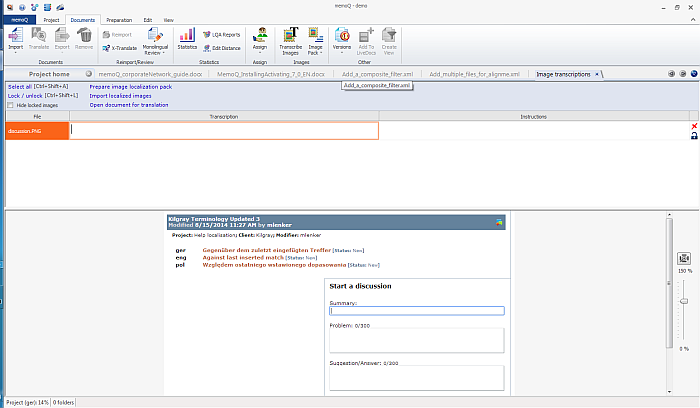
If you have images in your documents that needs localization, check the Import embedded images check box. Option 3: You can make the import of images, which need localization, a default setting. Go to the Application menu > Options > Options > Miscellaneous. On the Translation tab, check the Import embedded images and Import image files check boxes. Click Apply to apply the changes. Both check boxes are unchecked by default. How to begin (for option 2)On the Documents ribbon tab, go to Import, then choose the Import with options option. Choose an image. In the Document import options dialog, check the Import embedded images check box. Click OK to import the image. The image appears in the Documents list. Double click the image to preview it. On the Documents ribbon tab, click the Transcribe Images button to open the image for adding a transcription, or right-click the image, then choose Images > Transcribe Images. This opens the Image transcriptions tab:
The table shows the image name in the File column. Enter the translation in the Transcription column. Leave a comment or instructions for e.g. the DTP person in the Instruction column. Click the lock icon to lock a segment, click again the locked icon to unlock a segment. You get a preview in the section below. The image is shown in its original size. Use the scroll bar on the right side to zoom in or zoom out of the image preview. Note: When you work on the Image transcriptions tab, then only the formatting options (bold, italic, underline, superscript, subscript) are active on the Edit ribbon tab. Note: If the image file has no name because it is embedded in a document, then the file name is shown: <document name> image <serial number>. In the translation grid, you see the transcript only, while the preview shows you the image, transcript and instructions. Tip: The best way to translate images is to filter for all image files, create a view out of them by simply gluing them together, and opening the view for translation. This is faster than opening the documents one by one. Note: If you work with labels for example on technical drawings or long texts from a scanned page, memoQ will segment the text once you typed it in. You can create your own segmentation rules for that. Preparing an image localization packThis link is only visible after you imported images into your project. Create a image localization pack in selecting one or more images, then choose Images > Prepare Image Localization Pack from the context menu, or go to the Documents ribbon tab, click Image Pack, and choose the Prepare image localization pack option. In online projects, click the Prepare Image Localization Pack link in the Translations pane. You can also select all images and choose the same command, memoQ will then ignore all documents which are not images. Choose a location to save the package. The image localization pack is a ZIP file which contains: •all the image files, •an Excel document containing the meta-data (transcription and instructions). The Excel document contains one line for each image, with the image file name, transcription, translated transcription and instructions. •an empty folder with the target language code where you need to put the localized images, keeping their name, •a standard instructions document stating that the localized images need to be put into the target language folder with the original name kept. Handing back localized imagesZip the target language folder, which was created in the preparation step, and sent it to your project manager. Importing an image localization handbackWhen you as the project manager receive the zipped image localization pack, go to the Documents ribbon tab, choose Image Pack > Import image localization pack, or right-click the images, then choose Images > Import Localized Images in the Translations pane. Browse to the ZIP file. If memoQ cannot match the contents of the ZIP file to localizable images in this project, you get an error message displayed. Click the Browse button to browse to the correct location. Click OK to retry the import. Click Cancel to cancel the image import. When the import was successful, the image files are marked as fully localized. When you open the image files now, the localized image is displayed in the preview. You can check that the image was localized correctly. Or assign a reviewer to check all the images for proper localization. Locking an imageYou can lock an image. Click the Transcribe Images button on the Documents ribbon tab (or right-click an image, and choose Images >Transcribe Images) to open an image for translation. In the translation grid, choose Lock in the context menu for images, or click the Lock link. Click the Unlock link to unlock an image. If an image is locked, its background color turns to gray (similar to locked segments in the translation grid). If you open a locked image, then the Instructions column shows a Locked, do not localize message. You see a True value in the Locked column for this image. If an image is not locked, the value False is shown in the Locked column. This instruction is also added to the Excel document for the image localization pack preparation. Note. When you perform an export operation for a locked image, the source image is always exported. Note: Check the Hide locked images check box to hide all locked images in the Image transcriptions grid. Exporting imagesWhen you click an export option in the context menu for images, then the localized image is copied to the selected path (depending on the export type). When the image is embedded and is selected without its parent document (the document the image is extracted from), then only the image is exported and included in the specified path. If you select the parent document together with the embedded image, then the localized image is embedded in the document. You can also click the Export image localization pack link to export the translated images as pack which the project manager can then import in his project to update the images with your translations. Reimporting an imageWhen you reimport an image as part of a whole project or to get changes from a content connected project, then memoQ imports the image as a new import. If you then run X-translate, memoQ checks the image's hash value against the has value of the previous version of the image, and if they match, memoQ restores all information from the previous image version, i.e. image, transcription, translated transcription, instructions. Context menu for images in the translation gridWhen you open an image for translation in right-clicking and then choosing Translate Transcription (equivalent to the Open For Translation command for documents) in the Translations pane: View/edit document comments Lock/unlock Prepare image localization pack Import image Remove Reimport image Export (dialog) Export (stored path) Create view Statistics (this shows the statistics for transcribed text) Note: There is no History/report context menu item since no history-related commands are tracked for images. |