|
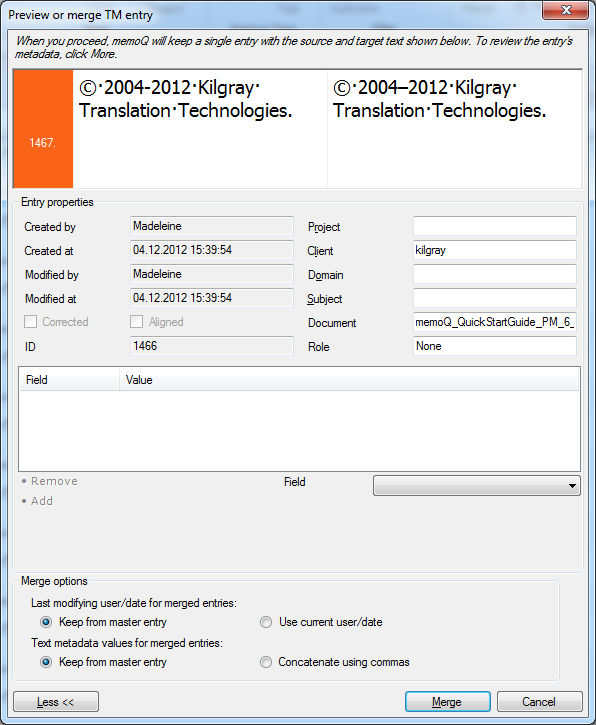
You can merge TM entries. You indicate a master entry in your TM, and then you can merge the duplicates into this master entry. If a TM entry is marked as merge master, and another (or more) to be merged into it, then: •Source and target segments come from the master entry. Source and target segments of the “slave” entry are lost. If you have edited the master entry in Merge mode, then this is kept. •Metadata is merged. oFor last modifying user/date, the settings set in the Filter for duplicates dialog are applied. oIf you use the Concatenate using commas option, then the text type metadata fields receive the original value from the master entry, followed by a comma+space sequence and then the text value from the first merged entry (only if different). If there are more entries, comma+space+value, etc. again. oIf you do not use the Concatenate using commas option, then the value for any text type metadata field comes solely from the master entry. Note: The Client, Project, Domain and Subject fields are treated as single choice pick lists. This means that the Concatenate using commas check box does not affect them. oFor single choice pick list fields, the value from the master entry is kept. oFor multiple choice pick list fields, all the values from all entries are kept. Context information is retained from the master entry. How to beginIn Project home, navigate to the Translation memories pane (click the Translation memories icon on the left). Select a translation memory that you are using in your project, and then click the Edit button on the Translation Memories ribbon tab. Or go to the Resource console > Translation Memories. Select a translation memory, and click the Edit link. Click OK in the following filter dialog to leave the defaults, or set TM filter settings. The translation memory editor appears. Click the Remove Duplicates button in the Duplicates section to filter your TM for duplicates. You can also manually merge entries. The following commands for merging are available on the upper right hand side of the TM editor: Merge Current [Ctrl+Enter] Merge Selection [Ctrl+Shift+Enter] You need to mark one entry as the master entry when you do an individual merge. For example, select an entry, then press Ctrl+Space to mark this entry as master. Candidate entries for merging will be grouped together, and such groups will be separated by horizontal orange lines (like in structural alignment). One such group contains one group of merge able items (for example, where the source is the same). •For each group, there can be zero or one entry marked as master. If there is no master, no merge. Deletions can still happen. •Entries can be marked for merging only if a master exists. When you attempt to change the current master entry into something else, a warning is displayed. •A group may contain no master, only entries to be skipped/deleted. Background colors for the entry types/actions: omaster: light pastel green omarked for merge: light peach omarked for deletion: light gray omarked to skip: normal white In the status bar, you find the following information to help you navigating the duplicate merging: •The selected entry is marked as the master, other entries will be merged into it. •The selected entry is marked to be merged into the master entry. •The selected entry is marked to be deleted. •The selected entry is marked to remain unchanged. Example for merging/committing an entryIn the Duplicate removal mode, click the Merge Current button on the Translation Memory Editor ribbon tab (the Duplicates section is only available when you are in the Duplicate removal mode). The Merge Current button is highlighted in orange. The Preview or merge TM entry dialog appears:
The dialog contains the Entry properties section and the Merge options section. The Entry properties section is the same as when you right-click a TM entry and choose View/Edit in the translation results pane, or of what you see on the right side in the TM editor. Merge options section: In the Last modifying user/date for merged entries section, choose what to do with duplicates that were last modified in the TM: •Keep from master entry: Choose this radio button to not store the last modified entry in the master TM entry. •Use current user/date: Choose this radio button to merge entries using the current user or date. In the Text metadata values for merged entries section, choose to •Keep from master entry: Choose this radio button to not store metadata from merged entries in the master TM entry. •Concatenate using commas: Choose this radio button to merge entries and to separate metadata by comma. If you use the Concatenate using commas option, then the text type metadata fields receive the original value from the master entry, followed by a comma+space sequence and then the text value from the first merged entry (only if different). If there are more entries, comma+space+value, etc. again. Note: If you change these settings, it will result in a live update of all the metadata. Your merge settings are always remembered. The selected metadata settings are saved for the next merges. Click the Merge button in the Preview and merge TM entry dialog to merge an entry. Click the Save changes button on the TM Editor ribbon tab to commit all changes to your TM. Click the Back To Editor button to leave the Duplicate removal mode. |