|
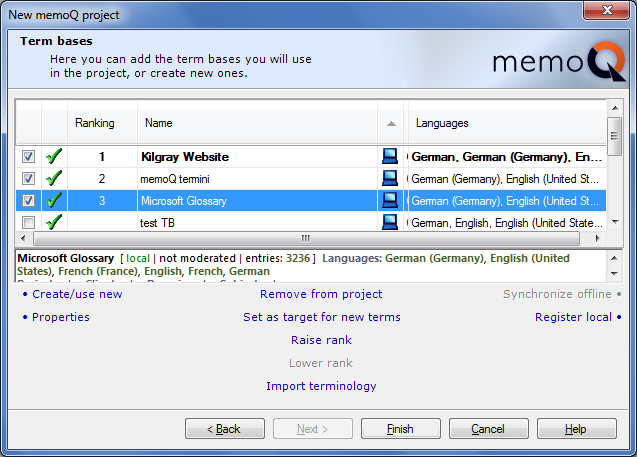
The last dialog in the New memoQ project wizard allows you to create or register term bases and/or assign term bases to the current project. It also provides access to memoQ's management and maintenance tools for term bases. You can advance to this dialog from the Translation memories dialog by clicking Next. To manage the term bases in this dialog, you can use the commands listed under the list view, or in the context menu invoked by right clicking the list view or its selected elements. The list view consists of the following elements: •check boxes where you can select the term bases you want to use in the project. This is useful as some term bases in the language pair of the project are listed automatically, but they are not necessarily required. You can select or deselect the check boxes either manually or by clicking the commands Use in project/Remove from project under the list. You can also click the Create/use new link to create a new term base. And if you have a CSV, TMX or Excel file, use the Import terminology link to import terms into your newly created term base. When you click Set as target for new terms, memoQ will mark this term base as the target for adding new terms with Ctrl+Q/Ctrl+E. This term base will be displayed in bold in the term base list but won’t necessarily get the top position in the translation results pane. •a symbol (either a green tick or a red x) showing the availability of the translation memory in question. •a column where the word Ranking appears for the term base you rank. The term base ranking first is the one where memoQ stores your newly entered terms, using all other term bases only for retrieving existing information. You can change the ranking for a term base by clicking Raise rank or Lower rank under the list. •a symbol showing whether the term base in question is a local resource, i.e. it is located on the user's computer instead of a remote server. If it is, the symbol is a blue PC, while if you have chosen the offline copy of a remote term base, the symbol is a purple PC. If there is a remote term base in the language pairs of your project that you have pinned to your computer, it will automatically be listed and marked with a cloud symbol. •the Path, or the folder where the term base in question is located on your computer. Only the beginning of the path is visible in the list - you can see the full path if you place the cursor over its visible part. •the Languages of the term base in question (e.g., English, Latin). Below the list, there are commands to manage or maintain term bases. Most of them will prompt you with new dialogs and allow you to add new term bases in several different ways. The following commands are not there to help you add new term bases but to let you manage those already added to the project: •Synchronize offline: Click this command to create a synchronized copy of a remote term base on your local computer. During synchronization the new entries added to the remote term base are downloaded, and the new entries you entered into the local synchronized term base are uploaded to the server. Thus the remote term base will be identical to your local synchronized term base. •Properties: Click this command to view and modify meta-information about the selected term base, to make it read-only or moderated, etc. After adding all term bases you wish to use and defining their required settings, click Finish to create the project as it is and go directly to the Translations pane of Project home, with the newly created project open. |