|
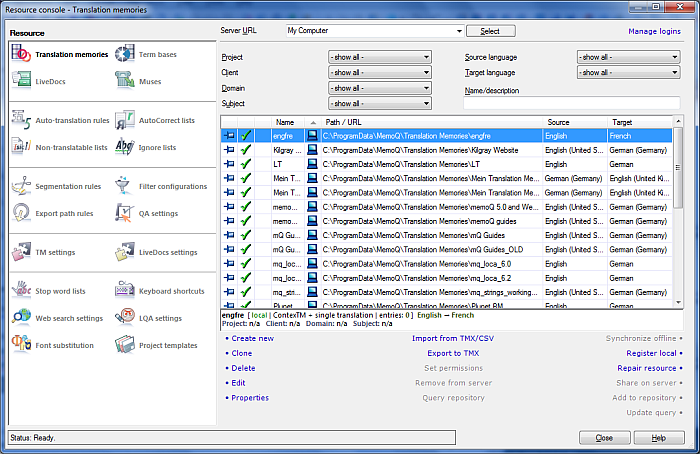
The Resource console is the central interface to manage resources such as translation memories, term bases, auto-translation rules, document filter configurations and so on. You can use the Resource console to create, share, edit, import, and export resources. How to beginIn the Application menu or from the Quick Access Toolbar, choose Resource console. LayoutThe Resource console manages 18 types of resources. In the first section of the Resource console window, memoQ lists the heavy resources (translation memories, term bases, LiveDocs and Muses) followed by light resource section which are grouped by resource type. •At the top of the window, you can select a memoQ server. The Resource console shows the resources from the selected server and the local computer. •At the left of the window, the resource categories are listed. Click a resource type icon to list the resources of that type in the main window section. •Above the resource list, there are various drop-down boxes and text boxes for filtering the resource list. This is useful when there is a large number of resources. •Directly below the resource list, memoQ shows a compact display of the properties of the currently selected resource. •At the bottom of the Resource console window, command links are available to perform various actions on the resource list or the currently selected resource. Resource typesResource types are listed at the left of the Resource console window. You can choose one of the following resource types:
Server selectionAt the top of the Resource console window, you can select a server. Type the IP address or the name of the server in the Server URL box. If you connected to the server previously, you can also choose the server URL from a drop-down list. After typing or choosing the server address, click Select. If you had no previous connection to the selected server, memoQ prompts you for a user name and a password. Type a user name and a password that are valid on the selected server. If you had a previous connection to the selected server, but you want to connect to the server using a different user name, click the Manage logins button on the Project ribbon tab. The Manage logins dialog appears, where you can delete your previous connection to the server. Then, if you click Select, memoQ will prompt you for a user name and a password, just as if you were connecting to the selected server for the first time. When you select a server in the Server URL box, memoQ will list the resources stored on the local computer plus the resources on the selected server. If you want to view the local resources only, expand the drop-down list in the Server URL box (click the down arrow next to the check box), and choose My Computer from the list. If you had no connections to any servers previously, the My Computer setting is the default. Understanding the resource listThe resource list appears in the form of a table. All resource types have the following columns: •The first column shows a pin if the resource is pinned to the list. When you are viewing resources from a server, you can select any resource and pin to the list. Pinned resources always appear on the list, even when they come from a specific server, and a different server is selected. If you click the pin, the resource will become unpinned. If you click this cell when it is empty, the resource will be pinned to the list. •The second column shows the status of the resource. For most of the time, this cell shows a green tick mark for the resource, indicating that the resource is ready for use. However, it might happen that the files for the resource are missing; the resource is undergoing a bulk import/export or maintenance operation; or the resource is damaged and cannot be used in its present state. •The third column shows the publishing status of an online resource. The •Name: The name of the resource. •The fifth column shows the location of the resource. •Path/URL: shows the location and the name of the folder of a local resource, or the address of the server for an online resource. There might be other columns in the table, depending on the resource type: •Source and Target: The source and target language of a translation memory. •Source or Language: Language or languages of a resource. Appears with term bases, segmentation rules, ignore lists, and AutoCorrect lists. •Filter: Shows the document type for filter configurations. •Rule type: Shows the type of rule (file or folder) for export path rules. Filtering the resource listAbove the resource list, various drop-down lists and text boxes help you filter the list when there are too many items. You can always filter for the name or the description of the resource. As you start typing in the Name/Description box, the list is immediately restricted to resources where either the Name or the Description property contains the characters you typed. In case of language-specific resources such as segmentation rules, ignore lists or AutoCorrect lists, you can also select a language to filter for. Lists of heavy resources – translation memories, term bases and LiveDocs corpora – have many more filtering options: You can filter those lists for meta-information details such as Project, Client, Domain and Subject. These appear in drop-down lists that shows all values that exist in the listed translation memories or term bases. You can also filter for the source language and the target language of the resource. Note: The list of term bases also has the Source language and the Target language drop-down list. Because a term base is multilingual, and it has no designated source language, these drop-down lists can be used to select two languages to filter the term base list. Pinning and unpinning resourcesBy default, all local resources are pinned to the resource list. Click the pin in the row of a local resource to unpin it from the list. memoQ will ask for confirmation. If you unpin a local resource, it will be removed from the list. Local resources that were unpinned from the list can be restored using the Register local command. When a server is selected in the Server URL box, memoQ also lists the online resources stored on that server. By default, these resources are not pinned to the list. If you click the empty pinning cell in the row of an online resource, memoQ will pin the resource to the list. Pinned online resources always appear on the resource list, regardless of the server selected in the Server URL box. Click the pin to unpin the resource from the list. memoQ will ask for confirmation. Online resources not pinned to the list are visible only if the Server URL box shows the name or address of the server hosting them. Resource operationsTo perform an operation on a resource, select the resource, and click a link below the list. Alternatively, right-click the resource, and choose a command from the popup menu. The following commands are available for all resources: •Create new: Displays the appropriate dialog to create a resource of the selected type. •Delete: Deletes the selected resource. memoQ asks for confirmation before executing the command. memoQ cannot delete remote resources that are currently published; you need to unpublish them first. •Edit: Displays the appropriate dialog or tab for editing the contents of the selected resource. Cannot edit default resources: You cannot edit the light resources (segmentation rules, project templates etc.) that come with memoQ. To edit a default resource, make a copy of it first: in Resource Console, select the resource, and then click Clone. •Properties: Displays the appropriate dialog to view or change the properties of the selected resource. •Set permissions: Displays the Set permissions dialog to control who can do what with the selected resource. Available for published online resources only. •Share on server: Copies the selected local resource to the selected server, and publishes it using default permissions. •Remove from server: Creates a local copy of the selected online resource, and removes it from the server. The following commands are available for translation memories: •Import from TMX/CSV: Imports the contents of a TMX or CSV file into the selected translation memory. •Export to TMX: Exports the contents of the selected translation memory into a TMX file. •Synchronize offline: Creates a local copy of the selected online translation memory, or – if the local copy already exists – synchronizes the contents of the local and the remote copies: uploads any local changes, and downloads any remote changes. •Register local: Adds a resource that you have in the file system to the Resource console. •Repair resource: Starts the Repair wizard for the selected translation memory. Use when you think the translation memory is damaged. The following commands are available for term bases: •Import terminology: Imports the contents of a CSV, Excel or TMX file into the selected term base. •Export terminology: Exports the contents of the selected term base into a CSV or tab-separated text file. •Synchronize offline: Creates a local copy of the selected online term base, or – if the local copy already exists – synchronizes the contents of the local and the remote copies: uploads any local changes, and downloads any remote changes. •Register local: Adds a resource that you have in the file system to the Resource console. •Repair resource: Starts the Repair wizard for the selected term base. Use when you think the term base is damaged. •Export: Exports the contents of the selected LiveDocs corpus into a zipped container of XLIFF files. •Register local: Adds a resource that you have in the file system to the Resource console. •Repair resource: Starts the Repair wizard for the LiveDocs corpus base. Use when you think the LiveDocs corpus is damaged. In a LiveDocs corpus you can also manage the underlying documents.
The following commands are available for Muses: •Create new: Displays the appropriate dialog to create a Muse. •Delete: Deletes the selected Muse. memoQ asks for confirmation before executing the command. memoQ cannot delete remote resources that are currently published; you need to unpublish them first. •Retrain: Displays the appropriate dialog to train or retrain a Muse. •Properties: Displays the appropriate dialog to view or change the properties of the selected resource. •Import: Imports a new resource of the selected type, and loads the contents from a .mqm (XML) file. •Export: Exports the contents of the selected resource into a .mqm (XML) file.
The following commands are available for light resources only: •Clone: Creates a copy of the selected resource. •Import new: Creates a new resource of the selected type, and loads the contents from a .mqres (XML) file. •Export: Exports the contents of the selected resource into a .mqres (XML) file. Publishing and unpublishing online resourcesThe Resource console lists all resources from the selected server, no matter whether or not they are actually published. Resources that are not published cannot be added to projects, and cannot be queried remotely. To publish an unpublished resource, click the To unpublish a published resource, click the NavigationClick Close to leave the Resource console.
See also: |