|
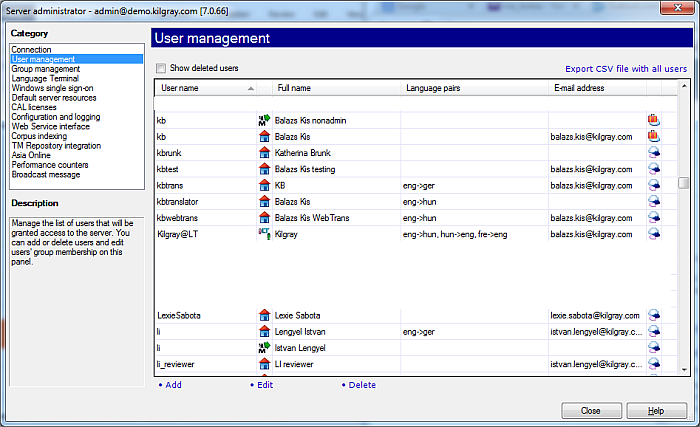
The User management pane of the Server administrator dialog allows you to manage the list of users who are entitled to access the resources (translation memories, term bases, etc.) and projects published on the memoQ server. Here you can create new users, and modify the details of existing users, including their group membership. It is also possible to delete users who will no longer have access to the server.
How to beginOn the Project ribbon tab, choose Server Administrator. In the Category list, click User management. UseThe most important section of the User management pane is the user list where you can view user details and select users. Uncheck the Show deleted users check box to display all users. Click the Export CSV file with all users link to export all users into a CSV file. Note: No SSO users are exported. For subvendor managers: only the members of the subvendor organization are exported; for the master organization: subvendor users are not exported, only the subvendor managers and normal local users are exported. The CSV file contains:username, full name, e-mail, address, phone number, mobile phone,package workflow setting, language pairs, group membership, user can edit information on memoQweb, user can edit language properties on memoQweb, user is disabled. The user list is a table where you can select individual cells: •To select a user, click one of the fields or the grey box left of the fields in the corresponding row. You can use the arrow keys to navigate within the list. You can select multiple rows by holding down the Ctrl key, and clicking the leftmost grey box in each row, one after another. You can also use the arrow keys: first, select the topmost or bottom row of your selection, then press the Shift key plus the down or up arrow key multiple times, until all desired rows are selected. Selected rows are highlighted. •You can sort the user list by User name, Full name, Phone number, Mobile number, E-mail and Address. To sort the list, click the heading of the appropriate column. To reverse the sorting order, click the heading again. The column used for sorting is indicated by a small arrow in the column heading. Note: The table containing the user list may be too wide to fit in the User management pane. If you do not see all columns, you can use the horizontal scroll bar at the bottom of the user list. You can also resize the Server administrator dialog to fit the list by dragging any of its edges. Add: Click this link to create a new user. The User properties dialog appears. Enter the details and click OK. A new row will appear on the list, containing the details of the new user. Edit: Click this link to modify the details of the selected user. The User properties dialog appears, containing the details of the user. You cannot rename the user here: you cannot change the login name. Otherwise, you can make any changes and confirm them by clicking OK. Note: If you click the Edit link for a Language Terminal user, the User properties dialog options are all grayed out, except for adding or removing the user to a group. Delete: Click this command to delete one or more selected users. memoQ will display a message, asking for confirmation. Click Yes if you want to proceed with the deletion. Important: Deleting users cannot be undone. Confirm the deletion only if you are absolutely sure that you know what you are doing. Note: When you delete a user, the user is removed from the Server administrator > User management, removed from any granted resource permissions and from implicit project permissions. Important: You can also delete the initial admin user. Sometimes, this might be appropriate for security reasons. However, make sure that there is at least one user with the Administrator role in the system. Otherwise, it will no longer be possible to administer the server. Note: Do not delete a user if you want to exclude him/her from the server only for a short period of time. In this case, you can disable their login permission. To do this, modify the details of the user (by selecting the corresponding row, and clicking Edit), and check the Disabled check box in the User properties dialog. User detailsEach row in the user list consists of the following fields: •User name: This column shows the user name used for logging the given user to the server. The user needs to specify this name whenever prompted by the server. •This column contains icons to show whether the user is oa single user: oa Language Terminal user: oa subvendor group manager: oor has a disabled account: •Disabled (second column without title): This column contains icons to show whether or not the users are temporarily disabled or not. Click the Edit link to enable or disable user access in the User properties dialog. •Full name: This column shows the real-life name of the user. It is for information purposes only. •Phone number: This column displays the normal (office) phone number of the user. It is for information purposes only. •Language pairs: This column displays the language pairs that the user can work with. Languages are represented by three-letter ISO codes. •E-mail address: This column indicates the e-mail address of the user. memoQ server uses this e-mail address to send e-mails through e-mail notifications. Note: You can set up e-mail notifications for an online project in the Manage online project dialog, in the Communications tab of the Settings pane. •The last column indicated the package workflow for the user which you need to specify in the user properties: oThe icon for both is: oThe icon for packages only is: oThe icon for online only is: NavigationClick Close to close the Server administrator dialog. memoQ will prompt you for confirmation, and offer to save your changes. |