|
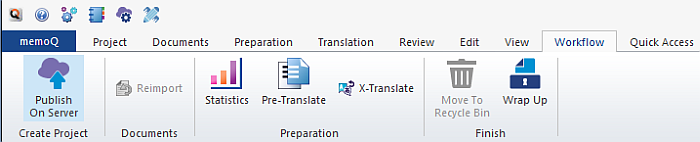
The Dashboard opens when you start memoQ. It allows you to choose what you want to do first, provides you with an interface where you can manage your projects, and displays information about the license you are using. See also: PM Dashboard, Translator Dashboard The Workflow ribbon tab is the second tab open after the Project ribbon tab which is open.
This ribbon tab comprises the main commands for project managers to manage a project, similar to the Quick Access ribbon tab for translators. Create Project section: •New Project: Click the arrow icon in the lower part of the New Project icon to choose the project type (New Project From Template, New Project, New Online Project From Template, New Online Project) to create a new memoQ project using the New memoQ project wizard. Only one project can be open at a time. If there is an active project, memoQ automatically offers to close it. Click the upper part of the icon to create a local project with a project template. •Publish On Server: Click this command to publish a project on a memoQ server.
Documents section: •Import: Click the arrow in the lower part of the Import icon for the import options. If you click the upper part of the icon, then the Open dialog opens directly. Note: The import and reimport commands are only available when you have a project open. oImport: Imports one or more documents, and adds them to the current project. When you click this link, the Open dialog appears where you can select one or more documents. You can select multiple documents of various types (i.e. you can mix the document types). With the Add document command, memoQ will use the default document filter with its default configuration for each document type. For example, it will import .DOCX files using default the Microsoft Office Word 2007 document filter. oImport With Options: Imports one or more documents, and adds them to the current project. When you click this link, you can specify the import settings for each document. After you select the document or documents in the Open dialog, the Document import settings dialog appears, where you can adjust the import settings specific to the selected document type. You can even select a different document type. oNote: For some document types, it is always highly recommended to use the Import with options command instead of simply choosing Import. Such document types are Microsoft Excel, XML, plain text, and bilingual Word documents. oImportant: Use the Import with options command link to add bilingual documents – DOC, TTX, XLIFF files. oImport Folder Structure: Displays the Add folder structure dialog where you can choose a folder to import, and configure various settings of the import process. memoQ will import all supported files from the selected folder and its subfolders. In this dialog, you can also configure the document filter for each file imported. oUpdate Bilingual: Imports a bilingual memoQ file format (memoQ XLIFF, two-column RTF) to update a view in your project. This option is only visible in checked out online projects for the View tab. If you are on the Documents tab, Update Bilingual is also not visible •Reimport: Imports the selected documents again. This is the same as removing the document first, and then using the Import command to import the document again. Use this command if the contents of the original documents have changed. The new version oft he document needs to be in the original location.
Preparation section: •Statistics: Opens the Statistics dialog to calculate word and character counts, and to analyse the documents against the translation memories in the project. •Pre-Translate: Displays the Pre-translate dialog with the pre-translation scope set to the whole project. •X-Translate: Displays the X-Translate dialog to retrieve translations from an earlier major version of the same document or the selected documents. This command is not available if the active document or the selected document is not under version control, and has no earlier major version. This means that the source text in the document must have changed at least once before this command can be used. •Assign: Click the arrow in the lower part of the Assign icon to show the assign options. If you click the upper part of the icon, the Assign selected documents to user dialog opens automatically. oAssign: Assign documents manually to your users. oAuto-Assign: Auto-assign suitable users to your documents automatically. oPeople: Opens the People pane to add users to your project. Note: These commands are only available when you have a project open.
Finish section: •Move To Recycle Bin: Moves a project to the recycle bin. •Wrap Up: Use this link to set a project to finished. This command is only available when you have a project open. |