This example shows how to set up automated actions for a fairly normal project. You can try this in local projects, as well as online ones.
You need to set up the following actions:
▪After a document is imported: Pre-translate them. In addition, Lock the segments that have exact (100%) or context (101%) matches, so that they aren't counted in the total word count. ▪After pre-translation: Run statistics on the project to have an up-to-date analysis. ▪After a document is reimported (because the source text changed while the project was going on): Get the translations from the previous version using X-Translate. ▪After X-Translation: Pre-translate the reimported document, and run statistics on the project again. ▪When every document is translated, and the project is over: Export documents automatically on the local computer or on the memoQ server if it's an online project. Here are the steps to set this up:
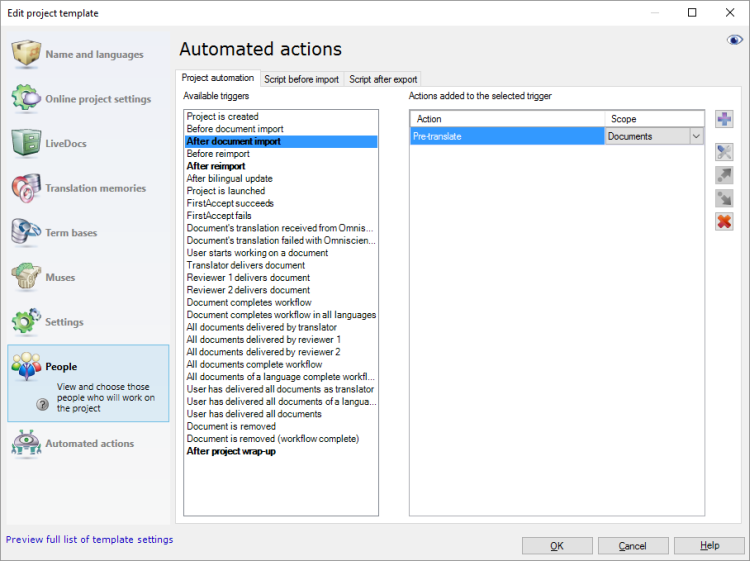
1.Edit the project template: Choose Automated actions, and click the Project automation tab. 2.Under Available triggers, click After document import. Now you will set up tasks for newly imported documents. 3.Next to the Actions added to the selected trigger list, click the + sign. The Select actions you want to add to the trigger window appears. 4.You need to pre-translate, and then run statistics. Click Pre-translate. Click Add. The Automated pre-translation and statistics settings window appears. 5.Make sure that memoQ automatically locks segments that have an exact match or a context match: Click the Confirm/lock tab. Under Rows to confirm..., click the Exact match with context radio button. At the bottom, check the Make rows locked check box. Click OK. The Edit project template window returns. Need translation memories or LiveDocs to pre-translate: Pre-translate will work if the project has translation memories or LiveDocs corpora. Make sure that this project template sets them up: Check the settings under LiveDocs and Translation memories.
6.Next, you need to add statistics: Click the + sign again. In the Select actions you want to add to the trigger window, click Create analysis report. Click Add. 7.The Automated analysis report settings window appears. Review the settings, and click OK. The Edit project template window returns. The Create analysis report task is added to the list on the right. 8.Each time a document is imported, you need to update the analysis report for the entire project. Next to the Create analysis report item, in the Scope column, choose Project from the drop-down list. With this setting, the entire project is analyzed again after a document is imported. 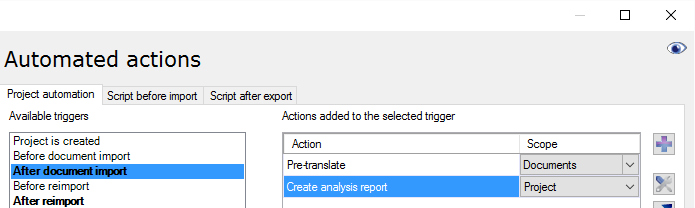
Now, set up the tasks for documents that were just reimported. It's almost the same as with newly imported documents. But before anything else, you need to get the existing translations from the previous version of the document.
9.Under Available triggers, click After reimport. 10.Next to the Actions added to the selected trigger list, click the + sign. The Select actions you want to add to the trigger window appears. 11.Click X-Translate. Click Add. The X-Translation settings window appears. 12.Click the Mid-project update radio button. There are no other settings in this case. memoQ preserves the status of the original segments. For example, segments that were confirmed and locked in the previous version of the document, will be confirmed and locked in the reimported version, too. 13.Set up pre-translation and analysis the same way as with newly imported documents. Repeat steps 3-8. Finally, the documents must be exported automatically after the project is finished.
If the project template is for local projects, do this:
14.Under Available triggers, click After project wrap-up. 15.Next to the Actions added to the selected trigger list, click the + sign. The Select actions you want to add to the trigger window appears. 16.Click Export document on this PC or Language Terminal. Click Add. 17.The Export document on this PC or Language Terminal - settings window appears. Review the settings, and click OK. If the project template is for an online project, do this:
14.Under Available triggers, click Document completes workflow. (This event doesn't happen in local projects.) 15.Next to the Actions added to the selected trigger list, click the + sign. The Select actions you want to add to the trigger window appears. 16.Click Export target documents on server. Click Add. The Export target documents - settings window appears. 17.Review the settings, and click OK. From an online project, the memoQ server exports the documents to a folder on the server. The server's owner accesses the exported documents from the file store in memoQ. The project manager needs to open the project for management, and then look at the files for that project.
18.To save the project template: In the Edit project template window, click OK. To try the automated actions: Create a local or an online project from the project template. Import a document. Make the document go through the entire workflow. In the meantime, reimport the document at least once. At the end, either wrap up the project (local projects) or deliver the document from the last workflow role (online projects).
|