|
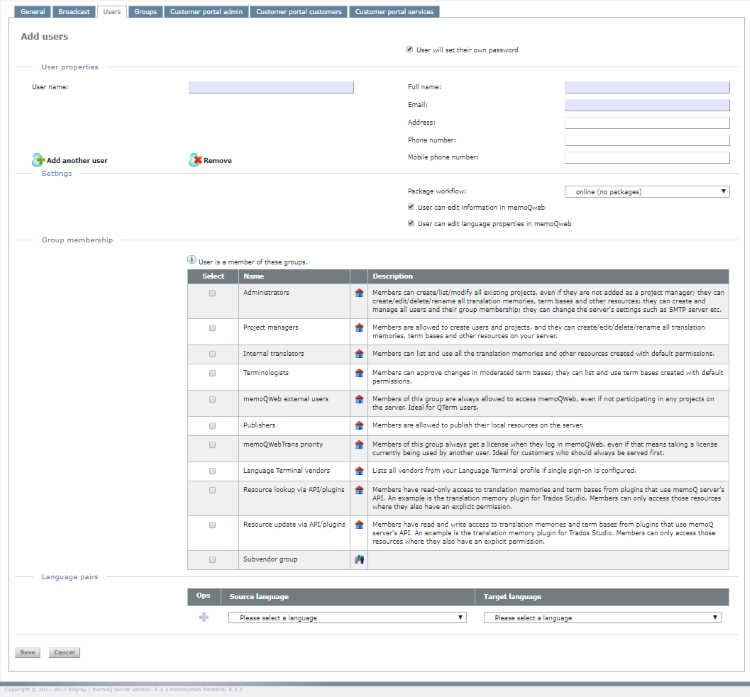
You can add users to a memoQ server directly from memoQWeb, without opening memoQ. The memoQWeb module must be installed on memoQ server. How to get here1.Open memoQWeb in a Web browser. Log in as an administrator or a project manager. 2.Click the Admin tab, then click the Users tab below it. 3.The Users page appears. •To add a new user: Click the Add users icon at the top of the user list. •To edit an existing user: In the Ops column, click the Edit
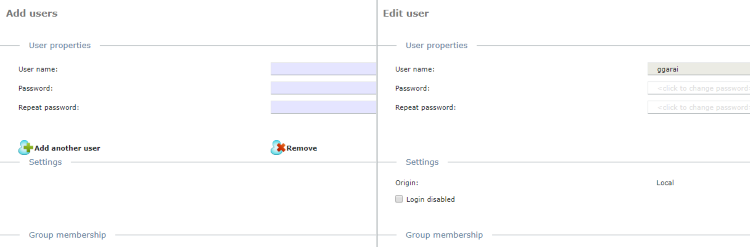
The Add users or the Edit user window appears. The two are almost the same. There is one small difference between them:
What can you do?Add or edit a user By default, users set their passwords for themselves. New users will receive an email with a link to memoQWeb's password form. To set up the password for the new user: Clear the User will set their own password check box. The Password and Repeat password boxes appear. Fill them in.
User properties In this section, you can enter or change personal details: •User name: Enter the user name with which this user signs in to the server. •Password: Enter or change the password with which this user signs in to the server. The password: omust have at least 12 characters, omust not start or end with whitespace characters, omust not contain the user name, and omust have at least one uppercase letter, one lowercase letter, one digit, and one other symbol. •Repeat password: Retype the password to avoid typos. This field must be the exactly same as the Password field. •Full name: Enter or change the user's real-life name. It is for information purposes only. •Address: Enter or change the user's postal address. It is for information purposes only. •Email: Enter or change the user's email. memoQWeb sends email notifications to this address. •Phone number: Enter or change the user's office phone number. It is for information purposes only. •Mobile phone number: Enter or change the user's mobile (cell phone) number. It is for information purposes only. User name cannot be changed: When you edit a user, you cannot change their user name. memoQ validates your entries: If you enter incorrect details (e.g. the email is not well-formed, or the Password and Repeat password fields do not match), a warning sign appears next to the incorrect field.
Settings •Origin: oLocal: the user is a native memoQ user or a synchronized Windows domain account. In the latter case, Origin shows e.g. "SAM:TRANS‑SRV". oIf the origin is not Local, the User name field shows the origin, e.g. "TRANS-SRV\MaxRob". •Package workflow: You can allow the user to use a package-based workflow in online projects. Choose from: oonline (no packages): The user can check out online projects, but cannot download packages. opackages: The user can download packages, but cannot check out online projects. oboth: The user can either download the package or check out the project. •User can edit information in memoQWeb: The user can edit their full name, email, address, phone number, mobile phone, and password on their Profile page. •User can edit language properties in memoQWeb: The user can edit their language pairs on their Profile page. Both options are disabled by default. You need to be an admin or a project manager to change them.
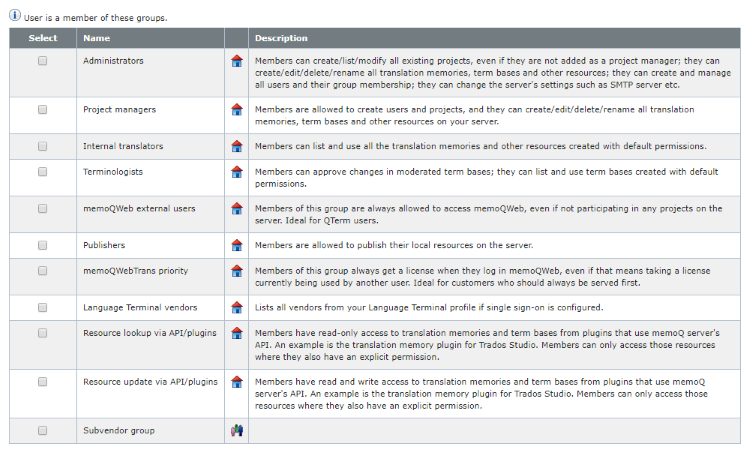
Group membership Note: If you are a subvendor group manager, you cannot modify the group membership of a user: the Group membership section is disabled. In memoQ, permissions tell if a user can access a resource and what they can do with it. To make this easier, memoQ supports groups. A group is a means to treat multiple users together: if a group has access to something, all of its members do. Adding a user to a group is much simpler than changing their permissions. To improve security, admins should give permissions to groups instead of single users. This table shows all groups:
To add the user to a group: Check the check box next to a group name. You can select more than one group. To remove the user from a selected group: Clear the check box next to the group name.
Language pairs You can set up the language pairs that the user works with. •To add a language pair: choose Source language and Target language from the dropdowns below the table. In the Ops column, click Add •To remove a language pair: In the Ops column, click Delete When you finishTo save your changes, click Save. To discard your changes and return to the Users page, click Cancel. |