|
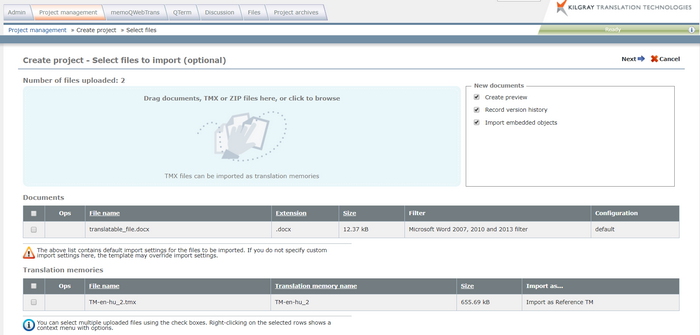
Create your memoQ online projects from within your web browser. The project is then created on the memoQ server. How to beginIn the project management dashboard, click the Create new project link ( Note: Import and export paths are relative paths. Note: You can drag multiple files of any supported file format in the Drag documents field. Multiple files can be selected in new browsers. Old browsers do not support this, only one file at a time. Note: You can also add a zip file holding translatables and TMs. If you do not want to use the default import filter for your documents, move the cursor in the Ops field for your file. The Delete and Edit icons appear. Click the Edit icon next to a document ( If you added a TMX file and want to translate it instead of using as a reference TM, click the Edit icon (
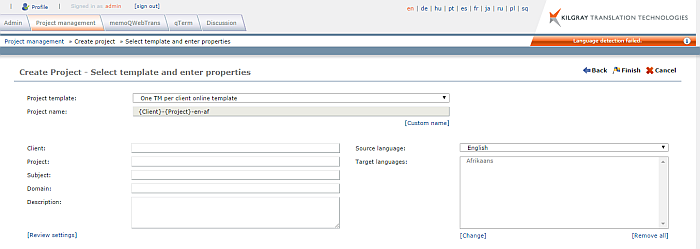
In the New documents section, choose the document options: •Create preview check box: This check box is activated by default. Team members can see the real-time preview of the documents they are working on. However, if you are concerned about the time it takes to download the documents, you might want to turn off this option. Users will have to download a smaller amount of data: they will be able to access the contents of the project more quickly. On the other hand, they will not be see the real-time preview, which might be crucial in certain projects. •Record version history check box: Check this check box to track the history of documents and segments in the project. Whenever a change is made to a segment, memoQ records the earlier version, so that you can view the changes, or even to revert to an earlier version. In addition, you can tag your project at a specific time, so that memoQ can always show how the project looked like at the time it was tagged. •Import embedded objects check box: Check this check box to import embedded objects like Visio graphics or Excel files embedded in a DOCX file. •Import embedded images check box: Check this check box to import images that have translatable text. memoQ will extract these texts and imports them as separate file. Note: Currently, you cannot connect your project to Language Terminal when you create your project in the web browser. You can later on connect your project to Language Terminal: open the project in memoQ, go to Overview and click the Create project entry in Language Terminal link. Click Next. memoQWeb tries to detect your source and target language, and then proceeds to select a project template for your project. Project templates help you to easily set up a project with pre-defined configurations. Create an online project with a few clicks using a template. In the template, you configure all resources, users and actions. You need to create your project templates in memoQ: go to the Resource Console > Project templates. Project templates allow you to automate workflow steps such as pre-translation and running statistics. This saves you time and extra steps. For instance, you do not need to manually run statistics, pre-translate, assign after you created a project. memoQ does it for you automatically. From the Project template drop-down list, choose the project template for your project. Enter metadata, if needed. Choose your source language if it was not detected automatically. Choose from the Source language drop-down list. If you need to make a change to the target languages, click the Change link. Click the Remove all link to remove all target languages. Click the Review settings link to review your project template settings.
Note: You need to define your resources such as additional TMs and term bases in the template to add them to your project when you create your memoQ online project in the Web PM. Note: When you have predefined values for the meta-information fields Client, Project, Subject and Domain, you need to choose a value from the drop-down lists. You cannot enter free text, e.g. for a project name. Important: You cannot edit project templates in Web PM. You need to edit project templates in the Resource Console of memoQ. Click Finish to finish the project creation.
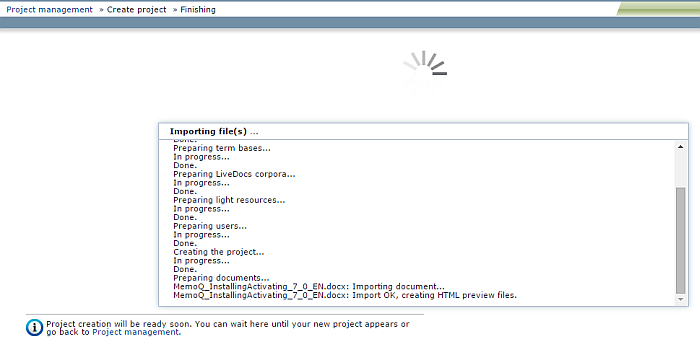
The project directly opens, and also appears in the Dashboard. From the Dashboard, select the project, open it, assign users and launch it. The launching is the same as from within memoQ. Note: Using a project template, you do not see resources (translation memories, term bases, LiveDocs) displayed for your project. After you created your project, an you would like to look at your file, not like in a traditional memoQ online project, you can go to the memoQWebTrans tab, navigate to your project, and open your document in your browser. |