The Grid
In the translation editor, the Grid is the place where you see the source text and type the translation.
For an introduction to translating in memoQ: See the Getting Started Guide from the memoq.com website.
How to get here
- Open a project. This can be a local project or a checkout of an online project.
- In Project home, choose Translations.
- Find the document you need to edit. Double-click its name. The translation editor opens on a separate editor tab.
Or: Right-click the document, and choose Open For Translation.
To open a view for editing: In the Translations pane of Project home, click the Views tab. Double-click the name of the view you need to edit.
What can you do?
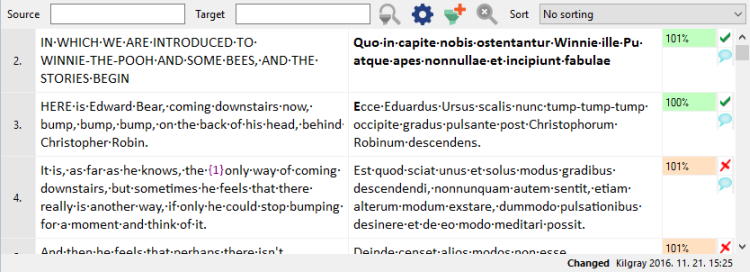
The translation editor shows each segment in a separate row.
- In running text, a segment usually corresponds to a sentence.
- In structured content (tables, XML files, and databases), a segment usually corresponds to a cell or a data record. It may contain just a phrase, but it may also contain several sentences.
In each row, there is a cell on the left that contains the source segment.
Type or edit the translation in the cell on the right.

To confirm your translation, press Ctrl+Enter.
When you confirm your translation:
- memoQ will save the translation in the document and in the working translation memory of the project.
- The status of the segment will become Confirmed.
- memoQ will move to the next segment and pre-translate it. If there are matches that cover the entire segment, the target cell will already have it. (The first segment of a document or a view is never pre-translated automatically.)
You do not have to save the document: memoQ will automatically save every change, even when a segment is not confirmed.
When the target cell is not really a translation, or there is no translation memory in the project: To confirm a segment, press Ctrl+Shift+Enter instead. This will save the segment to the document, make it Confirmed, but it will not save the segment to the working translation memory.
Move around:
- To move up and down in the document, use the Up and Down arrow keys.
- To move up and down by a screenful of segments, press Page Up or Page Down.
- To move one word at a time: Press Ctrl+Left or Ctrl+Right.
- To jump to the beginning of the segment: Press Ctrl+Page Up. (Home jumps to the beginning of the line.)
- To jump to the end of the segment: Press Ctrl+Page Down. (End jumps to the end of the line.)
- To jump to the beginning of the document: Press Ctrl+Home.
- To jump to the end of the document: Press Ctrl+End.
Select text:
- To select characters: Press and hold down Shift and keep pressing Right or Left.
- To select a word at a time (and to select more words), press and hold down Shift and Ctrl, and keep pressing Right or Left.
- To select text by the line: Press and hold down Shift, and keep pressing Up or Down.
Caution: If you reach the first or the last line of the segment, and then press Shift+Up or Shift+Down, memoQ will select the entire segment and the previous or the next segment with it. This is how you select entire segments.
- To select the entire target cell: Press Ctrl+A.
Select segments:
- To select entire segments: Click the first segment. Press and hold down Shift, and press Down. If the first segment has two or more lines in the target cell, memoQ will start selecting lines. When you reach the end of the segment, memoQ will start selecting entire segments.
Or: Click the number of the first segment. Scroll down to the last segment you want to select. (Do not click any segments in the process.) Press and hold down Shift, and click the number of the last segment.
- To select all segments in the document: Press Ctrl+Shift+A.
- To select all segments from the current segment to the end: Press Ctrl+Shift+End.
- To select all segments from the current segment to the beginning: Press Ctrl+Shift+Home.
You can use the mouse (or a touchscreen), too:
- Click the place you want to jump to.
- Click and hold down the mouse button, then drag the mouse to select text or segments.
- Use the wheel of the mouse to scroll up and down. Or, you can click a position on the scroll bar on the right.
When you start working on a segment, memoQ will collect suggestions for the source text there.
The suggestions will appear on the Translation results list. Some suggestions cover the entire segment, others are just for parts of it.
To insert a suggestion:
- Press Ctrl+Space to insert the first (topmost) suggestion.
- To insert another suggestion, press Ctrl and the number of the suggestion.
- Or, move to the suggestion by pressing Ctrl+Down and Ctrl+Up, then press Ctrl+Enter.
- Or, double-click the suggestion.
If you arrive to the current segment by confirming the previous one: The highest-ranking suggestion will already be there in the target cell (if there are matches for the entire segment). You do not have to insert a suggestion - unless you need a different one.
- If a suggestion is for the entire segment, the suggested translation will replace any text that you typed previously.
- If a suggestion is for part of the segment, the suggested translation will be inserted where the caret is.
After inserting the suggestions, edit the text as necessary. When the translation is ready, confirm the segment: Press Ctrl+Enter.
memoQ will predict suggestions from term bases and auto-translation rules. Predictive typing will also give hints from Muses.
Normally, when you type two characters of a word, a number, or a phrase, and memoQ has something to offer, a menu appears right there in the cell:

- To accept the first suggestion in the menu, press Tab or Enter. (Or click it.)
- To choose another suggestion, select it by pressing Down until you get there, and then press Tab or Enter. (Or click it.)
Or, pick an item to insert.
You can pick from placeables: Numbers, tags, terms, non-translatable items, auto-translation suggestions are together called placeables.
To pick something from placeables: Press Ctrl while you type the translation.
The AutoPick menu appears right there in the cell. It shows the terms, numbers, tags, and other placeables from the source text that are not in the target cell yet.

- To insert the first suggestion from the AutoPick menu, press Tab or Enter. (Or click it.)
- To choose another suggestion, select it by pressing Down until you get there, and then press Tab or Enter. (Or click it.)
The usual copy, cut, paste actions all work in memoQ. Use Ctrl+C, Ctrl+X, and Ctrl+Z - all the familiar key shortcuts - to make them work.
You can drag the selected text with the mouse inside a target cell, or into another target cell.
There are some special cases, too.
To copy text from the source cell into the target cell:
- To copy the entire text from the source cell: Press Ctrl+Shift+S. The source text will replace the text that is already in the target cell.
Copy multiple source cells to the target cells: Select two or more segments, then press Ctrl+Shift+S. memoQ will copy the source text to the target cell in each segment.
- To copy just a part of the source text into the target cell: Select text in the source cell. Press Ctrl+Shift+T. memoQ will insert the selected source text at the current position in the target cell. The target text will not be deleted.
To move the selected text by one word at a time:
- To move the selected text after the next word: Press Ctrl+Shift+N.
- To move the selected text before the previous word: Press Ctrl+Shift+N.
If you make a change - overwrite or delete text, mostly - you can undo it. To undo the last action, press Ctrl+Z.
You can undo actions until the document is closed: You can undo changes while the document is open. After you close the document, and open it again, you will not be able to undo changes you made before closing the document.
To undo not one but several actions: On the Edit ribbon, click the little button next to the Undo icon. The Undo menu appears:
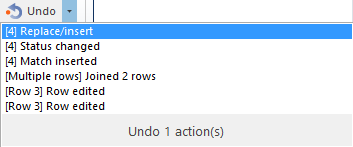
memoQ lists the actions that you can undo.
To undo the last three actions, click the third one. To undo five, click the fifth one - and so on.
memoQ displays some of the formatting from the source document, but not all.
If the type of the document allows it, memoQ will display the following:
- bold,
- italic,
- underlined formatting, and
- the combinations of these, as well as
- superscript and subscript.
All other formatting appears as inline tags: Other formatting commands will appear in the form of inline tags. To work with inline tags, see the next section on this page.
You can freely apply these in the target cells, too. For example, you can use bold formatting even when there is none in the source cell.
You can also change the case of the selected text from all lowercase to Initial capitals to ALL CAPITALS.
To apply formatting to selected text, use the Format section of the Edit ribbon:

Or, use the keyboard to apply some of them. Initially, they are the same as in Microsoft Word:
- Bold: Ctrl+B
- Italic: Ctrl+I
- Underlined: Ctrl+U
- Change case: Shift+F3. When you press Shift+F3, a menu appears, where you can choose the capitalization you need:

When you first press Shift+F3 in memoQ 8.5, a notification appears:
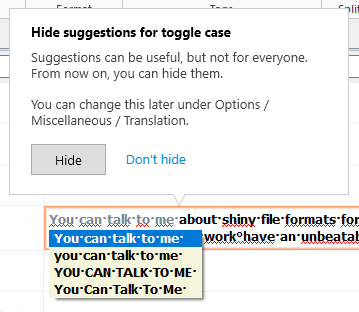
To hide the menu and just switch by pressing Shift+F3: Click Hide.
To keep working as before: Click Don't hide.
To make a choice later: click anywhere outside the notification. memoQ will ask you later.
If you made a choice and want to change it:
- In the top left corner of memoQ, on the Quick access toolbar, click the Options
 icon.
icon. - On the left side of the Options window, click Miscellaneous in the list.
- On the Translation tab, check or clear the Show suggestions for toggle case (Shift+F3) check box, as needed.
- In the top left corner of memoQ, on the Quick access toolbar, click the Options
Cannot change or apply formatting? This type of formatting is not available with all document formats. If you are translating a document where the document format does not allow inline formatting, or it does not use formatting that memoQ can recognize, you will not be able to apply bold, italic, or underlined formatting - simply because memoQ does not know how that looks in the document, or if they are possible at all in that document format.
If there is a change of structure or formatting inside a segment, memoQ will show an inline tag:

If it comes from a Word document, it may indicate a change in font face, size, or color:

When you translate the document, you need to copy this formatting to the target cell. Otherwise, the red font will not make it in the translation:

To do this:
- Select the translation of 'Line 26' (in the example: 'Bus Nummer 26'), and press F9. The same two tags appear before and after your selection. You can do this if the tags are paired: there is an opening tag
 before and a closing tag
  after a phrase.
 - Or, press Ctrl, and choose the right tag pair from the menu that appears.
If the tag stands alone (for example, it is an empty tag
 ), you can copy them one by one: Place the caret where the tag belongs. In the example above, you would click right before 'Bus'. Then press F9. Or, press Ctrl, and choose the right tag (or tag sequence) from the menu that appears.
There can be several tags next to one another. When you press F9, the entire tag sequence is copied.
- If there are several tags or tag sequences in a cell: F9 copies the first one from the source cell that is not yet in the target cell. If you press Ctrl, you can choose which one(s) to copy.
- If there are several tags, and you lose track: You can clear all tags from the target cell. Press Ctrl+F8.
- If there are figures, images, or embedded objects in the document, memoQ displays inline tags for them, too.
Legacy formatting tags: Some tags appear with curly brackets:
 . In some document types, these tags appear when there is a paragraph break inside a segment. To copy these tags, press F9. Or press Ctrl, and choose it from the menu that appears.
If some tags are not copied: Some tags are required. If a required tag is missing from the target cell, there will be an error. Legacy formatting tags are always required.
Here is what an error looks like:

If an optional tag is missing: memoQ gives you a warning. On the right, it appears as an orange lightning bolt. To deal with the warning, double-click the lightning bolt. Or, open the Resolve errors and warnings tab, and go through all warnings at once.

In some document types, you can insert new tags into the target cell.
To work with tags, use the commands on the Edit ribbon.
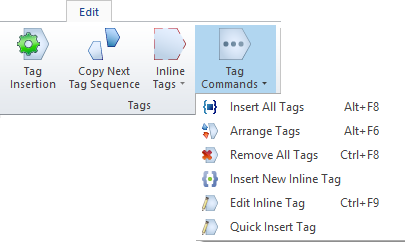
- Tag insertion: Turns on tag insertion mode. In this mode, you can place every tag by a single click of the mouse. First, you need to place all the tags, and then you can edit the text again. You can also press Ctrl+F6 to start this.
- Copy next tag sequence: Or, press F9. Copies the next sequence of inline tags or formatting tags into the target cell. A tag sequence is all the tags next to one another, regardless of the type of tags. This command always copies the first tag sequence that is not yet in the target cell. If there are paired tags: In the target cell, first select the phrase that you want to enclose in the pair. Then press F9. memoQ copies the tag pair, not just one tag sequence.
- Arrange tags: If the order of tags is wrong, this command will fix it. You can also press Alt+F6.
- Insert all tags: Copies every tag from the source cell to one position in the target cell. Use this only if there are a lot of tags, and their position does not matter, and you want to get rid of errors and warnings quickly. In other words, it is not recommended to use this command. You can also press Alt+F8.
- Remove all tags: Removes all tags from the current target cell. Default shortcut key: Ctrl+F8.
- Insert new inline tag: Inserts a new inline tag into the target cell. This means a tag that does not exist in the source cell. The tag must be allowed by the document type. The command opens the Inline tag window where you can choose the tag to insert.
- Edit inline tag: Edits the selected tag. Opens the Inline tag window where you can change the tag. You can also press Ctrl+F9.
- Quick insert tag: Allows you to insert any tag that is allowed by the source document type. A menu of tags appears on the right, where you can choose the tag to insert. Paired tags are inserted in pairs, not one by one.
You can also choose how much memoQ shows of each tag. On the Edit ribbon, click the bottom of the Inline tags icon, and choose one of the following:
- Show Short Inline Tags: memoQ shows inline tags in their most compact form. All you can see is there is a tag, and if it is an opening, closing, or empty tag. Names and attributes of tags do not appear.
- Show Medium Inline Tags: memoQ displays the name of inline tags but not the attributes.
- Show Filtered Inline Tags: memoQ displays the name and some attributs of inline tags. The attributes to show are part of the document type definition. If you are working on an XML file, this is part of the filter configuration. This is what memoQ normally shows.
- Show Long Inline Tags: memoQ shows the name and every attribute of each inline tag. Caution: This setting may make the document unreadable Use it only if you are working to resolve a problem.
Sometimes, the document looks like it still contains code or tags that appear as part of the text, not as tags.

This can also happen if you have an Excel document where some of the cells contain web page (HTML) codes.
It is difficult to translate a document that looks like this, because you need to copy these parts very carefully. One missing character can make the translated document unusable.
In this case, you may want to turn these parts into real tags. This is to preserve parts that look like code, placeholders, or XML tags - so that they are not altered during translation. Practically, you can do this to parts of text that belong to the structure rather than the contents.
To do this: On the Preparation ribbon, click Regex Tagger. The Tag current document window opens. You can write up rules - or choose an existing set of rules - that turn parts of your document into inline tags.
Caution: To do this, you need to know about regular expressions.
To learn more: See Help about the Tag current document window.
You can insert special characters in the translation. To do that: On the Edit ribbon, click Frequent Symbols, then choose from the menu:
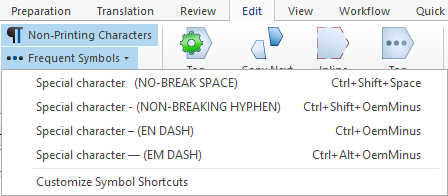
- You can add other symbols and characters to the menu. To do that: On the Edit ribbon, click Customize Symbol Shortcuts. The Customize symbol shortcuts window opens.
- If you need to insert a character that is not on your keyboard: On the Edit ribbon, click Insert Symbol. The Insert symbol window opens.
- Some characters - spaces, non-breaking spaces - are not visible. To make them visible: On the Edit ribbon, click Non-Printing Characters.
You can also insert special control characters in Arabic and Hebrew texts. You need them when the right-to-left script contains numbers - or words in a Latin alphabet. This is called a bi-directional text.
To show bidirectional texts in the correct order, memoQ uses control characters for languages like Arabic or Hebrew. These control characters are not shown in Office (Word, Excel, Powerpoint). Microsoft Office uses an extra flag for each character that defines how to treat a character. memoQ translates these into Left-To-Right (LTR) or Right-To-Left (RTL) markers. This also helps to disambiguate neutral characters such as spaces, commas, periods or parentheses.
If the target language is Arabic or Hebrew - or another language that uses Arabic script - you can insert LTR and RTL markers from the Edit ribbon. Example:

Working as a reviewer, you can track your changes in memoQ, and you do not have to create a new document version for that.
To turn on tracking changes: On the Review ribbon, click Track changes.
When you edit the document, memoQ will show insertions, changes, and deletions, more or less in the same way as Microsoft Word.
When you turn on tracking changes, memoQ will show the markup. However, you can view the final version only. On the Review ribbon, click Show changes. From the menu, choose Final version.
To turn off tracking changes: On the Review ribbon, click Track changes again.
memoQ will save the changes in the documents. Each change is marked with the name of the user who made the change, and the time when the change was made. To see the details of a change, point the mouse at it:

When you track your own changes, memoQ will use your user name to mark the changes. In a local project that you created, you can change the user name in the Settings pane of Project home. On the General tab of the Settings pane, simply change the name in the User name box. memoQ will automatically save it, and use the new name as soon as you return to your document.
Cannot change name in an online project: When you work on the checkout of an online project, you cannot change your name. Your changes will always be marked with the user name you use to log in to memoQ server.
Markup is exported in certain formats only: In most document formats, memoQ cannot export the markup. But if the document is Microsoft Word, you can export the tracked changes. You can also export them in SDLXLIFF documents, and into multi-column RTF documents, too.
You may not be able to track changes in online projects: The project manager can set up the project so that tracking changes is not allowed. If you work on the checkout of an online project, and the Track changes button is not active - and you think it should be -, ask your project manager if this is intentional.
When you are reviewing a translation, you can add feedback in various ways. One of them is turning on Track changes (see the previous section). Or, you can add notes to a segment.
However, the best option is to reject problematic segments - if the project is using a linguistic quality assurance model (LQA model).
To reject a segment, press Shift+Enter.
If the project has an LQA model, the Enter LQA error window opens. When you fill in the fields in this window, you give detailed feedback about the problems with the segment.
After you finish reviewing the document, you can send it back to the translator. To do that, use the Deliver or return command. This works if you are working on an online project or received the project in a handoff package.
At any rate, whoever opens the document after you, they will see the LQA feedback. Project managers can even get an LQA report from this information.
To find out if a project uses an LQA model: Open the Settings pane in Project home, and check the LQA models tab - or ask your project manager.
This is useful if you have translated a document in the past, and now you need to translate an edited version of it.
In this case, the source document arrives with tracked markup, which appears in the source cell:

When you translate this document, watch the Translation results list for TC matches. A TC match is an exact match for the source segment with the changes rejected. This means that memoQ looks up the segments without the edits - in other words, it looks up the version you translated originally.
If there are tracked changes in the source document, memoQ will show the markup. However, you can view the final version only. On the Review ribbon, click Show changes. From the menu, choose Final version. The TC matches will appear in the Translation results list regardless.
After they are inserted, TC matches look like this in the translation editor:

To learn more about a change: Point the mouse at a change. memoQ will show the name of the user who made the change, and the time when the change was made:

Some documents are very tightly regulated. They are written with strict version control, with every bit of change clearly marked up. When you translate these documents, you need to translate the unedited version, plus every tracked change as it is.
In memoQ, the way to do this is the following:
- Import the documents without the tracked changes - as if all changes were rejected. You can do this with Word documents, and you need to import them with options.
- Translate the document, and confirm every segment in a translation memory.
- Import the document again, this time with the tracked changes. Again, you can do this with Word documents, and you need to import them with options.
- Use the TC matches from the previous translation, and insert the changes one by one (sorry, there is no simpler way to do this). Usually, you need to copy the name of the author along with the change.
- Before you do it, skim through the document, and get a list of authors who inserted changes - list at least those who inserted a lot of changes. To get the author of a change, point the mouse at the change.
- Work on the changes inserted by one author at a time. Return to Project home, and choose Settings (do not close the translation editor). Click the General tab. In the User name box, enter the name of the first author.
- Return to the document, and translate the changes of this author. When you finish, go back to Project home, and enter the name of the second author. Translate the changes of that author as well.
- Repeat this until all changes are translated. Finally, change the User name box back to your own name.
This works in local projects only: When you work on the checkout of an online project, you cannot change your name. Your changes will always be marked with the user name you use to log in to memoQ server.
To edit the source cell in the current row, press F2.
The background of the source cell becomes green. Make changes, and press Tab, or click in the target cell.
Never delete tags: Do not delete tags from the source cell. If you do, you may not be able to solve tagging problems later.
You may want to change a source cell when there are obvious errors in the text. If you expect your client to correct the error, you may anticipate this by correcting the source segment.
When you confirm a segment where the source text was edited, memoQ saves two units in the translation memory: One with the source text before editing, and another with the edited source segment.
When memoQ divides the source text into segments, it is called segmentation. Because memoQ does not understand the text, all it can do is guess where a sentence ends and another starts. The basic rule is that a sentence ends where there is a period, followed by a space and a capital letter. There are exceptions, but this is how simple we must make it for the computer.
Sometimes it goes wrong:

In memoQ, you can use two commands to fix this: join and split.
Segmentation is not this bad in memoQ: After a long search, we had to make up this error to demonstrate joining and splitting.
To join two segments: Place the caret in the first one, and press Ctrl+J. The two segments will become one, and if there are translations in the right-hand cells, they will be appended together, too:

To split one segment in two: Place the caret at the place where you want to split the text, and then press Ctrl+T. (In the example, it’s best to place the cursor right after the third inline tag.) memoQ will replace the segment with two segments. If there was a translation in the target cell, it remains with the first segment:

If the problem is caused by an abbreviation: If the segmentation is incorrect because memoQ does not know about an abbreviation (in the above example, this is 'No.'), you can add it to the active segmentation rules, and re-segment the document.
Segmentation rules must have standard abbreviation lists: If the active segmentation rules were edited too much, and the standard abbreviation lists have been removed, this will not work. To check this, open the active segmentation rules for editing.
To add an abbreviation:
- Select the abbreviation in the source cell.
- On the Edit ribbon, click Add Abbreviation. The Add abbreviation window opens.
- Check if the abbreviation is there.
- Choose if this is an abbreviation, a proper name, or an abbreviation before a number.
- Check the Resegment this document now check box. If you suspect that other documents in the project may have the same problem, check the Resegment all documents now check box, too.
- Click OK. memoQ will add the abbreviation and change the segments where necessary.
If memoQ does not let you join or split segments, that may be perfectly normal.
- If you are working from a package you received from your client, the project manager may have disabled joining or splitting segments. This means you are not allowed to join or split segments, even if it were technically possible.
- Sometimes you cannot join certain segments. This happens when the document was imported from a structured document such as Excel or XML. You cannot join two segments if they come from different cells in an Excel sheet, or they come from different XML elements. When you cannot join two segments, always look at the preview - that will show the two segments, and it will help you find out why thy cannot be joined.
Before you can check the spelling of the translation, you need to set up the spelling checker.
To do that: Open Options, and choose Spelling and grammar.
To run the spell checker, press F7. The Spell checking window opens. In this window, you can go through all suspect words and phrases. You can add words to the ignore lists, and change the settings of the spell checker.
However, you usually do not need this:
Normally, memoQ will underline the suspect words and phrases:
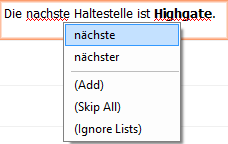
Right-click the red underline, and choose an option from the menu.
- memoQ will list the possible corrections, and a few options. If the right word is on the list, just click it: memoQ will replace the word in the text, and the curly underline will go away.
- If you are sure the word is correct, and you just want to clear the underline, click Skip all.
- If you want memoQ to accept this word in the future, click Add.
- You can also make memoQ ignore this word in the future, but you will need to use ignore lists for that. Normally, a memoQ project doesn’t come with an ignore list.
To add an ignore list: Start the spell checker by pressing F7. In the Spell checking window, click Ignore lists. Check the check box of an ignore list you want to use. Or, to add a new ignore list, click Add.
If your computer has Microsoft Word, and Word has a grammar checker for your target language, memoQ can use it to check the grammar of your translation.
To mark a suspect sentence, memoQ will underline it in blue:

Right-click the underlined sentence. You can accept memoQ's suggestion (if there is one), or you can skip the sentence.
To get more information, run the spell checker: Press F7. If grammar checking is active, the Spell checking window will give you grammar warnings, too.
The built-in quality checker will give warnings for various problems: missing inline tags, extra spaces, missing numbers, inconsistent translations etc. In fact, you can get errors and warning. It shows on the right of the segment, in the status box:

- Warning: If you see the orange lightning
 symbol, there are warnings from the quality assurance module. To learn more about the problems, double-click the lightning symbol. The Warnings window opens. You can ignore a warning there. In the segment, an ignored warning looks like this:
  .
.You can export a document that has warnings: If there are warnings in the document, memoQ will allow you to export it. However, the exported document may have formatting or structural problems.
- Error: If you see the
 symbol, there is an error in the segment. This means that required inline tags - or legacy formatting tags - are missing from the target cell. You cannot export the document until you make sure these are copied. To learn more about an error, double-click the error symbol. You cannot ignore an error.
For a complete list of QA warnings in memoQ, see this Help topic.
After the Run QA command, some warnings may disappear when you confirm a segment: The Run QA command runs checks that are not run when you simply confirm a segment. These checks are mostly consistency checks (e.g. checking if the same segment was translated several different ways). When you confirm a segment, QA will check the segment again. But this time only 'quick' checks are run, consistency checks are not. The warning sign may disappear even if you do not change the segment or the QA settings profile.
Translation documents, may contain a large number of segments. To find the segments you need, use the options on the filtering and sorting bar right above the grid:

To filter for segments that contain a word or two in the source cell: In the Source box, type the words you are looking for. memoQ will reduce the grid to segments that contain these words.
To filter for segments that contain a word or two in the target cell: In the Target box, type the words you are looking for. memoQ will reduce the grid to segments that contain these words.
You can use the Source and Target boxes together.
Regular expressions: You can enter regular expressions in the filtering boxes, and memoQ will display those segments that match the regular expression. Before you do that, click the Settings ![]() icon. The Filtering options window opens. Check the Use regex check box.
icon. The Filtering options window opens. Check the Use regex check box.
To change the filtering options: Click the Settings ![]() icon. The Filtering options window opens.
icon. The Filtering options window opens.
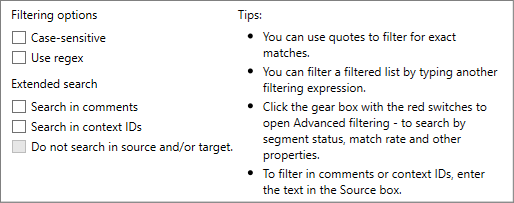
- Case-sensitive: Check this check box to distinguish between uppercase and lowercase characters when looking for matches. If the check box is on, the word "memoQ" will not be found if you enter "memoq". Clear the check box to get more results.
- Use regex: Check this check box to use regular expressions in the text filters. Then you can use the same regular expressions to find text as in the Find and replace window.
- Search in comments: When filtering for the segment content, search in the comments of segments, too.
- Search in context IDs: In structured documents, each segment has a context identifier. Check this check box to search in these identifiers, too.
- When you search in comments or in context identifiers, you can tell memoQ not to search in the actual text. To do that, check the Do not search in source and/or target check box.
What do the other icons do in the filter bar?
-
 : Click this to start filtering for segments containing the words you entered into the Source and/or Target field.
 -
 : Click this to clear the filter, and display all segments again. If your previous filter did not display any segments, click this icon before you enter a new filter.
Press Ctrl+Shift+F to filter for selected text: Select text in a source or a target cell, then press Ctrl+Shift+F. This will filter your document to the text you selected. If you select text in a source cell, memoQ will filter the Grid for text that occurs in the source text. To filter by the target, select text in a target cell, and then press Ctrl+Shift+F. To turn off the filter, and return to the full document, press Ctrl+Shift+F again.
To sort the segments in the Grid, choose a sorting order from the Sort drop-down box.
To find specific text in the document, simply press Ctrl+F. The Quick find window opens. Type the text you need to look for, and press Enter. To learn more, see Help about the Quick find window.
If you need more options, press Ctrl+F again. This will open the Advanced find and replace window. To learn more, see Help about Advanced find and replace.
To replace text: press Ctrl+H. This opens the Quick find and replace window. If you need more options, press Ctrl+H again. That will get you to the Advanced find and replace window.
On the right end of each row, in the status box, there is a comment ![]() icon.
icon.
To add a comment to the segment, double-click this icon. Or, press Ctrl+M.
The Notes window opens. Choose how serious the comment is, and which part of the segment it belongs to. Then write the comment itself. Click OK.
To learn more: See Help about the Notes and discussions window.
If there is already a comment, it will appear when you point at the comment icon.
Comments are stored in the project, and exported to bilingual documents.
If the source document was a Microsoft Word document, you can even export the comments to the finished translation.
To mark text in a segment (similarly to a highlighter):
- Select the text in the source or in the target cell.
- On the Quick Access ribbon or on the Review ribbon, click Mark text. memoQ will highlight the text in green.
- To select the color (and the type of the highlight): click the little arrow below the Mark text icon, and choose from Information, Warning, Error, or Other.
- After you mark text, you can add a comment to the highlight. Still in the same segment, on the Review or the Quick Access ribbon, click Notes. The Notes and discussions window opens. The highlight will appear on the list of notes, and you can edit the comment that belongs to it.
 . Segment that was rejected by a reviewer.
Want to change the status? You may want to change the status back from Confirmed - even to Not started - so that you get more accurate counts in Statistics. To do this, double-click the status box. The Change segment status window opens.
What are the percent values? If a match from a translation memory or a LiveDocs corpus was inserted in the segment earlier, the match rate of that match is there in the status cell. To learn more about match rates, see Help about Match rates from translation memories and LiveDocs corpora.
When a document is reimported; or a new version of the translation is imported from a bilingual document; or when a snapthot is made or a document is pre-translated, a new version is made.
To compare these versions: On the Review ribbon, click Track changes:
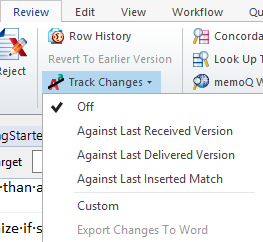
Here are your choices:
- Off: No track changes information appears.
- Against Last Received Version: memoQ compares the current version to the last one that was imported from a bilingual document.
- Against Last Delivered Version: memoQ compares the current version to the last one that was exported into a bilingual document.
- Against Last Inserted Match: memoQ compares the current version to the snapshot that was made after the last Pre-translate action.
- Custom: The Track changes against previous version window opens. You can choose any two versions that you want to compare.
To prevent accidental changes to segments, or to exclude some segments from Statistics, you can lock them.
- To lock the current segment: Click it, and then press Ctrl+Shift+L. To unlock a segment, press Ctrl+Shift+L again.
- To lock several segments: Select the segments. Press Ctrl+Shift+L.
- To lock segments in several documents: On the Preparation ribbon, click Lock/Unlock segments. The Lock segments window opens.
memoQ can fill in several or all of the segments in a document from translation memories, LiveDocs corpora, machine translation, and by putting together suggestions from fragments.
To do this, pre-translate the document.
To pre-translate the document: On the Preparation ribbon, click Pre-translate. The Pre-translate and statistics window opens.
You may select segments before running Pre-translate. Then you can fill in the selected segments.
Only Not started and Pre-translated segments are overwritten: When pre-translating segments, memoQ will not overwrite translations that were edited or confirmed. If you need to pre-translate edited or confirmed segments, too, clear the translations first.
To learn more: See Help about the Pre-translate and statistics window.
In some cases, you may want to start over with clean slate. For example, you copy the source text to the target first, and test the export. To start translating the document, you need to clear these copied 'translations'.
To do that: On the Preparation ribbon, choose Clear translations. The Clear translations window opens. You may want to select segments first.
Some translators prefer to translate downwards, not from left to right. This means that they prefer to have the target cell below the source cell, not next to it.
memoQ can do this for the current segment. Although there will still be the Grid, the current segment appears in a horizontal view in the middle of the Grid.
To arrange this: On the View ribbon, click the bottom of the Active Row icon. From the menu, choose In the middle (horizontal). The result looks like this:
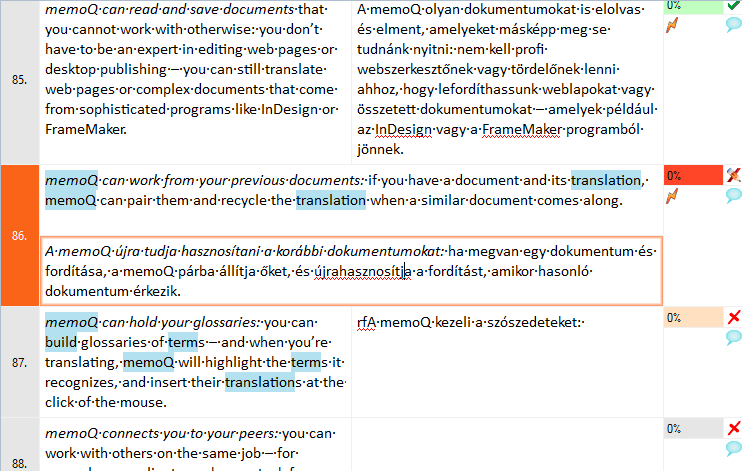
To switch back to the original view: On the View ribbon, click the bottom of the Active Row icon. From the menu, choose Anywhere.
When you finish
You do not have to save the document: memoQ will automatically save every change, even in segments that were not confirmed.
To return to Project home: Close the editor tab by clicking the Close  button on the tab itself. Or, press Ctrl+F4.