Customize appearance
You can change the font and the colors that appear in the translation editor and in the Translation results list.
On very large screens, the letters in the translation editor and in the Translation results list may seem too small. On small screens, you may need even smaller letters so that a sensible amount of text fits on the screen.
If someone is visually impaired, they may also need a larger font. Those who have difficulties distinguishing between colors may need a high-contrast or black-and-white setting in the Translation results list.
The Customize appearance window helps you set this up. You can change the font and the color for the Grid, the Translation results list, and for the tracked changes in the text.
How to get here
- Open a project. Open a document for translation.
- In the translation editor, right-click any segment. Choose Customize appearance.
Or: In the Translation results pane, right-click the list or the empty space below it. Choose Customize appearance.
Or: In the Translation results pane, right-click the compare boxes. Choose Customize appearance.
The Customize appearance window appears.

What can you do?
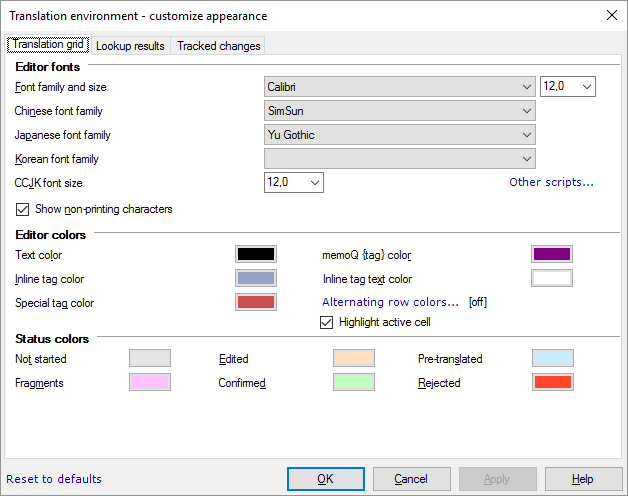
You can set up three things: the font for the editor, the colors for the editor, and the colors for the segment statuses.
Careful with status colors: The Help pages sometimes refer to the segment status colors. If you change the colors, these references in the Help won't be true anymore.
You can set up a font for regular text, Chinese text, Japanese text, and Korean text (and many other scripts in a different window). You can set the size for regular text, and also East Asian (CCJK) scripts. Here are the options you have:
- Font family and size drop-down boxes: Choose a font family and size to display general text in the translation editor and in the alignment editor.
- Chinese font family drop-down box: Choose a font family to display Chinese text in the translation editor and in the alignment editor.
- Japanese font family drop-down box: Choose a font family to display Japanese text in the translation editor and in the alignment editor.
- Korean font family drop-down box: Choose a font family to display Korean text in the translation editor and in the alignment editor.
- CCJK font size drop-down box: Choose a font size for Chinese (traditional), Chinese (simplified), Japanese and Korean text in the translation editor and in the alignment editor.
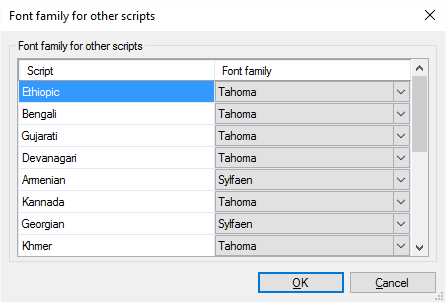
- Other scripts: Click this link to display the Font family for other scripts window. There you can select a font face for every other script. For each script, choose a fonts from the drop-down list next to it:

- Show non-printing characters check box: To show spaces, tabs, or newlines in the translation grid: Check this check box. Normally, it's cleared.
To set the colors of the editor, here are your options:
- Text color color box: Choose the color to display text in the translation editor and in the alignment editor.
- memoQ {tag} color box: Choose the color to display memoQ formatting {tags} in the translation editor and in the alignment editor.
- Inline tag color box: Choose the background color for inline tags in the translation editor and in the alignment editor.
- Inline tag text color box: Choose the text color for inline tags in the translation editor and in the alignment editor.
- Special tag color box: Choose the color of special tags in the translation editor and in the alignment editor.
- Alternating row colors: Opens the Alternating row background colors window. There you can set up alternating colors for rows in the translation editor. Once this is set up, every second row in the grid has a different background color.
To set the colors for the different segment statuses, click the color buttons for each status:
- Not started: Choose a color for Not started segments.
- Edited: Choose a color for Edited segments.
- Pre-translated: Choose a color for Pre-translated segments.
- Fragments: Choose a color for Fragment-assembled segments.
- Confirmed: Choose a color for Confirmed segments (no matter whether Translator, Reviewer 1, or Reviewer 2).
There is no "dark theme" in memoQ. If you work at night, use the operating system's "Night mode" feature, or lower the brightness of your display.
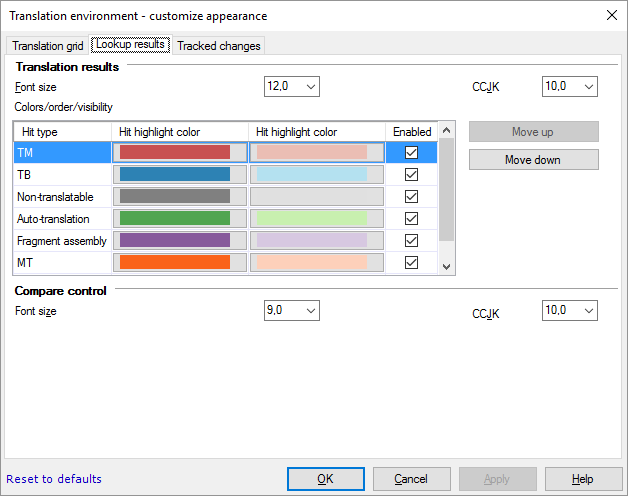
To get here, click the Lookup results tab. Set up colors for two parts of the Translation results list: the actual list (Translation results) and the so-called compare control. The compare control appears when you select a match from a translation memory or a LiveDocs corpus. It shows the difference between the current segment and the text that was found in the resource.

- To set the font size for the Translation results list: Choose point sizes from the Font size and CCJK drop-down lists. The second point size is for East Asian scripts.
- To change the order of the different types of matches: The Translation results list displays the different types of matches in the order they appear in the Colors/order/visibility list. To change the order: Select a match type, and click Move down or Move up. Repeat this for other match types if necessary.
- To hide a type of match or enable it again: Clear or check the check box in the row of the match type you want to hide or show again.
- To set the colors for the different kinds of matches: For each type of match, choose two colors: one to display the match on the list, and another to indicate that the match is highlighted. To change the colors: Click the colored stripes in the row of the match type.
- To set the font sizes in the compare control: Under Compare control, select a point size in the Font size and CCJK drop-down lists. The second point size is for East Asian scripts.
- You can also choose a markup and a color for each type of difference (insertions, changes, deletions).
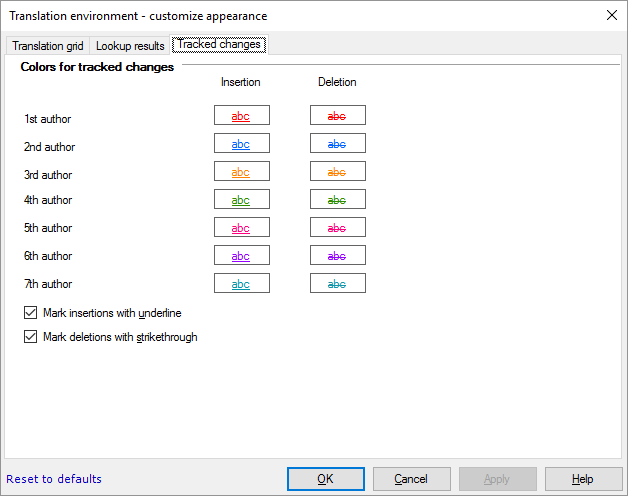
To get here, click the Tracked changes tab. Documents may contain tracked changes from several authors. memoQ - just like Microsoft Word - uses different colors to mark changes from different authors. You can choose colors for seven authors. You can set different colors for the insertions and for the deletions from each author.

To change a color, click a box in the row of an author, under Insertion or under Deletion. A color selector window opens. Choose a color, and click OK.
Normally, memoQ marks insertions with underline, and deletions with strikethrough. You can turn this off, though. (It is not recommended.)
Use different colors when changes are not marked with underlines and strikethrough: When the Mark insertions with underline or the Mark deletions with strikethrough check boxes are cleared, you need to specify a different color for the insertions and for the deletions within one author. After you clear these check boxes, always review the colors. (But even better, do not clear them,)
When you finish:
To change the fonts and the colors, and return to the translation editor: Click OK.
To return to the translation editor, and not change the fonts and colors: Click Cancel.
To save the changes to the fonts and colors, but stay in the window, and make more changes: Click Apply.