Translation Memory Exchange (TMX) files
In memoQ, you can use the translation editor to work on translation memories. To do that, you need to import TMX (Translation Memory Exchange) files into a project as documents.
memoQ can do this through the TMX filter.
TMX files are bilingual or multilingual. If a TMX file has more than two languages, you can import text from two languages only.
Can't split or join segments in a multilingual TMX file: If a TMX file has languages that were not imported in the project, you can't split or join segments in the translation editor.
How to get here
- Start importing a TMX file as a document (use Import with Options).
- In the Document import options window, select the TMX files, and click Change filter and configuration.
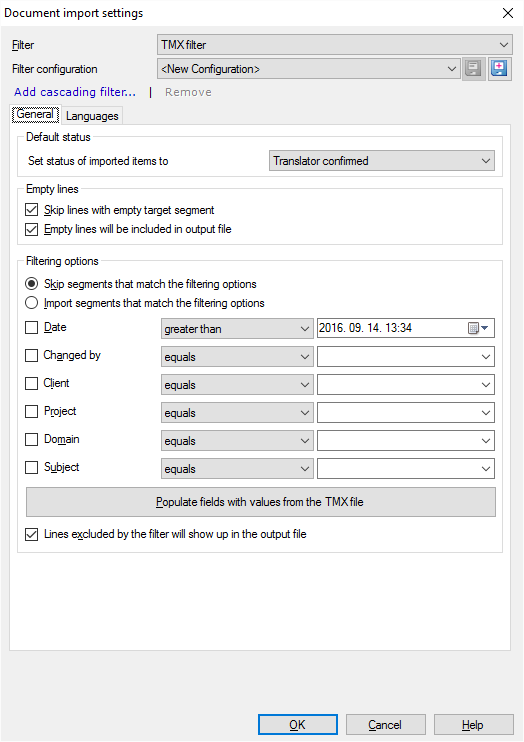
- The Document import settings window appears. From the Filter drop-down list, choose TMX filter.

What can you do?
- Choose a status for imported segments. Normally, the imported segments are set to Translator confirmed. To change it, choose another status from the Set status of imported items to drop-down box. You have the following choices: Assembled from fragments, Not started, Partially edited, Pre-translated, Reviewer 1 confirmed, Reviewer 2 confirmed, Rejected, Machine translated.
- Choose what memoQ does with empty items. Normally, if the target segment is empty in a TMX entry, memoQ doesn't import the entry, but it will be exported to the target file. To import entries with empty target segments: Clear the Skip lines with empty target segment check box.
If you skip the entries with empty target segments, you can remove them from the exported document, too. To do that, clear the Empty lines will be included in output file check box.
A TMX file can be large - hundreds of thousands of entries or even more. You don't have to work on the entire file at once.
Use the settings under Filtering options. You can set conditions for various fields in the TMX file. You can choose to import or ignore the entries that match the conditions.
Normally, memoQ doesn't import the entries that match the conditions, and imports everything else.
To import just the filtered entries: Click the Import segments that match the filtering options radio button.
From the check boxes, choose one or more conditions to restrict. If you choose two or more conditions, they will apply together: memoQ filters those entries that match all the conditions.
To add a condition to the filter, check its check box. Choose a comparison operator ("equals", "is greater than", "is less than", "not equals"). Type or choose a value on the right.
memoQ can read through the TMX file to set up the values in the drop-down boxes. This way you don't have to guess at the names in the conditions. But this may take time, so memoQ doesn't do it automatically. To get the possible values from the TMX file: Click Populate fields with values from the TMX file.
You can set conditions for the following fields:
- Date: This is the date and time when the entry was last modified. From the drop-down box, choose greater than or less than. On the right, choose a date and a time.
- Changed by: This is the name of the user who made the last change to the entry. From the drop-down box, choose equals or not equals. On the right, type or choose a name.
- Client: This is the value of the Client field in the entry. From the drop-down box, choose equals or not equals. On the right, type or choose a name.
- Project: This is the value of the Project field in the entry. From the drop-down box, choose equals or not equals. On the right, type or choose a name.
- Domain: This is the value of the Domain field in the entry. From the drop-down box, choose equals or not equals. On the right, type or choose a name.
- Subject: This is the value of the Subject field in the entry. From the drop-down box, choose equals or not equals. On the right, type or choose a name.
If memoQ doesn't import an entry, it will still be there in the exported file: Normally, this is how memoQ processes the TMX files. If you need only the imported entries in the export, clear the Lines excluded by the filter will show up in the output file check box.
A TMX file can be multilingual. In addition, the languages in the TMX file may be different from the languages of the project.
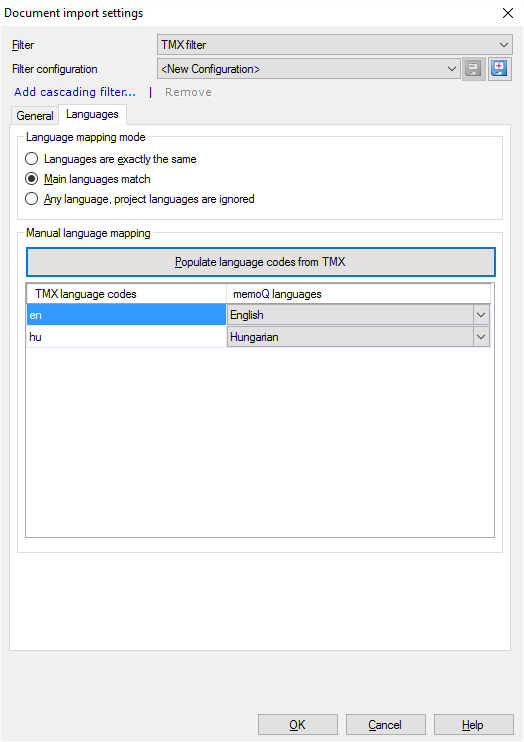
Normally, memoQ looks for the the main languages of the project in the TMX file. If they are found, memoQ imports the text that belongs to those languages. Normally, when memoQ matches the languages, it looks for the main languages only. If the sublanguages are different, the TMX file can still be imported.
- This can be a problem if the TMX file has different sublanguages of the same main language (such as US English and UK English). In this case, memoQ won't know which one to import.
- Another problem is if the TMX file doesn't have one or more of the languages of the project. For example, the project may be English into German, but the TMX file is English into Dutch, where you suspect there are misplaced German translations.

You deal with the language differences in two ways:
Control automatic language mapping:
- To make sure memoQ chooses the same sublanguage as in the project: Under Language mapping mode, click the Languages are exactly the same radio button.
- To import the first two strings from each entry, regardless of the language: Under Language mapping mode, click the Any language, project languages are ignored radio button.
Tell memoQ exactly which languages to use from the TMX file:
- Under Manual language mapping, click Populate language codes from TMX. This may take a few minutes or even longer, depending on the size of the TMX file.
- Below this button, memoQ lists the language codes it finds in the TMX file.
- For each language code, choose a language from the current memoQ project.
You can choose from all the languages memoQ supports: But if you choose a language that isn't in the project, memoQ won't import the text marked with the corresponding language code.
When you finish
To confirm the settings, and return to the Document import options window: Click OK.
To return the Document import options window, and not change the filter settings: Click Cancel.
In the Document import options window: Click OK again to start importing the documents.
Joined or split segments replace the original ones on export: If you join or split segments while editing the TMX file in memoQ, the joined or split segments get a new creation date and a new ID. The original segments will not be exported back - they are replaced with the joined or split ones.