Microsoft Excel 97–2003 (XLS, XLT)
Microsoft Excel workbooks are tricky to import because they contain much more than translatable text. Usually, only a small part of an Excel workbook is translatable.
There are many settings that help you select what to translate and what to ignore.
This window is for old-style Excel workbooks: Use it to import .xls and .xlt files.
To import multilingual tables: Use the Multilingual Excel filter instead. Use the Multilingual Excel filter, too, if the translation mustn't replace the source text but must go into another column.
How to get here
- Start importing a legacy Excel workbook (an .xls or .xlt file).
- In the Document import options window, select the Excel workbooks, and click Change filter and configuration.
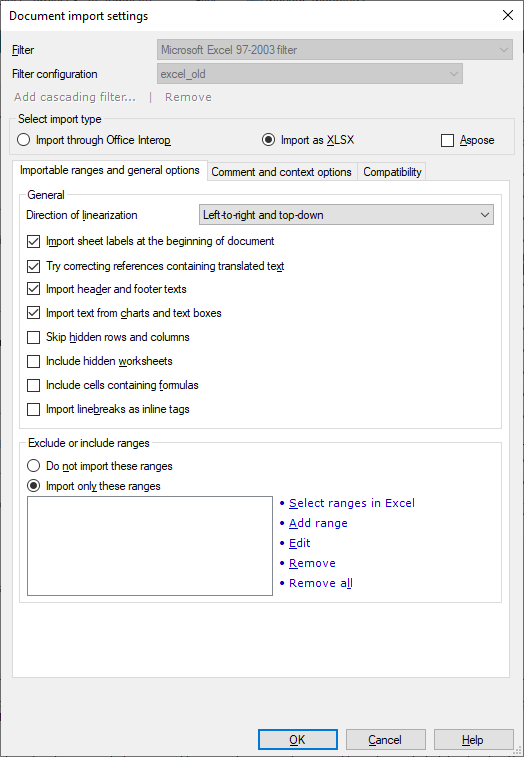
- The Document import settings window appears. From the Filter drop-down list, choose Microsoft Excel 97–2003 filter.
If you see a different window that the one below: Click the Import as XLSX radio button.

What can you do?
First, memoQ converts the workbook in the XLSX format (the one used by Excel 2007 or later).
Under Select import type: Click Import as XLSX. Do not click Import through Office interop.
This works if Excel 2007 or later is installed on your computer. memoQ calls Excel to save the workbook in the newest format.
If Excel 2007 or later isn't installed: Check the Aspose check box. In this case, memoQ converts the workbook into the newest format on its own. For that, memoQ uses a module called Aspose.
In Excel, cells are laid out in rows and columns. What's more, there are layers of worksheets, with rows and columns on each. You do not read through them in a fixed order.
But in memoQ, segments come one after another. There is an order of segments you need to follow when you translate them.
When you import an Excel workbook, memoQ needs to know how it should put the cells in order. There are four possibilities:
|
1 |
2 |
|
2 |
1 |
|
1 |
4 |
|
4 |
1 |
|
3 |
4 |
|
4 |
3 |
|
2 |
5 |
|
5 |
2 |
|
5 |
6 |
|
6 |
5 |
|
3 |
6 |
|
6 |
3 |
|
Left-to-right and top-down |
|
Right-to-left and top-down |
|
Top-down and left-to-right |
|
Top-down and right-to-left |
||||
From the Direction of linearization drop-down box, choose the option you need. Normally, memoQ lists the cells from left to right and from top to bottom. This is the same order as you would read running text in a European script.
There are certain parts of an Excel workbook that memoQ can import or ignore. Although you can include or exclude ranges of cells, some parts are easier to include or exclude by their type. Here are the options you have:
- Import sheet labels at the beginning of the document: Normally, memoQ imports the names of each worksheet in the workbook. The names will appear at the beginning of the document. To ignore sheet labels: Clear this check box.
- Try correcting references to sheet names: In the workbook, default sheet names may be used in various localized forms. Normally, memoQ tries to match the different localized forms of sheet names to each other. To leave these references as they are: Clear this check box.
- Import header and footer texts: A workbook or a worksheet may have a header and a footer. These are not cells; they are outside the table. Normally, memoQ imports these for translation. To skip them: Clear this check box.
- Import text from charts and text boxes: An Excel workbook may contain charts and text boxes. These have text that are outside the cells (titles, axes labels, etc.). Normally, memoQ imports these for translation. To skip them: Clear this check box.
- Skip hidden rows and columns: Normally, memoQ imports hidden text from a worksheet. If you don't want to translate them: Check this check box.
- Include hidden worksheets: An Excel workbook may contain entire worksheets that are hidden. Normally, memoQ doesn't import them. To import them: Check this check box.
- Include cells containing formulas: Normally, memoQ doesn't import cells that contain formulas. But sometimes the formulas may contain text that needs to be translated. To import the formulas for translation: Check this check box. Be careful with formulas: memoQ doesn't tag syntax elements, and it's easy to introduce errors in them.
A cell in Excel can contain line breaks. To insert a line break in Excel, press Alt+Enter.
Normally, memoQ starts a new segment when it finds a line break in a cell.
But in many projects, cells must stay one segment.
To keep the text in a cell together: Under General, check the Import linebreaks as inline tags check box. memoQ will include an inline tag for each line break.
You can specify ranges of cells in Excel that memoQ should import or ignore. You can list the cell ranges in the Excel style (for example, Sheet1!A1:B678).
But first, click one of these radio buttons to tell memoQ what should happen to the ranges:
- Do not import these ranges: Excludes the listed ranges from the import. Cells that fall in the ranges you list are not imported. memoQ imports all other cells.
- Import only these ranges: Imports the listed ranges only. memoQ limits the import to the cells that fall in the ranges on the list. Other cells will not be imported.
Second, list the ranges. There are several ways to do that:
- Click Select ranges in Excel: Click this to open the workbook in Excel, and display the Mark selected ranges window. You can select the range in Excel, and then add the selection to memoQ.
You need Excel for this: To do this, Microsoft Office Excel 2007 or higher must be installed on your computer. If it isn't, you need to enter the cell ranges manually, in the Excel format (for example, Sheet1!A1:B678).
To learn more: See the topic about the Mark selected ranges window.
- Click Add range: Displays the Add range window. It has one text box only. Type the reference to the range in the Excel format: sheetname!upper_left_cell:lower_right_cell (example: Sheet1!A1:B678). Click OK.
- To change a range already on the list: Select the range in the list. Click Edit. The Add range window appears. Change the range, then click OK. Click Cancel or press Esc to return to the Document import settings window, and not change the range.
- To remove ranges from the list: Select the range you want to remove, and then click Remove. To remove all ranges: Click Remove all.
To learn more: Here's a video about importing ranges from Excel.
Each segment can have a comment. You can import comments from Excel.
For each cell that is imported for translation, there can be another cell that serves as its comment. It's relatively easy to import them in memoQ that way.
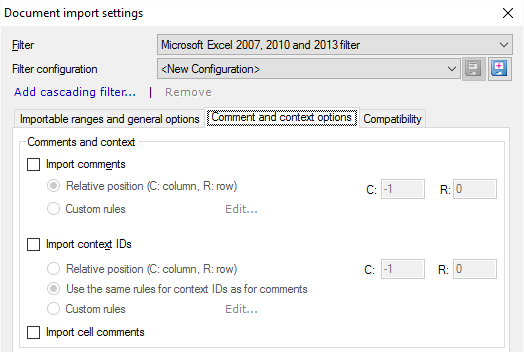
You can set this up in the Comment and context options tab of the Document import settings window:

To import other cells as the comment for a source cell:
- Check the Import comments check box.
Next, tell memoQ where the comment cells are. If they are always in the same row or in the same column: Specify how many cells away they are.
- Click the Relative position (C: column, R: row) radio button.
- In the C: box, type how many columns away the comment is.
- In the R: box, type how many rows away the comment is.
- A negative number in C: means cells to the left of the imported cells. A positive number means cells to the right. Zero means the same column.
- A negative number in R: means cells above the imported cells. A positive number means cells below the imported cells. Zero means the same row.
Examples:
- To import cells from A1 through A100, and get the comments from cells B1 through B100: Type 1 in C:, and 0 in R:.
- To import cells from A1 through Z1, and get the comments from cells A2 through Z2: Type 0 in C:, and 1 in R:.
- To translate cells in column B, and get the comments from column A: Type -1 in C:, and 0 in R:.
If you can't simply tell the relative position: Click Custom rules. Next to the radio button, click Edit. The Edit rules for ranges window appears. Set up the ranges there. To learn more: See the topic about the Edit rules for ranges window.
Excel can have comments, too: In Excel, each cell can have a comment (which is not in another cell). To import these comments as memoQ comments: Check the Import cell comments check box.
memoQ can give you context matches (101%) when the context of a segment is also there in the translation memory or in the LiveDocs corpus.
In running text, the context is the segment before and the segment after the current one.
But an Excel sheet is not running text. Most of the time, the context of the cell will be in another cell.
You can set this up in the Comment and context options tab of the Document import settings window:

To import other cells as the context for a source cell:
- Check the Import context IDs check box.
Next, tell memoQ where the comment cells are. If they are always in the same row or in the same column: Specify how many cells away they are.
- Click the Relative position (C: column, R: row) radio button.
- In the C: box, type how many columns away the context is.
- In the R: box, type how many rows away the context is.
- A negative number in C: means cells to the left of the imported cells. A positive number means cells to the right. Zero means the same column.
- A negative number in R: means cells above the imported cells. A positive number means cells below the imported cells. Zero means the same row.
Examples:
- To import cells from A1 through A100, and get the contexts from cells B1 through B100: Type 1 in C:, and 0 in R:
- To import cells from A1 through Z1, and get the contexts from cells A2 through Z2: Type 0 in C:, and 1 in R:.
- To translate cells in column B, and get the contexts from column A: Type -1 in C:, and 0 in R:.
If you can't simply tell the relative position: Click Custom rules. Next to the radio button, click Edit. The Edit rules for ranges window appears. Set up the ranges there. To learn more: See the topic about the Edit rules for ranges window.
After you translate an old-style Excel document, memoQ converts it back to the old format when the translation is exported.
Because the original document is from an old Excel version, there will be no extensions that work in Excel 2007 or later only.
You can safely ignore the settings on the Compatibility tab.

When you finish
To confirm the settings, and return to the Document import options window: Click OK.
To return the Document import options window, and not change the filter settings: Click Cancel.
If this is a cascading filter, you can change the settings of another filter in the chain: Click the name of the filter at the top of the window.
In the Document import options window: Click OK again to start importing the documents.