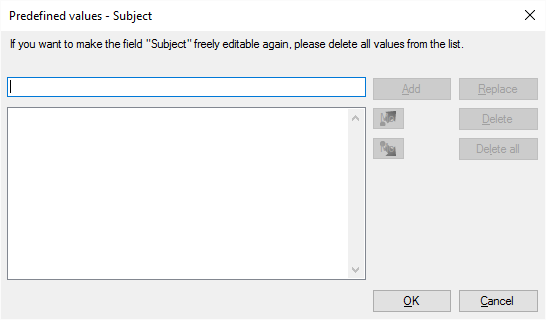
Edit template - Predefined values (for metadata fields)
In this window, you can set up a choice of several values for a descriptive (metadata) field of a project. Later, when you create a project from the template, you can choose a value from a dropdown rather than typing it.
A project has four metadata fields that help you classify your jobs. These are the following:
- Client: The name of the client who orders the job;
- Project: The name of the larger project that the job belongs to;
- Subject: The subject field of the job, such as Pharmaceutical or Legal
- Domain: A classification field where you can state the style, the genre, or the target audience of the job. Or, you can use it as a second subject field.
Normally, these fields are free text in memoQ. For every project, you type them.
Avoid typing metadata values if you can: You might type them differently every time. This makes classification very difficult. For example, 'Pharma' or 'Pharmaceutical' might mean the same subject field, but memoQ can't connect them.
Project templates to the rescue: In project templates, you can prescribe metadata fields. More precisely, you have three choices:
- Don't type anything in the template. memoQ will ask you to type a value when you create a project from the template. This is the traditional behavior.
- Type exactly one value in the template: For example, you would do this in the Client field when you create a template specifically for that client. When you create a project from the template, this field will be filled in, and you won't be able to change it.
- Offer a choice from several values: In the template, you can list some values that are possible for a field. When you create a project from the template, you will have a drop-down menu of these values. Then you can choose from them, but you can't type a new value.
In the Predefined values window, you can list the values that the user can choose from later.
This template only: The list of predefined values belongs to one template only. These won't be available in other project templates. But memoQ always offers the choice when you create a project from this project template.
Can't type in the field if there are predefined values: You can't type a value freely in the project template or in the project itself when there are predefined values for a metadata field. Remove the list if you need to type a value again.
Changes affect new projects only: If you remove a value that was used in a project earlier, the previous project won't change: the value stays there. But it will not be there for new projects you create from the project template.
How to get here
- Open the Resource Console.
- On the left, click Project templates.
-
Select the template you want to edit.
To set up a template for online projects or resources: Use an online template for this. Choose your memoQ server at the top of Resource console. Click the Select
 button.
- Under the list, click Edit.
- Next to a metadata field (Client, Project, Subject, or Domain), click the Predefined values
 icon. The Predefined values window appears, for that metadata field.

What can you do?
- Type a value in the text box at the top.
- Click Add.
- Repeat this until all predefined values are on the list.
Selected metadata field only: These values are there for one metadata field only. This is the one where you clicked the Predefined values ![]() icon. The other metadata fields can have an entirely different list, or no list at all.
icon. The other metadata fields can have an entirely different list, or no list at all.
- To correct a value: Click the value on the list. Edit it in the text box at the top. Click Replace.
- To remove a value: Click the value on the list. Click Delete.
- To change the order of values: You can move one value at a time. Click the value on the list. Click the Up
 icon to move it upwards. Click the Down
  icon to move it downwards.
You need to delete all the values on the list. Click Delete All.
The list becomes empty. After you click OK, you can type text in the metadata field again.
When you finish
To save the list and return to the Edit project template window: Click OK.
To discard - lose - the list, and return to the Edit project template window: Click Cancel.