Regex text filter - Structured text files
With the Regex text filter, memoQ can import structured text files, and extract translatable content from them. memoQ can also extract context and comments for the imported content.
Here is a simple example of a structured text file:
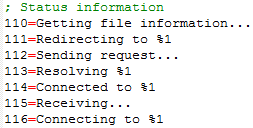
You can mainly control the regex text filter through regular expressions.
The Regex text filter processes structured text files in three steps:
- It breaks up the files into paragraphs.
- It identifies and extracts paragraphs that contain translatable text.
- From the extracted paragraphs, it extracts translatable text, and optionally context and comments.
The options of the filter follow these three steps.
- You need to specify how paragraphs are separated.
- You describe what an imported paragraph looks like.
- You list those parts that really need to be translated.
This procedure requires writing up regular expressions, and this is something you can do through trial and error. While you are doing this, memoQ gives you a preview tab that shows what will be imported and how.
You need regular expressions: This is how you can describe patterns that paragraphs or their parts must match. memoQ uses regular expressions after the Microsoft .NET fashion. For a general description of .NET regular expressions, see the Microsoft documentation. For examples of using regular expressions in memoQ, see this help topic.
How to get here
- Start importing a structured text file.
- In the Document import options window, select the text files, and click Change filter and configuration.
- The Document import settings window appears. From the Filter drop-down list, choose Regex text filter.
You may receive settings: If you have received pre-defined regular expression settings from another user, or there is a filter configuration available on a memoQ server in your reach, you can select the filter configuration from the Filter configuration dropdown. In this case, it may be unnecessary to change the settings in the dialog.
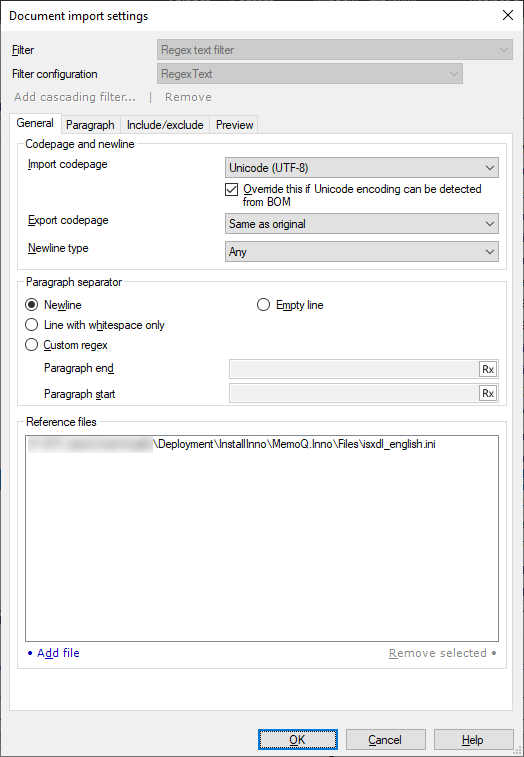
What can you do?
In the General tab, you can set the import and export code page for the document. You can also specify how paragraphs are separated, and you can add reference files that memoQ uses to show the preview in the Preview tab.
In the Codepage and newline section, you can set the import and export codepage:
- Import codepage dropdown: Select the encoding of the source file. Normally, memoQ uses Unicode (UTF-8), but the actual files may be different. You may need to look at the file in a plain-text editor. But if the file begins with a byte order mark (BOM), memoQ uses that to detect the encoding. If you want to set the encoding yourself, clear the Override this if Unicode encoding can be detected from BOM check box.
- Export codepage dropdown: Choose the encoding memoQ uses when it exports the translated document. Normally, memoQ uses the same encoding as the source document. But you may need to choose a different encoding. You need this if, for example, the source encoding is not Unicode, and you are translating from French into Japanese.
- Newline type dropdown: Choose what sort of newline memoQ should look for in the original file. Normally, memoQ detects all sorts of newlines (Windows, Linux/Unix, and Mac are using different ones). You may need to choose a specific type - if some character sequences that look like a newline must not be taken for one.
Text editors may not be able to detect the encoding of the exported file: Note down the export encoding because text editors may open the exported file incorrectly at first. This happens because the encoding of a plain-text file cannot be easily detected. You can set the encoding manually in most text editors - if you remember it.
In the Paragraph separator section, you can tell memoQ how to separate paragraphs:
- Newline radio button: Click this if one line in the file is the same as a paragraph. In most cases, structured text files are like this.
- Empty line radio button: In some structured text file formats (such as LaTEX), paragraphs span several lines, and end in an empty line. Click this if you are dealing with a file that has multi-line paragraphs.
- Line with whitespace only radio button: Click this if paragraphs can consist of multiple lines, and end in an empty line, but the empty line may contain whitespace characters (spaces, tabs).
-
Custom regex radio button: Click this if paragraphs are not separated by newline characters or empty lines. If the paragraphs are complicated, you can write up a regular expression that marks the end and the start of a paragraph.
If you click this radio button, you also need to write regular expressions in the Paragraph end and the Paragraph start text boxes. The regular expressions should specifically match the end and the start of the paragraph. The Paragraph end text box must not contain patterns that overlap the start of the next paragraph, and the Paragraph start text box must not contain patterns that overlap with the previous paragraph.
If you need assistance, open the Regex Assistant: Click the icon on the right, and create a regex, or choose one from the regex library. Then click the Insert regex button. memoQ inserts your regex into the text boxes as needed.
In the Reference files section, you can add files that memoQ displays in the Preview tab. memoQ automatically adds the files you're importing.
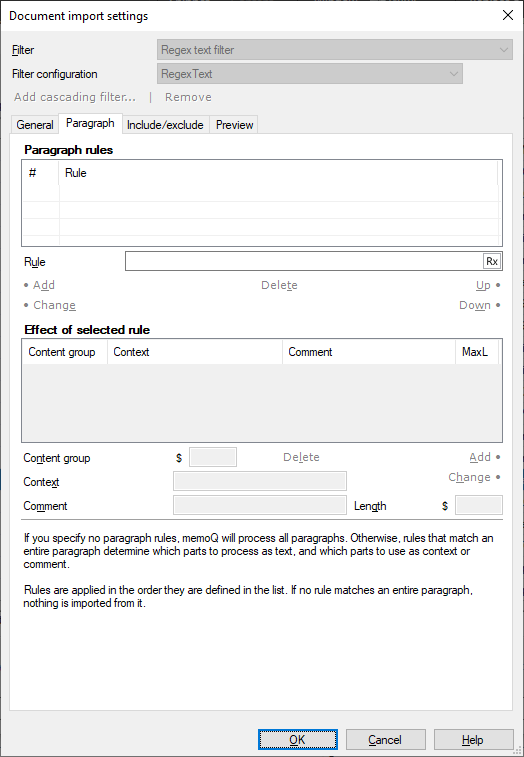
On the Paragraph tab, you can specify regular expression rules. Each rule should match an entire paragraph (that is, you need to write regular expressions that cover an entire paragraph). If a rule matches a paragraph, memoQ will import text from it. In the Paragraph tab, you can also specify what part of the paragraph is imported.
If you need assistance, open the Regex Assistant: Click the icon on the right, and create a regex, or choose one from the regex library. Then click the Insert regex button. memoQ inserts your regex into the text boxes as needed.
If you do not specify rules on this tab, memoQ will import all paragraphs for translation.
Use the Paragraph rules table to list the regular expressions that match entire paragraphs:
-
To add a new regular expression: Write it in the Rule text box. Click Add.
Special regex needed: The regex in the Rule text box needs to have at least one capture group (that is, something in parentheses), and must not start with a ^ (caret) and end with a $ (dollar sign).
Example: For the text at the top of this page, the regular expression is (\d+)=(.+). This tells memoQ to pick up paragraphs that start with a sequence of numbers, followed by an equal sign (=), and then any characters until the end of the paragraph.
-
To change an existing regular expression in the list: Click the rule in the table. Make changes in the Rule text box. Click Change.
-
To remove a regular expression from the table: Click the rule. Click Delete.
-
To move a rule up and down in the list: Select it, and click Up or Down. This is useful if two patterns match the same paragraph, but the content groups are different. In this case, the order of processing important.
Use content groups to mark content, context, and comments to import: In the regular expressions, use parentheses ( ) to mark content groups. Then you can refer to a content groups by its number. The first content group from left to right is $1; the second is $2; and so on.
For each rule, you can determine what should happen to the different parts of the paragraph. Click a rule in the upper table. Then use the settings in the Effect of selected rule section to tell which content group is the content, which one is the context, and so on. Specify content groups from the selected rule.
- To add a content group to the list: Type its number in the Content group text box. Click Add. memoQ will import this content group as translatable text. If you need context and comments for the content group, you can write that information in the Context and Comment boxes (before clicking Add). It can be constant text. But you can also use content group references ($0, $1 etc.), too.
For the example above, Content group would be 2 because the text to translate is in the second content group. For Context, you need $1 - if you want to use the numbers at the beginning of the lines as context.
- To change the settings for a content group: Click the content group in the list. Make changes in the Content group, Context, and Comment text boxes. Click Change.
- To remove a content group from the list: Click it in the list. Click Delete.
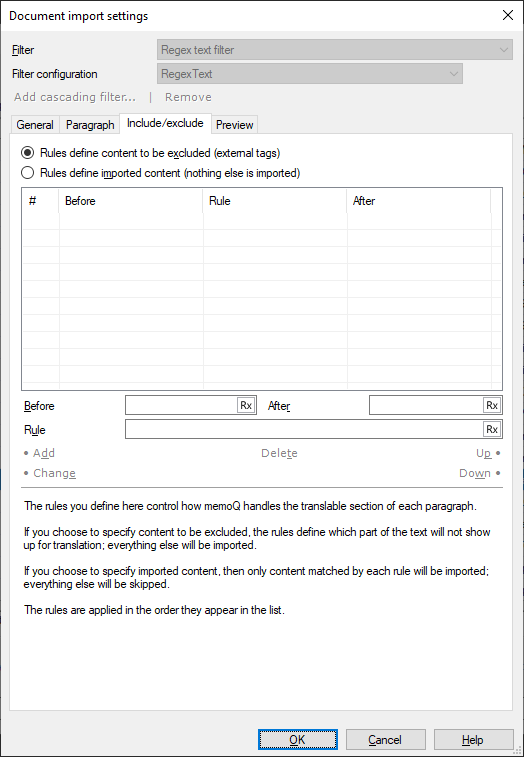
In the Include/Exclude tab, you can fine-tune the import. On the Paragraph tab, you have already specified what parts of what paragraphs are imported. The Include/Exclude settings work on the text that is imported from the paragraphs.
From the text that was allowed through by the Paragraph settings, you can specify what needs translation and what does not.
First, use the radio buttons to say whether the rules below describe content that needs to be imported; or, the rules actually exclude parts of the text.
- Click Rules define content to be excluded (external tags) if you are writing patterns for parts that should not appear in the imported text.
- Click Rules define imported content (nothing else is imported) if you are writing patterns for parts that should be imported.
In a rule, you can write regular expressions for the content itself, and also for content that occurs before and after the part that is to be included or excluded.
If you need assistance, open the Regex Assistant: Click the icon on the right, and create a regex, or choose one from the regex library. Then click the Insert regex button. memoQ inserts your regex into the text boxes as needed.
- To add a rule: Type a regular expression in the Rule box. Optionally, in the Before or After text boxes, write further regular expressions for characters that occur before or after the content. Click Add.
- To modify a rule: Click the rule in the list. Make changes in the Rule, Before, and After text boxes. Click Add.
- To delete a rule: Click the rule in the list. Click Delete.
- To move a rule up or down in the list: Click the rule, and click Up or Down. This is useful if a rule matches the same text, but in an overlapping manner (say, one covers more characters than the other). In this case, the order of processing is important.
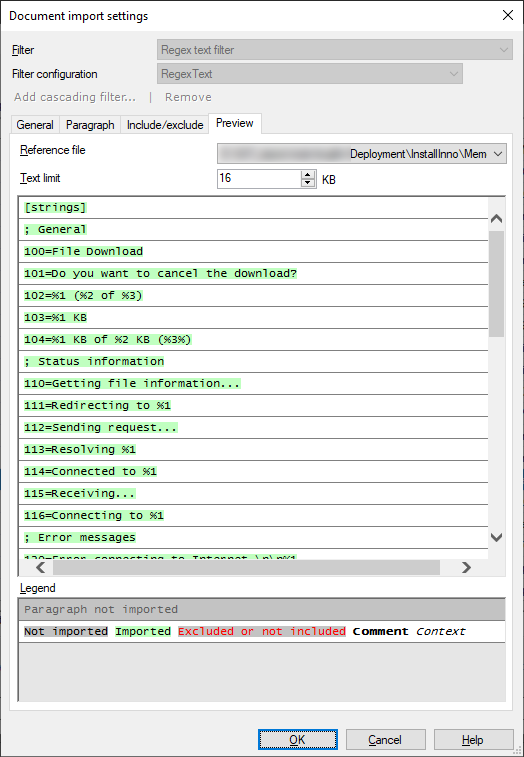
The Preview tab shows text from one of the reference files you specified on the General tab. More specifically, the preview shows the text that will be imported from the document. Use the preview to check the following:
- Is the character encoding correct? (Do all characters display correctly?)
- Are the paragraphs separated correctly? (Each row between two horizontal bars corresponds to a paragraph.)
- Is imported text highlighted correctly?
If your answer to all three questions is yes, you can click OK to import the file.
Important: The screenshot below shows a real-life example of importing an INI file. memoQ does not display this preview by default.
From the Reference file dropdown, choose which reference file to display. Normally, memoQ shows the first file that you selected for importing.
In the Text limit number box, choose how much text is shown. Normally, memoQ shows the first 16 kilobytes of the file. This is roughly 4,000 to 16,000 characters, depending on the encoding of the file.
The Preview tab displays the paragraphs, separated by horizontal bars. Colors show what is imported and what is not:
- If a piece of text appears with grey background (in black or red letters), it is not imported. If the letters are black, the content skipped because of the rules on the Paragraph tab. If the text is red, the text was excluded because of the rules on the Include/Exclude tab.
- If a piece of text appears with green background, it is imported.
- Text with white background is either a comment (bold letters) or context (italic letters) for the paragraph.
When you finish
To confirm the settings, and return to the Document import options window: Click OK.
To return the Document import options window, and not change the filter settings: Click Cancel.
If this is a cascading filter, you can change the settings of another filter in the chain: Click the name of the filter at the top of the window.
In the Document import options window: Click OK again to start importing the documents.