Confirm and update rows
With Confirm and update rows, you can copy segments (with translations) to a translation memory.
Use it when you need to update a master translation memory with reviewed translations.
When you receive a bilingual document from a reviewer, you need to run Confirm and update rows to save the contents in a translation memory. You create a project; add the translation memory you want to update; import the bilingual document or documents; and then call on Confirm and update rows.
You need a working or a master translation memory in your project before you can do this.
How to get here
Open a project. You can also open a document for translation. On the Preparation ribbon, choose Confirm and Update.
Or: Open a project. Open a document if needed. Press Ctrl+Shift+U.

What can you do?
-
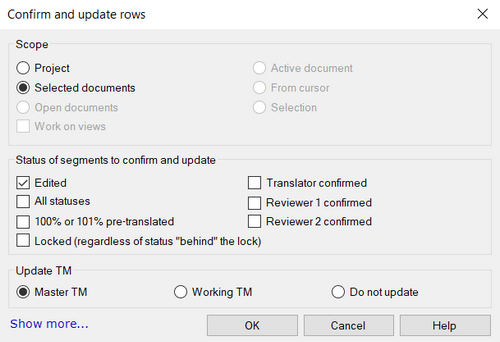
Choose a scope. Then filter the segments along their statuses, if needed.
A scope tells memoQ which documents to look at. You have the following options - choose one radio button:
- Project: memoQ confirms all segments in all documents of the current project.
- Active document: memoQ confirms all segments in the active document. The active document is the one you are looking at in the translation editor. You can choose this only if you are working on a document in the translation editor.
- Selected documents: memoQ confirms all segments in the selected documents. You can choose this only if you select several documents in Translations under Project home. It doesn't work when the translation editor is in the front.
- From cursor: memoQ confirms segments below the current position in the active document. The active document is the one you are looking at in the translation editor. You can choose this only if you are working on a document in the translation editor.
- Open documents: memoQ confirms all segments in every document that is open in a translation editor tab.
- Selection: memoQ confirms the selected segments in the active document. The active document is the one you are looking at in the translation editor. You can choose this only if you are working on a document in the translation editor.
- Work on views check box: Check this to make memoQ confirm segments in the views in the current project. You can choose this only if there is at least one view in the project.
-
Then choose the status of segments that memoQ will confirm and save to the translation memory. Check or clear one or more of these check boxes:
- Edited: Check this to confirm Edited segments.
- All statuses: Check this to confirm every segment, regardless of the status. This overrides all the other check boxes, except Locked. If you check the All statuses check box:
- If Locked is turned on, memoQ saves all segments into the TM.
- If Locked is turned off, memoQ saves only the unlocked segments into the TM.
- No matter if Locked is turned on or off, only the status of unlocked segments will change, based on the Set segment status to setting. memoQ does not make changes to locked segments - they are locked exactly to not be changed.
- 100% or 101% pre-translated: Check this to confirm segments that were pre-translated, and received an exact (100%) match or a context (101%) match originally.
- Translator confirmed: Check this to confirm segments that are in the Translator confirmed status.
- Reviewer 1 confirmed: Check this to confirm segments that are in the Reviewer 1 confirmed status.
- Reviewer 2 confirmed: Check this to confirm segments that are in the Reviewer 2 confirmed status.
- Locked (regardless of status "behind" the lock): Check this to save locked segments into the TM, no matter what their status is.
You can tell memoQ which TM you want to update with the confirmed segments. Select one of the following:
- Master TM: This is the default. For projects and templates created with memoQ versions earlier than 8.2, this option is selected.
- Working TM: This is useful when you want to update a separate TM with translations received from others.
- Working/Master TM: If there is only one TM for the project, or you chose the same TM as Master and Working, the two options above are joined.
- Do not update: No TM will be updated. Select this if you do not want the translations to be added to any TM.
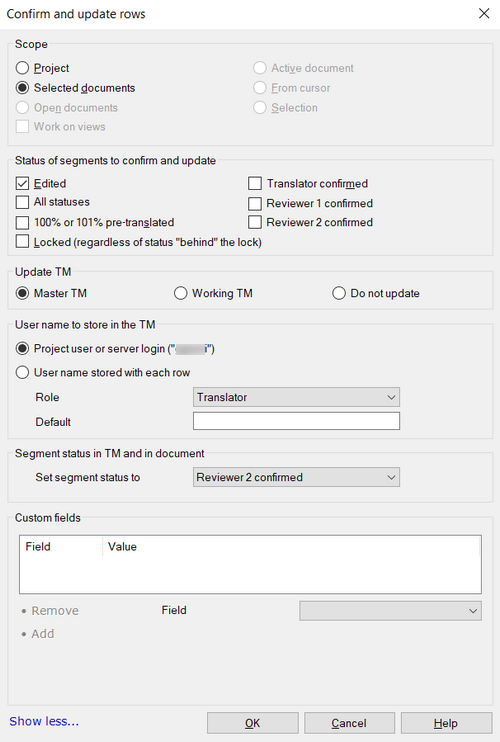
When a segment is saved to a translation memory, it also notes the user who made the change. There is a default user name. In a local project, it's your user name in Windows. In an online project, it's your user name on the memoQ server.
You can choose another name if necessary, and you can save the role (Translator, Reviewer 1, Reviewer 2) to the translation memory, if the project's TM settings allow it.
There are more details to save, too.
- To save these details, click Show more. See the lower half of the Confirm and update rows window.

-
To change the user name: Click the User name stored with each row radio button. Type the user name in the Default text box.
-
There are three types of confirmation (Translator confirmed, Reviewer 1 confirmed, and Reviewer 2 confirmed). Normally, memoQ confirms the segment as Translator confirmed. To use a 'stronger' confirmation, choose it from the Set segment status to dropdown.
To save a user role in the TM: The value you choose from the Set segment status to defines the role (Translator, Reviewer 1, or Reviewer 2) that memoQ saves in the segment's metadata. These appear at the bottom of the Translation results pane:

Role is not always saved: In the project, use a TM settings resource where you allow memoQ to save user roles to the translation memory. Otherwise, the role in the TM will be None for every new segment.
- Set up custom fields if necessary. In the properties of a translation memory, you can add more fields than memoQ offers. These are custom fields. If your translation memory contains custom fields, you can set them up for the new segments in the Custom fields section. Choose a field in the Field dropdown. Set a value in the boxes that appear below that. Click Add. To remove a value, select it, and click Remove.
When you finish
Click OK to perform the confirm and update operation. Click Cancel to close the dialog box without making changes to your documents.
Click Show more to view the User name and the Custom fields section. In the expanded view, click Show less to collapse the Confirm and update rows dialog, and show the first two sections only.