Add new CMS connection
memoQ server can receive translation jobs directly from content management systems (CMS) such as WordPress. Before a CMS system (such as a WordPress web site) can send translation jobs, you need to set up a connection for it in Server Administrator.
A CMS connection is a permission for a specific CMS system to sent translation jobs to memoQ server. Most of the time, a CMS system is a web server or a web site.
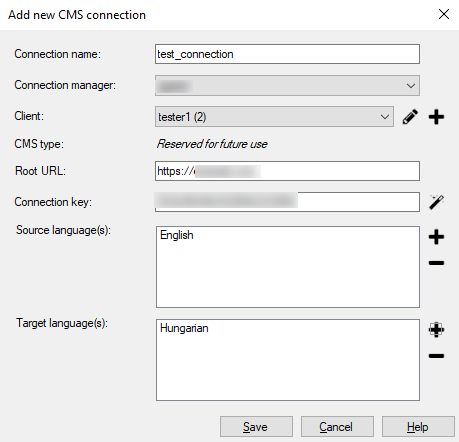
In this window, you can type or choose the details of a new CMS connection.
Before you set up a connection: Turn on the CMS API in the memoQ server deployment tool. To learn more: See the the documentation about setting up the CMS API.
How to get here
- Under Category, click CMS connections. The CMS connections pane appears.
- At the top of the CMS connections pane, click Add. The Add new CMS connection window opens.

At the very top of the memoQ window - in the Quick Access toolbar -, click the Server Administrator (cogwheel in a cloud)
 ![]() icon. The Server Administrator window opens, with the Connection pane.
icon. The Server Administrator window opens, with the Connection pane.
Or: On the Project ribbon, click Server Administrator.
Type or choose the address of the memoQ server, and click the Select button.
You may need to log in to the memoQ server: If you have not used the server before, the Log in to server window opens. Type your user name and password for that server, and click OK.
What can you do?
At the top of the window, there is a list of CMS connections. For each CMS system, there is a connection. Most of the time, a CMS system is a web server or a web site.
Before you add a CMS connection, you need to know the following:
- The name of the connection. Choose a name that refers to the CMS system you are allowing to connect.
- Details of the client who owns the CMS site. This includes the name of the client, a numeric identifier, and the e-mail address of the contact person of the client.
- The root URL (web site address) of the content management system. You can get this from the owner of the CMS site.
- A connection key. The CMS site will need to use this key when it connects to memoQ server. You can generate a new key when you add the connection.
- A connection manager: The connection manager is a user on memoQ server who will manage the jobs sent by the CMS site. This user must be member of the Project managers or the Administrators group.
To fill in the details in the Add new CMS connection window:
- In the Connection name box, type a name for the connection. The name should remind of the CMS site that sends the translation jobs.
- In the Connection manager drop-down box, choose a project manager who will be in charge of the jobs sent by the CMS site. The drop-down box will list the members of the Project managers and the Administrators group.
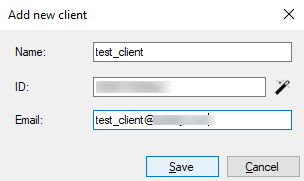
- In the Client drop-down box, choose the client. The client is the owner of the CMS site that sends the translation jobs. You can also add a new client: Next to the drop-down box, click the plus sign. The Add new client window opens. Fill in the name, the ID, and the e-mail address. The ID must be unique. To make sure the new ID is unique, click the magic wand
 icon next to the ID box. When you finish, click Save.
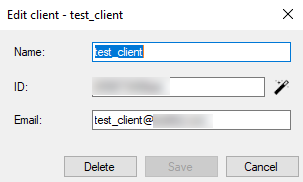
- To change the details of the current client: Next to the Client name (ID) drop-down box, click the pencil
 icon. The Edit client window opens. Change the details in all three fields, and click Save.
- In the Root URL box, type or paste the web address of the CMS site. You can get this information from the owner of the CMS site.
- Next to the Connection key box, click the magic wand
 icon. This will create a new connection key. The CMS site will need to use this key when it connects to memoQ server.
A connection also defines the languages of the translation jobs. memoQ server can accept a translation job if the source language is one of the source languages listed with the connection, and every target language is listed among the accepted target languages.
- To add a new source language: Next to the Source language(s) list, click the plus + sign. The Select language window opens. Choose the source language, and click OK.
- To remove a source language: In the Source language(s) list, select the language, and click the minus - sign. Make sure at least one source language remains on the list.
- To add a new target language: Next to the Target language(s) list, click the plus + sign. The Select language window opens. Choose the target language, and click OK.
- To remove a source language: In the Target language(s) list, select the language, and click the minus - sign. Make sure at least one target language remains on the list.
When you finish
To save the details: Click Save.
If you do not want to make changes after all: Click Cancel.
The Server Administrator will return, with the CMS connections pane open.
After you set up a new connection, you need to configure the CMS system to use it. To learn more, see the When you finish section in the documentation for the CMS Connections pane.