Table RTF export settings
When there's a change in a project, memoQ can automatically export documents to table RTF files that can be opened and edited in Word. This works in projects that you create from project templates.
For example, you can set up a project template to export a new document into table RTF automatically after the translator delivers their work. You may need this if your reviewer doesn't use a translation tool, and needs to work in Microsoft Word or a similar word processor. Later, memoQ can update the project from the reviewed RTF document. After you set this up in the template, memoQ will do this in all projects you create from that project template.
To learn more: See the topic about exporting bilingual documents manually.
How to get here
- Open Resource console. Choose Project templates.
To set up the template for online projects: Use an online template for this. Choose your memoQ server at the top of Resource console. Click Select.
- Select the project template that you want to set up with automated actions that use custom scripts. Right-click the selection, and click Edit.
- In the Edit project template window, choose Automated actions. Click the Project automation tab if you don't see it at first.
- Under Available triggers, click an event when you want memoQ to export the table RTF files. For example, if you want to run this after a document is imported, click After document import.
- Next to Actions added to the selected trigger, click the + sign. The Select actions you want to add to the trigger window appears.
- Click Export to table RTF. The Table RTF export settings window appears. This action saves the table RTF file on the local computer.
To set up the template for online projects: Choose Export table RTF on server instead. This saves the table RTF file on the server, in the project file store.
If you can't add this action because it's already there: Under Actions added to the selected trigger, click Export to table RTF or Export table RTF on server. Next to the list, click the Settings ![]() button. The Table RTF export settings window appears.
button. The Table RTF export settings window appears.
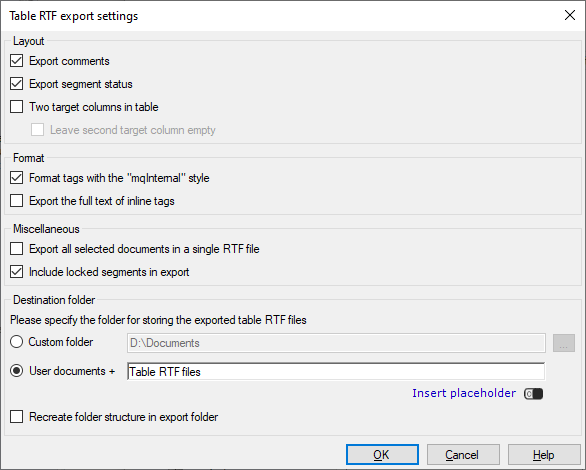
The window looks like this if you're setting up the template for local projects (you chose the Export to table RTF action):

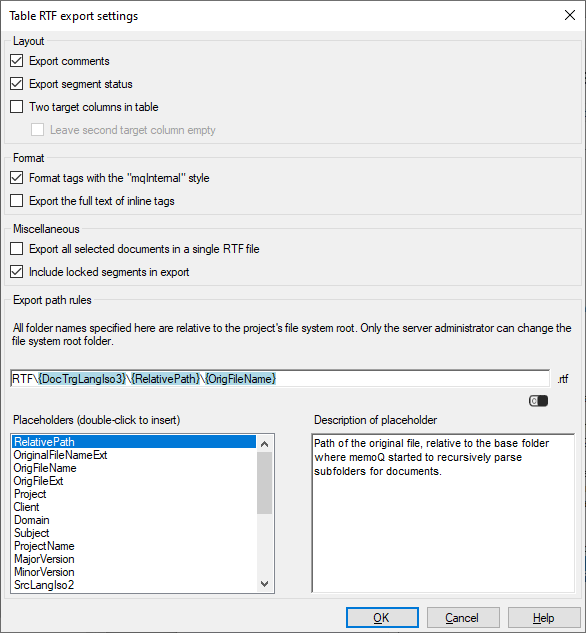
The window looks like this if you're setting up the template for online projects (you chose the Export table RTF on server action):

What can you do?
memoQ can save a Rich Text (RTF) file that contains the bilingual document in a table. This is called the table RTF format.
You can send the exported file to someone who doesn't have a translation tool. They edit it in Word, and send the edited file back to you. You can import this file into the same project in memoQ: memoQ updates the document in the project.
To save a table RTF file:
- Click the Table RTF radio button. If you check the Open exported bilingual file in Word check box, memoQ shows you the document in Word immediately after it is saved. Click Next.
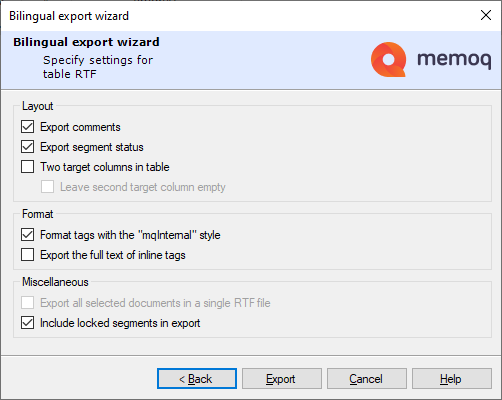
- The second page of the wizard appears. In this page, you can fine-tune the contents, the layout, and the format of the exported bilingual file.

-
Export comments: Check this to create an extra column in the table. It will contain the comments from the document. This option is checked by default.
-
Export segment status: Check this to add an extra column that shows the segment status (both the color and the match rate). This option is checked by default.
-
Two target columns in table: Check this to export the target column twice. Usually, both target columns contain the translation. In such a case, the reviewer should leave the first target column and modify only the second one.
If you want to add an empty second target column, check the Leave second target column empty check box. memoQ adds another column named Comments to your file.

- Format tags with the "mqInternal" style: In the exported file, the characters in formatting tags will be formatted with the mqInternal style. For memoQ, importing or updating documents with this style is easier, so make sure this check box stays checked.
- Export the full text of inline tags: memoQ exports every attribute in inline tags. Don't use this option, unless you absolutely need to. This makes the document extremely difficult to read in Word.
-
Export all selected documents in a single RTF file: Check this check box to export several documents, and save them in a single RTF file. Exported table has multiple headers, so that you can identify each memoQ document.

-
Include locked segments in export: Check this check box if you don't want to include locked segments in your RTF file. The reviewer won't be able to accidentally change the text that should not be changed, but it's difficult to review text if you can't see the whole of it. memoQ exports locked segments by default.
Be careful when editing your document: The RTF file contains identifiers (long numbers) for each document and segment. The document ID appears below the document title. The segment IDs appear next to the segment numbers in a font size of 1 point (unreadable). These identifiers must not be changed or deleted in Word because memoQ won't be able to update the project from the RTF file without them.
If tracking changes is turned on: Tracked changes in the document are exported to the RTF file as proper tracked changes (both from target and source text). They will appear in Microsoft Word as tracked changes. This works for every source document format, even if the final export format can't handle tracked changes.
Be careful when editing your document: The RTF file contains identifiers (long numbers) for each document and segment. The document ID appears below the document title. The segment IDs appear next to the segment numbers in a font size of 1 point (unreadable). These identifiers must not be changed or deleted in Word because memoQ won't be able to update the project from the RTF file without them.
- First, set a destination folder. Normally, the document is saved in a folder called Table RTF files, inside your personal Documents folder. If you want to save the document elsewhere, click Custom folder. Click the ellipsis
 button, and find or create your folder.
 - Next, type a file name. You can use placeholders, so that memoQ can take the name from the name of the project, the date or time when the document was exported, the project languages, and so on. memoQ fills in the placeholders with actual details in ongoing projects that are created from this project template.
- If you imported a folder structure in the project rather than single documents, and you want to have the same subfolders when the documents are exported: Check the Recreate folder structure in export folder check box.
- To insert a placeholder, click Insert placeholder, and choose from the menu.
- Project: Contents of the Project field of the project. This is not the project name.
- Client: Contents of the Client field of the project. Normally, the name of the end-user of the translation.
- Domain: Contents of the Domain field of the project. Normally, the narrower subject or the genre of the source documents.
- Subject: Contents of the Subject field of the project. Normally, the subject field of the source documents.
- Template: The name of the template that was used to create the project.
- SrcLangIso2: Two-letter code of the source language of the project.
- SrcLangIso3: Three-letter code of the source language of the project.
- TrgLangIso2: Two-letter code of the target language of the document. For a document, there can be only one. For the entire project, there can be several.
- TrgLangIso3: Three-letter code of the target language of the document.
- TrgLangListIso2: List of two-letter codes of the target languages of the project.
- TrgLangListIso3: List of three-letter codes of the target languages of the project.
- YYYY: The year when the document is exported, in four digits.
- MM: The month when the document is exported, in two digits.
- DD: The day when the document is exported, in two digits.
- HH-NN: The hour and minute when the document is exported, in two digits.
Under Export path rules, set up the folder and name of the table RTF files. You can use placeholders, so that memoQ server takes the name from the name of the project, the date or time when the document was exported, the project languages, and so on. memoQ fills in the placeholders with actual details in ongoing projects that are created from this project template.
There is a fixed main folder: memoQ server exports the document to the project's file store. This is a folder on the server. Only a system administrator can change the location of that folder.
Normally, memoQ server exports the documents in a folder called RTF. In that folder, memoQ server creates another folder by the name of the target language. If a folder structure was imported, memoQ server recreates the same subfolders under RTF and the target language. Then it saves the file with the same name as the original document.
You can change this: You can add folders to the path, or you can use different placeholders in the name. You can also use these placeholders in the names of the folders. Don't change RTF, though.
- RelativePath: Use this if a folder structure was imported in the project. This contains the subfolder within the original folder where the document is. For example, if you import a folder called D:\Documents\ToTranslate, and the ToTranslate folder contains an ENG subfolder, then the RelativePath for the documents in the ENG folder will be ENG.
- OriginalFileNameExt: The name and extension of the original document. Example: if the original document is called ToTranslate.docx, OriginalFileNameExt is ToTranslate.docx.
- OrigFileName: The name of the original document without the extension. (It's also called a file type in Windows.) Example: if the original document is called ToTranslate.docx, OrigFileName is ToTranslate.
- OrigFileExt: The extension of the name of the original document (DOCX, HTML, XML, PDF etc.). (It's also called a file type in Windows.) Example: if the original document is called ToTranslate.docx, OrigFileExt is docx.
- Project: Contents of the Project field of the project. This is not the project name.
- Client: Contents of the Client field of the project. Normally, the name of the end-user of the translation.
- Domain: Contents of the Domain field of the project. Normally, the narrower subject or the genre of the source documents.
- Subject: Contents of the Subject field of the project. Normally, the subject field of the source documents.
- ProjectName: The full name of the project. memoQ and memoQ server use this name to identify the project.
- MajorVersion: The first version number of the document. This is the version of the source text. If the source document doesn't change during a project, it stays 1.
- MinorVersion: The second version number of the document. This is the version of the translation. This changes a lot of times during a project: When a translator or a reviewer delivers the document; when it's updated from a bilingual document; before or after the document is pre-translated or X-translated; or when someone manually creates a snapshot.
- SrcLangIso2: Two-letter code of the source language of the project.
- SrcLangIso3: Three-letter code of the source language of the project.
- DocTrgLangIso2: Two-letter code of the target language of the document. For a document, there can be only one. For the entire project, there can be several.
- DocTrgLangIso3: Three-letter code of the target language of the document.
- YYYY: The year when the document is exported, in four digits.
- MM: The month when the document is exported, in two digits.
- DD: The day when the document is exported, in two digits.
- HH: The hour when the document is exported, in two digits.
- NN: The minutes when the document is exported, in two digits.
- Translator: Name of the user who got the document in the Translator role.
- Reviewer1: Name of the user who got the document in the Reviewer 1 role. If there was no Reviewer 1, this is empty.
- Reviewer2: Name of the user who got the document in the Reviewer 2 role. If there was no Reviewer 2, this is empty.
When you finish
To add the action to the project template: Click OK.
Nothing will be exported when you click OK: To export bilingual documents automatically in an ongoing project: Create a project from this project template, and start working on it. Check the output folder for exported files.
To return to the Edit project template window, and not add an action to the project template: Click Cancel.