Create new project (from template)
To do a job in memoQ, you set up a project. To begin, you open the documents you need to translate.
But a project is more than that. memoQ needs to know how to deal with the documents, and how to help you with the translation.
While you write your translation, memoQ offers you help - earlier translations - from translation memories and LiveDocs. For parts of the text, memoQ offers suggestions from term bases, auto-translation rules, automatic concordancing, and many other sources. You can even use machine translation if you need to.
memoQ needs the project so that it knows what translation memories, LiveDocs corpora, term bases, and other resources it must use to help you best.
Normally, memoQ chooses these settings automatically, based on the details of your job. But later on, you can make changes to the project, down to the tiniest detail if you need to.
When you start a project, it's created from a template. memoQ comes with two built-in templates.
- One TM and one TB per language pair: For each language pair, memoQ creates one translation memory and one term base. When you start working with a new language pair, memoQ adds a new translation memory and a new term base.
- One TM per client template: If you work for several clients, you may want to keep their translations separate. If you use this template, memoQ will start a new translation memory for each client. But when you start the second project for a client, memoQ uses the existing translation memory.
Make your own templates: If this is not good enough, you can set up and edit your own templates.
Changing the template doesn't change existing projects: You can edit project templates in memoQ. When you do that, the changes will appear in new projects you start afterwards. Existing projects won't change.
Want an online project instead? If you need to start an online project, see the topic about creating an online project.
How to get here
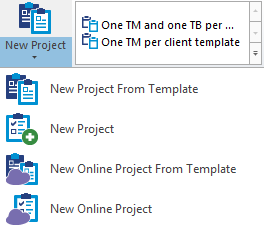
On the Project ribbon, click New Project, and from the menu, choose New Project From Template.
Start from a template: On the Project ribbon, next to the New Project icon, click the name of a template.
Start from the documents: In memoQ translator pro, drag documents to the white box that says 'Drop files here to start translating'. Then click Start translating.
Start from Windows: In Windows, open File Explorer, and find the folder where your documents are. Select the documents. Right-click the selection, and choose Translate with memoQ. memoQ opens automatically, and starts creating a new project.
What can you do?
You can get the source documents from your computer, or from a content source. By default, memoQ offers to import local documents:
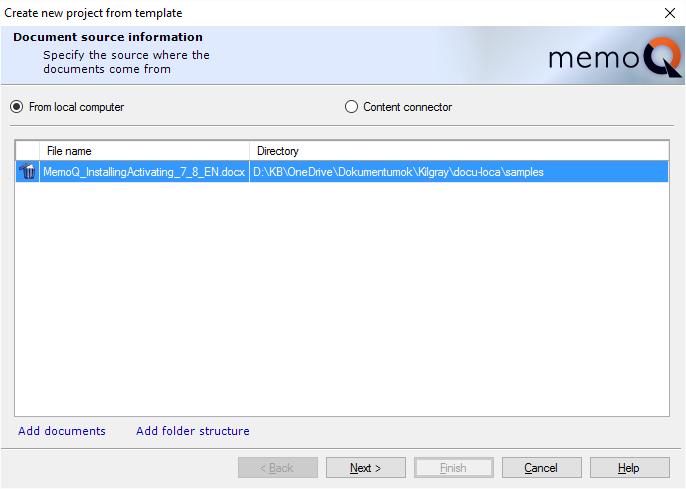
Click Add documents to pick up the documents you need to translate. If you need to work with an entire folder and its subfolders, click Add folder structure instead, then find the folder.
Once this is done, click Next.
memoQ will read the files, and detect their language: that will be the default source language of the project. memoQ will also indicate if it cannot read a document or another.
Can't customize document import here: memoQ imports documents with the settings that are in the project template. If a document was not imported correctly, you can reimport it after the project is created. When you reimport a document, you can change the import settings. On the other hand, you can customize the document import settings in a template, but you need to do it before you start creating the project.
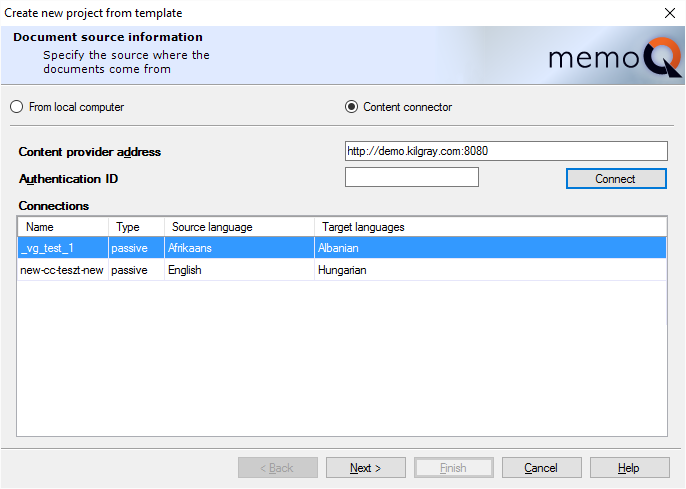
To connect your project to a content source, click the Content connector radio button first. The wizard page will change as follows:
Content connector languages are stronger than template languages: When you create a template-based project using a connection, memoQ will use the source and target languages in the connection, and not the ones in the template. When you create a content-connected project from a template, memoQ will ignore the source and target languages that were set up in the template.
Type the address of the content source in the Content provider address box, and if the content source requires an authentication ID (practically, a password), type or paste it in the Authentication ID box. Then click Connect.
memoQ will list the available content sources in the Connections list. Click the content source you wish to use, and click Next.
memoQ will fetch the documents from the content source, and detect their language.
Template filter configurations are stronger than content connector filter configurations: When you use this template to create a content-connected project, memoQ will use the filter configurations in the template, and not the ones in the content source. When you create a content-connected project from a template, memoQ will ignore the filter configurations that were set up in the content connector.
On the second page, select the project template.
Note: If you started this wizard by clicking a template name on the ribbon, the template will already be filled in.
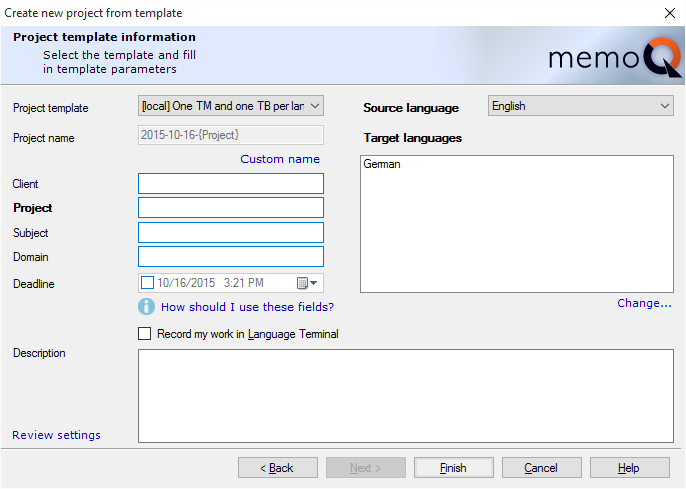
Choose a project template from the Project template drop-down list. The Project name box is automatically filled in: the name is created from the project details, using a format specified in the template. If you wish to use a different name, click the Custom name link to type another name in the Project name box.
If they are defined in the template, memoQ will also fill in the Client, Project, Subject and Domain boxes. If the template contains predefined values for one or more of these fields, you will be able to choose the details from drop-down lists. You cannot enter free text in those fields that work with drop-down lists.
The Source language box is already filled in. You can choose a different language, though.
In the Target language box, choose the target language of the project.
Multiple target languages: If you have the project manager edition of memoQ, you can choose more than one target languages. Below the Target languages list, click Change, and in the Select target languages dialog, select all the target languages you wish to work with.
In addition to the details above, you can set a deadline for the entire project, and you can also type a sentence or two in the Description box. The Description will appear among the details of the project (on the Dashboard), and if this is an online project, memoQ will display it for those users who check out the project on their computers.
If this is a local project, you can use Language Terminal to store and calculate financial information, and keep track of your progress.
To track this project in Language Terminal: Check the Record my work in Language Terminal check box.
If you are not using Language Terminal, click Finish: memoQ will create the project.
If this is a local project, you can set it up to work with Language Terminal. You will be able to calculate a price, create a quote, track your progress, deliver your documents through Language Terminal. In addition, Language Terminal can create summary reports over all projects that you recorded there.
To track your project in Language Terminal, check the Record my work in Language Terminal check box in the Create new project from template wizard. The second wizard page will change as follows:
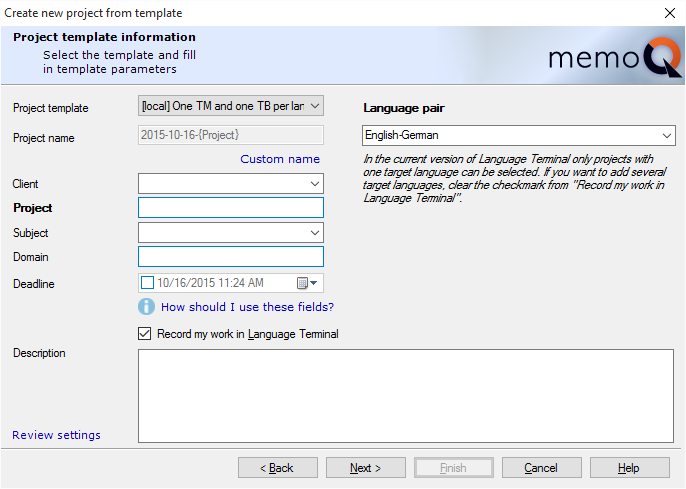
The project must have one target language only. Instead of source and target languages, you choose a language pair. The Language pair drop-down box lists the language pairs in your Language Terminal profile.
If the language pair you need is not there: Choose New language pair. The Add new language pair window opens. There you can add the language pair to your project and to your Language Terminal profile.
The Client and Subject boxes also become drop-down lists. The Client box lists the clients that you added to your Language Terminal, and the Subject box has the subject fields that you listed in your profile.
After you fill in these boxes, click Next. With Language Terminal, you have one more wizard page left:
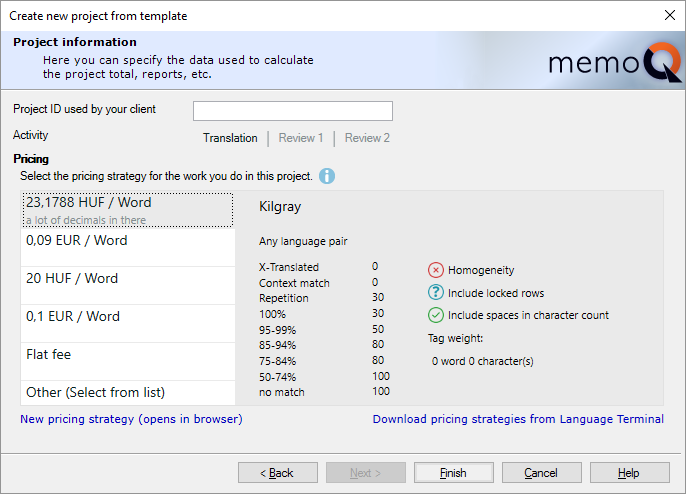
In this third wizard page, you can type a project name – this is the name your client uses. You do not have to fill it in, unless your client requires you to do so.
If you wish to track the finances of the project, and you need to send a quote to your client, you need to choose your price in this wizard page.
Language Terminal stores so-called pricing strategies for you. Pricing strategies usually specify a word rate or an hourly rate, and if there is a word rate, you can also specify fuzzy discounts that you grant to your client. A pricing strategy can also be a flat fee, where you simply type the total amount of money that you wish to receive for your work.
Fuzzy discounts not forced: The above pricing strategies are examples only; they do not come by default with memoQ or Language Terminal. memoQ and Language Terminal do not force you to grant fuzzy discounts to your clients, although the possibility is there.
In memoQ, you must choose from pricing strategies that already exist on Language Terminal. If you need to add a new pricing strategy, click the New pricing strategy link. This will open Language Terminal in your default Web browser: there you will be able to add a new pricing strategy or edit an existing one.
After you make changes to the pricing strategies in Language Terminal, return to memoQ, and click Download pricing strategies from Language Terminal.
In this wizard page, click the pricing strategy you wish to use, and then click Finish. memoQ will create the project.
Local projects only: To learn how you can track online projects in Language Terminal, see Help about creating online projects.
When you finish
To create the project: Click Finish.
Project home opens: memoQ opens the new project in Project home. You can start translating from there, or you can change the settings of the project.
To return to memoQ's Dashboard, and not create a project: Click Cancel.