Edit a term base
The Term Base Editor allows you to edit a term base directly. You can see the list of entries, filter them, and edit each entry.
You can edit individual term base entries directly without the term base editor: When you work on a translation, you have term base hits in the Translation results pane. Right-click the term base hit, and choose View/Edit. The contents of the entry appear in the Edit term base entry window.
Only one person can edit a term base at a time: You can edit an online term base (on a memoQ server) if you have sufficient permissions. But only one user can edit a term base at a time. Editing an online term base may be slow, depending on the network connection and the workload of the memoQ server.
Can't edit QTerm term bases: To edit a QTerm term base, use a web browser to open it in QTerm/memoQWeb.
Term base editor is a tab, but doesn't belong to the project: The term base editor opens in a new tab in the main memoQ window. But it doesn't close when you close the project you're working on. You need to close it separately.
How to get here
From a project:
- Open a project.
- In Project home, click Term bases. The Term bases pane appears, with the list of term bases.
- Right-click the name of the term base. In the menu, click Edit.
From the Resource console:
- Open the Resource console.
- Click Term bases. The Term bases pane appears, with the list of term bases.
- Right-click the name of the term base. In the menu, click Edit.
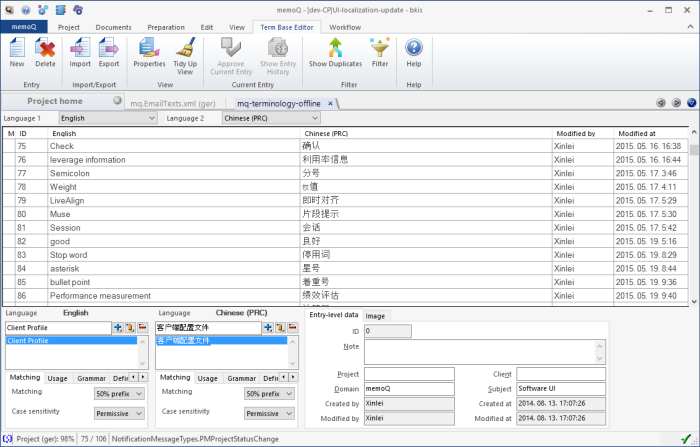
Term base editor with English and Chinese terms
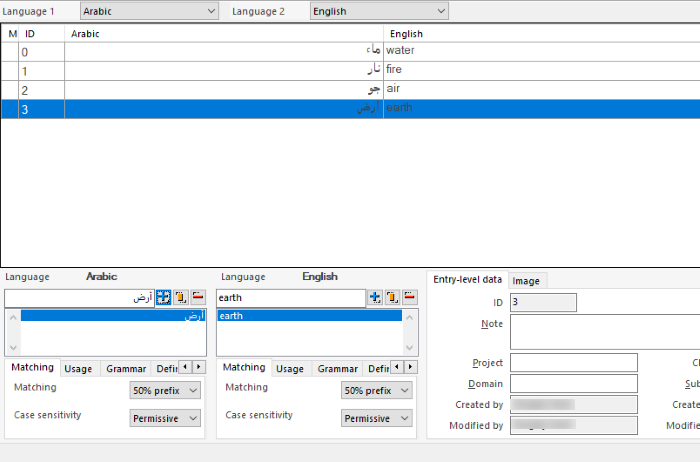
Term base editor with English and Arabic terms - right-to-left language text is aligned properly
What can you do?
memoQ lists the terms in the term base in two languages. To choose the languages, use the Language 1 and Language 2 drop-down boxes. For example, if you change the target language from Latin to German, memoQ will display the German translations of the same terms instead of the Latin ones in the list. The drop-down lists offer the languages in the term base.
You can't add new languages to the term base in the term base editor.
In the list, each row represents a term base entry. Normally, memoQ lists all entries.
- To select a term base entry: Click the row in the list.
- To move in the list: Use the arrow keys (up and down). Or, press PageDown or PageUp to move faster. You can also scroll the list.
- To select several entries: Click the first entry. Scroll to the last entry (don't press a key!). Press and hold down Shift, and click the last entry.
Or: Click the first entry. Press and hold down Shift. Press the down arrow key until you reach the last entry.
Normally, memoQ lists all the entries from a term base. You can filter the list, so that it includes some terms only, or terms that were modified after a date, or by someone in particular. You have many options to filter the list.
- In the Term base editor ribbon, click Filter.
- The Filtering and sorting window appears. Set the conditions for the filter. Click Accept.
memoQ displays a list of entries that meet the conditions. No other entries will appear.
For example, let's filter for entries where the English term contains the word 'Performance': In the Filtering and sorting window, choose English for the language. Type the word 'Performance', and click Add. Click Accept.

To forget the filter, and return to the full list:
- On the Term base editor ribbon, click Filter again.
- In the Filtering and sorting window, click No filtering/sorting.
The term base editor returns to the full list.
To edit a term in the list:
- Click the cell you want to edit.
- Press F2.
- Edit the term, and press Tab or Enter.
Enter takes you to the next entry.
To add a new term to the list:
- On the Term base editor ribbon, click New.
- A new, empty entry appears at the bottom of the list. It has an identifier of -1.
- Click the first language cell of the entry.
- Press F2. Type the term in the first language (the language selected in the Language 1 drop-down box.) Press Tab.
memoQ actually creates the entry at this point. A real identifier appears on the left.
- Press F2. Type the term in the second language (the language selected in the Language 2 drop-down box.) Press Enter.
To delete an entry or several entries:
- Click the entry. Or, select a block of entries: Click the first entry. Press and hold down Shift, and click the last entry.
- In the Term base editor ribbon, click Delete.
- memoQ asks if you really want to delete the entry. Click Yes.
memoQ replaces the entry with an empty row that has an identifier of -2 and says '<entry deleted>'.
In a term base, each entry represents an object or a concept.
- Each entry has language sections - as many as the languages in the term base.
- In each language section, there are terms - one or more.
- In addition, there may be a definition for the entry.
- For each term, there are settings as fields - matching settings for lookups, grammar information, samples etc.
- For the entry, there may be a note and a picture.
To edit every field in a term base entry:
- In the list, click the entry.
- At the bottom of the term base editor, change the fields as necessary.

On the left, the list of term variants shows all source-language and target-language term variants in the selected entry.
You can't edit other languages than the ones chosen in the Language 1 and the Language 2 drop-down boxes.
- To add a new term variant
 : Type a term in the box at the top on the source or the target side. Click this button to add the term as a new variant.
 - To edit a term variant:
 : Click a term variant on the source or the target side. Edit the term in the box at the top. Click this button to save the changes.
 - To delete a term variant
 : Click a term variant on the source or the target side. Click this button to delete the selected term variant.
When you're working on a translation, memoQ watches the text for terms. When a term is found, it appears in the Translation results pane, along with its translation.
If the entire term occurs in the source segment in the exact same form as in the term base, memoQ will always find it. But when the term in the text is slightly different, memoQ must use tricks to find it nevertheless.
To set up matching:
- Click a term variant.
- On the Matching tab below the list, choose a matching method from the Matching drop-down box.
- From the Case sensitivity drop-down box, choose what happens if the lowercase and uppercase letters are different in the text.
You can choose from these matching methods:
- Fuzzy: Use this to get hits independently of prefix or suffix matching. In German, for example, you have "Mutter" in your term base. With the Fuzzy setting, it also finds "Mütter". German also has a lot of compound words like "Festplattenspeicherplatz". When your term base contains "Festplatte" and "speicher", it will be highlighted in the source cell containing the word "Festplattenspeicherplatz".
- 50% prefix: Normally, memoQ finds a word in the text if it begins with this term variant, and more than half of it matches the term variant. For example, if the term variant is 'project', memoQ finds both 'project' and 'projects', but it will not find 'projectapplication'.
- Exact: memoQ finds the term variant only if it occurs in the text in the exact same form. Use this value to set the prefix matching sensitivity of the selected term base entry to insensitive. If the term variant is 'project', memoQ finds project, but it won't find 'projects'.
- Custom: Use this to allow wildcards in the term variants. Use the pipe (|) to mark the end of the stem of a word, or use the asterisk (*) to allow anything to come after the last character. If your term is 'Wassert|urm', memoQ finds 'Wasserturm' and 'Wassertürme' but it will not find 'Wasserschutz'. You can enter several words with pipes and asterisks. For example 'bankovn|í operac|e' matches 'bankovních operací' and 'bankovními operacemi' as well. If you enter at least one pipe or asterisk in a term variant, the Matching setting will automatically switch to Custom.
Regardless of the settings, memoQ will not find any hits where the selected term base entry is not at the beginning of the expression, that is, it isn't a prefix of the expression in the text.
To choose what happens if the lowercase and the uppercase letters are different in the term variant and the text: Choose from the Case sensitivity drop-down box. You have the following choices:
- Yes: This makes the term variant case-sensitive. The text must contain the term in the exact same form as far as lowercase and uppercase are concerned. For example, if the term is the name 'Will', it is worth setting its case sensitivity to 'Yes' to avoid false positives for 'will'.
- Permissive: This makes the term variant case-sensitive for capital letters and insensitive for lowercase letters. Normally, memoQ works with this. For example, if the term is 'memoQ', and the case-sensitivity is permissive, memoQ will match 'memoQ' and 'MEMOQ' but not 'memoq'.
- No: This makes the term variant case-insensitive. memoQ will find the term in the text, regardless of the lowercase and uppercase letters.
To do this, click a term variant on the source or the target side, and click the Usage tab below the list.

You can prevent the use of a term in the translation. If a source term is forbidden, it doesn't appear on the Translation results pane. If a target term is forbidden, it appears on the Translation results pane in black. If the you use a forbidden term in the translation, you will get a QA warning.
To forbid a term variant: Check the Forbidden term check box.
To give a usage example for a term variant: Type it in the Example box.
Forbidden terms are indicated in the term base editor:
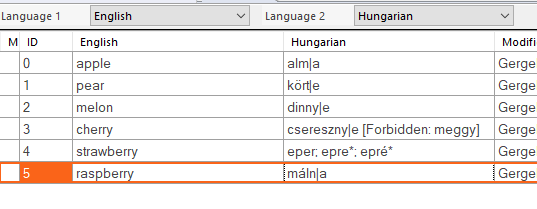
To do this, click a term variant on the source or the target side, and click the Grammar tab below the list.
You can choose a part of speech, a gender mark, and a grammatical number, all for the selected term variant:

From the Part of speech drop-down box, you can choose one of the following: ------ (unspecified or unknown part of speech), Noun, Adjective, Adverb, Verb, Other.
From the Gender drop-down box, you can choose one of the following: ------ (unspecified, unknown, or unmarked gender), Masculine, Feminine, Neuter.
From the Number drop-down box, you can choose one of the following: ------ (unspecified or unknown number), Singular, Plural. You can't choose dual or paucal for the time being.
To do this, use the Entry-level data tab to the right of the term lists, still at the bottom of the term base editor:
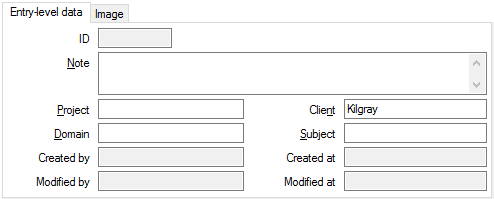
These details belong to the entire entry, not to a language or a term. You can fill in the following:
- ID: This is the unique identifier of the entry in the term base. You cannot edit this field.
- Note: Write a note here.
- Project: The larger translation project where the entry was created. You can edit this field.
- Domain: This is the domain of the term base entry. You can edit this field.
- Created by: This is the user name of the person who created the entry.
- Modified by: This is the user name of the person who created or last modified the entry. If the entry was modified, the Created by field shows a different name.
- Client: This is the client the term base entry was created for. You can edit this field.
- Subject: This is the subject of the term base. You can edit this field.
- Created at: This is the date and time when the entry was created.
- Modified at: This is the date and time when the entry was created or last modified. If the entry was modified, the Created by field shows a different date and time.
The creation and modification dates, identifiers and author names are updated automatically, but the Subject, Domain and Note can be changed.
To do this, use the Image tab to the right of the term lists, still at the bottom of the term base editor:
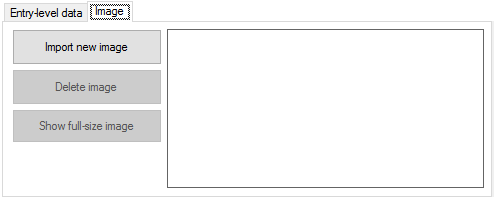
You can add an image to the selected term base entry, or remove it.
- To add a new image: Click Import new image. Then find and choose the image file. memoQ can import .jpg, .png, .gif, and .bmp images.
- To remove the image: Click Delete image.
- To view the image in full size: Click Show full-size image. From online term bases, it may take longer to download the image. When you're working on a translation, this may make you wait a bit if you click a term in the Translation results pane to look at the entry.
You can clean your term base from duplicate entries. It's easy to generate duplicates in a term base. You may end up with a lot of them if you do one of these:
- Import entries from a file;
- Add terms to the term base from the translation editor using the Quick add term command (Ctrl+Q).
To start cleaning the duplicates: On the Term Base Editor ribbon, click Show Duplicates.
The Filter for duplicates window appears. In this window, you can choose what counts as a duplicate; if lower- or uppercase, punctuation and spaces make a difference; and what should happen to duplicates when they are found.
To learn more: See the topic about the Filter for duplicates window.
After you set up all this, click OK. The term base editor displays the duplicates. This list is slightly different from the plain list of term base entries.
You can simply click Merge Selection command to merge each group into a single entry (100 groups into 100 entries, for example), or you can mark each group for a different action (keep a master entry, delete a superfluous entry, merge the entries, or do nothing), and then click Merge Selection to perform the selected action for group of duplicates. Then the action can be different for each group.

To merge group of duplicates: Place the cursor in the group, and press Ctrl+Enter.
To merge every group in the list: Press Ctrl+Alt+Enter.
In addition, you can choose from these commands, available on the Term base editor ribbon:
- Merge Current [Ctrl+Enter]: Merges the entries in the group where the cursor is.
- Merge Selection [Ctrl+Alt+Enter]: Merges entries in every group on the list, except for those where you chose a different action (mark master entry, or delete an entry). With those duplicate groups, memoQ will run the action that was marked, instead of merging. Every duplicate group will turn into an entry. (memoQ will not merge groups with each other, if there were 100 duplicate groups, they will be replaced with 100 entries.)
- Mark As Master [Ctrl+Space]: If you want to keep one entry in a duplicate group, but drop the other one(s), place the cursor in the entry you want to keep, and click this command. The Mark commands are useful if you need a different action for each duplicate group. The other entries will be dropped when the user presses Ctrl+Alt+Enter (or uses the Merge Selection command) after every entry is marked.
- Mark For Merge [Ctrl+Alt+Space]: Marks the current duplicate group for merging, but does not perform the merge. The merge will happen when the user presses Ctrl+Alt+Enter (or uses the Merge Selection command) after every entry is marked.
- Mark For Deletion [Ctrl+D]: If you want to delete an entry from a duplicate group, but keep the other one(s), place the cursor on the entry you want to delete, and click this command. The entry will be deleted when the user presses Ctrl+Alt+Enter (or uses the Merge Selection command) after every entry is marked.
- Mark To Skip [Ctrl+Shift+Space]: If you use this command on a duplicate entry, memoQ will not touch these entries when running the Merge command at the end.
When you run an individual merge, an entry merge window opens. You can preview and edit the merged entry.
When you finish, click the Remember these settings for the next merge check box at the bottom of this window. memoQ will remember these settings.
Click OK to confirm the merge and close this dialog. The merged entries are replaced with the master entry. The new merged entry and any skipped entries remain. You need to mark one entry as the master entry when you do an individual merge. To do this: Select an entry, then press Ctrl+Space to mark this entry as master.
To return to the normal term base editor: On the Term base editor ribbon, click Back To Normal Edit Mode.
Languages are merged, too: If an entry is merged into a master entry that doesn't have all the languages as the merged entry, the new merged entry will have all the languages in the group.
Each entry may be marked for a different merge action. You know the action from the background color in the list:
- master: light pastel green
- marked for merge: light peach
- marked for deletion: light gray
- marked to skip: normal white
If you are editing a moderated online term base, some entries may be marked by a red bullet in the leftmost column.
To see these together, filter for them:
- On the Term base editor ribbon, click Filter.
- The Filtering and sorting window appears. Check the Needs moderation check box.
- Click Accept.
memoQ gives you a list of all entries that need approval, and nothing else.

You can approve or delete the entry. Or you can correct the terms, and then approve this entry. To approve the entry: On the Term base editor ribbon, click Approve current entry.
To import new entries into the term base from a CSV or an Excel file: On the Term base editor ribbon, click Import. Find and choose the file to import. Then the Term base CSV import settings, or the Term base Excel import settings, or the Term base TMX import settings window appears.
To learn more about the settings: See the documentation about each of these windows (click the name of the window above).
Caution, you may get duplicates: After an import, it's recommended to run Show Duplicates to find and remove the duplicates.
To export entries to a file: On the Term base editor ribbon, click Export.
You can export the term base to a CSV or a SDL Trados MultiTerm XML file.
The Term base export settings window appears. To learn more, see the documentation for that window.
To export just some of the entries:
- On the Term base editor ribbon, click Filter. The Filtering and sorting window appears.
- Set up the conditions for the entries you want to see, and click OK.
- On the Term base editor ribbon, click Export. memoQ warns you that only the filtered entries will be exported, not the entire term base.
- Click No. The Term base export settings window appears.
- Choose the settings you need, and click Export.
When you finish
Changes are saved automatically: There is no Save or Commit button. When you make a change, it is immediately saved to the term base.
To close the term base editor: Click the ![]() button on the tab at the top. Or, press Ctrl+F4.
button on the tab at the top. Or, press Ctrl+F4.
To switch to a document tab or to Project home, leaving the term base editor open: Click any other tab. Or, press Ctrl+Tab several times until you get where you want.
