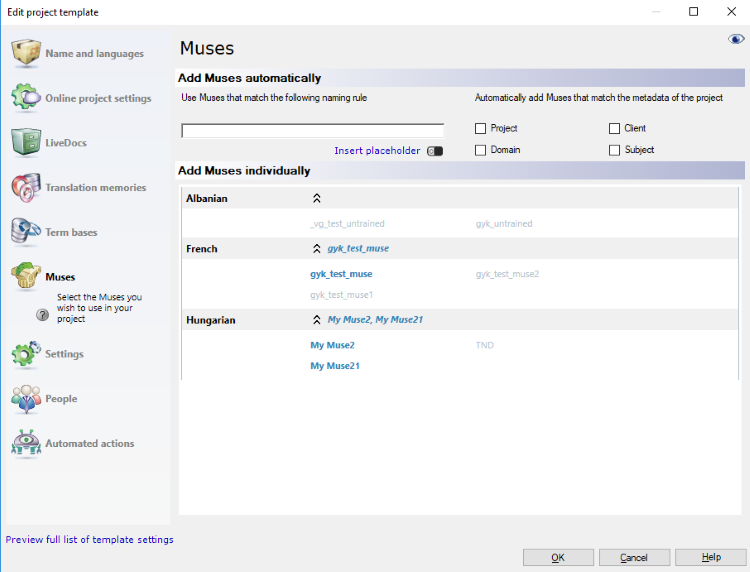
Edit template - Muses
memoQ needs Muses to suggest possible next words in predictive typing.
From a template, memoQ can automatically set up Muses for a project.
You can use Muses specifically for the client, domain, subject, and umbrella project for the job. If the template is set up with these, memoQ will use existing Muses if they are already there. If they are not: You need to create them manually. memoQ won't create a Muse automatically.
You can select Muses using a naming rule. This works if you have several Muses, and you follow a strict naming convention.
How to get here
Open the Resource Console. Choose Project templates. Select the template you want to edit. Under the list, click Edit.
On the left, click Muses. The Muses pane appears.

What can you do?
At the top right, check one or more of the Project, Client, Domain, Subject check boxes.
When memoQ creates a project from the template, it will look for Muses that have the same values in Project, Client, Domain, or Subject. memoQ adds all Muses to the project where there is a match in these fields. memoQ does not create new Muses if there is no match.
Example: In the template, the Client and Subject check boxes are checked. From the template, you create a project that has 'memoQLtd' in Client and 'memoQ' in Subject. memoQ looks for Muses that have 'memoQLtd' in Client and 'memoQ' in Subject. One is found: memoQ adds it to the project. Note that both fields must match.
Languages must match: A Muse has a source language and a target language, just like a translation memory. The Muse must match the source language and one of the target languages of the project.
From the details of the project, you can put together a name, and look for a Muse by that name.
Languages must match: A Muse has a source language and a target language, just like a translation memory. The Muse must match the source language and one of the target languages of the project.
Under Use Muses that match the following naming rule, type a rule for the name. In the rule, you can use placeholders.
Placeholders are details that you don't know in the template. They are filled in when a specific project is created. Until then, you refer to them by the name of the field.
- Project: Contents of the Project field of the project. This is not the project name, rather the name of a larger project that the job is part of.
- Client: Contents of the Client field of the project. Normally, the name of the end-user of the translation.
- Domain: Contents of the Domain field of the project. Normally, the narrower subject or the genre of the source documents.
- Subject: Contents of the Subject field of the project. Normally, the subject field of the source documents.
- Template: The name of the project template. You may want to group your projects by the template they are created from.
- SrcLangIso2: Two-letter code of the source language of the project.
- SrcLangIso3: Three-letter code of the source language of the project.
- MuseTrgLangIso2: Two-letter code of the target language of the Muse. The name of the Muse must match one of the target languages of the project.
- MuseTrgLangIso3: Three-letter code of a target language of the Muse. The name of the Muse must match one of the target languages of the project.
- YYYY: The year when the project is created, in four digits.
- MM: The month when the project is created, in two digits.
- DD: The day when the project is created, in two digits.
- HH-NN: Hour and minutes when the project is created, in two digits.
Example: The name rule is {Client}-{Subject}-{SrcLangIso2}. You create a project where Client is 'memoQLtd', Subject is 'memoQ', and the source language is German. memoQ looks for a Muse called 'memoQLtd-memoQ-DE'. If there is one, memoQ adds it to the project. If there isn't a Muse by that name, no Muse is added to the project. Muses cannot be created automatically.
Under Add muses individually, click the names of Muses you want to add to the project template. Added muses are displayed in bold in the list, and appear besides the languages, too.
When you finish
To set up other options: Click another category in the Edit project template window.
To set up translation memories: On the left, click Translation memories.
To save the project template: Click OK.
To return to the Resource console, and not change the project template: Click Cancel.