Further info about OIDC-based single sign-on
General schema of the OIDC-based user authentication
The new way of approving users’ identity is based on the OpenID Connect protocol that is supported by leading ID providers - also known as Identity and Access Management (IAM) systems. These schemas show how the user authentication flow happens in the memoQ desktop app and in memoQWeb.
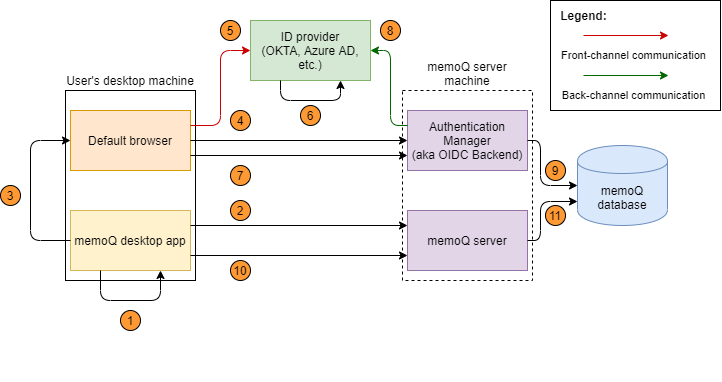
- In memoQ, the user chooses to log in with an external ID provider (Okta, Azure AD, etc.)
- The memoQ desktop app requests and gets the URL of the Authentication Manager's login page (to choose an ID provider).
- The memoQ desktop app generates a random login ID for identifying the login session. It opens the login URL (received in step 2) in the machine's default browser, and passes the hash of the generated login ID to the login page. This page is served by Authentication Manager over HTTPS.
- On the login page, the user chooses an ID provider. The login function of the Authentication Manager passes the login ID hash and the ID provider's name. As a response, it receives a redirect to the ID provider's login page, with the login ID hash and a callback path as parameters.
- The browser is redirected to the ID provider, forwarding the login ID hash and the callback path as parameters.
- The ID provider authenticates the user, and generates an auth code. Then it redirects the browser to the callback path, and passes the generated auth code.
- The browser is redirected to the callback path, and forwards the login ID hash and the auth code to the Authentication Manager as parameters.
- The Authentication Manager calls the ID provider to exchange the received auth code to an ID token. This happens via a more secure back-channel communication.
- The Authentication Manager receives and validates the received ID token which contains the user claims (the authenticated user's details), and saves it into the memoQ database, using the ID token as the record's key.
- The memoQ desktop app sends the login ID to the memoQ server, and requests a memoQ session.
- The memoQ server creates a hash from the login ID, and tries to get the ID token based on that hash. If successful, it creates a memoQ session for the ID token's authenticated user.
The login flow from memoQweb follows the same logic as the desktop:
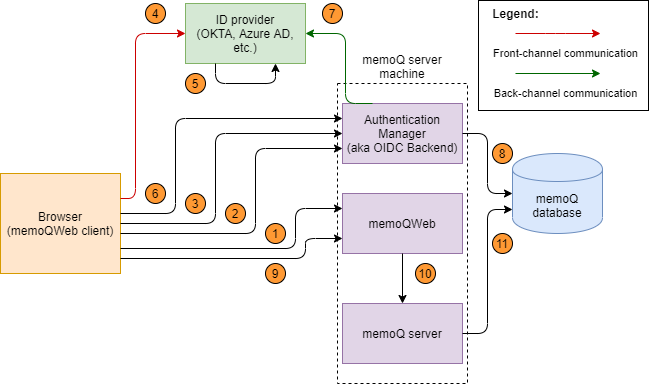
- The user opens memoQWeb (practically, the central web-based login module) to work in webTrans or webPM. The login screen shows the list of the registered ID providers below the traditional memoQ login form.
- On the login page, the user chooses an ID provider. The web client generates a random login ID for identifying the login session.
- The browser is redirected to the ID provider, forwarding the login ID hash and the callback path as parameters.
- The ID provider authenticates the user, and generates an auth code. Then it redirects the browser to the callback path, and passes the generated auth code.
- The browser is redirected to the callback path, and forwards the login ID hash and the auth code to the Authentication Manager as parameters.
- The Authentication Manager calls the ID Provider to exchange the received auth code to an ID token. This happens via a more secure back-channel communication.
- The Authentication Manager receives and validates the received ID token which contains the user claims (the authenticated user's details), and saves it into the memoQ database, using the ID token as the record's key.
- The memoQWeb front-end sends the login ID to the memoQ server, and requests a memoQ session.
- The memoQ server creates a hash from the login ID, and tries to get the ID token based on that hash. If successful, it creates a memoQ session for the ID token's authenticated user.
Identifying the user in the memoQ user database
- If the user is found in the user database, memoQ’s normal authorization flow starts, and the user gets their license and permissions (that is, they are logged in).
- If the user is not found, it means this is the first time they try to log in with these IDP credentials. Depending on whether the user has worked before on this memoQ server, the Authentication Manager will create a new user for them, or update the old one (see the details later).
Tips for test environments
There are two things that can simplify SSO setup, but should not be used in production environments. However, when you first try out this feature, you might want to get through the setup faster.
In a test environment, you can use a self-signed certificate instead of a commercial one.
- Download, unpack and run the CreateAndInstallSelfSignedCert.ps1 PowerShell script file in admin mode. This step will create a self-signed certificate, register it as trusted certificate and export it to a password protected .pfx file to the current folder.
- Open the Manage Computer Certificates application and on the Certificates - Local Computer/Personal/Certificate and Certificates - Local Computer/Trusted Root Certification Authorities/Certificate nodes you should see the newly created certificate.
- Edit the appsettings.json file, set the Kestrel.Certificates.Default.Subject property to the value used previously as <dns name for the certificate>.
On each client machine where someone will use the memoQ desktop app or memoQweb, you need to register the certificate as trusted:
- Copy the certificate file created on the server machine to the client machine.
- Double click on the file and the Certificate Import Wizard will open.
- Select Current User as store location and click Next.
- Click Next again.
- Enter the certificate file's password (the one you set when exporting the certificate), and click Next.
- Click Next again.
- Click Finish.
If you need to use the Authentication Manager on the server machine, with self-signed certificates, you also need to do this on the server machine, starting from Step 2.
In a test environment, you can use a certificate file instead of a certificate store.
Add this section to the beginning of the file %PROGRAMDATA%\MemoQ Server\Oidc Backend\appsettings.json.
"Kestrel": {
"Certificates": {
"Default": {
"Path": "<absolute-path-of-certificate-file>",
"Password": "",
},
},
},

Grant the Authentication Manager read access on this certificate:
- Open the folder that contains the PFX file.
- Right-click the certificate. In the context menu, choose Properties.
- In the <certificate> properties window, click the Security tab, then click the Edit button.
- In the Permissions for <certificate> window, click the Add button.
- In the Select users... window, enter the name of the Authentication Manager service (if needed, run services.msc to see the list of all services), and click the Check names button.
- When Windows recognizes the service name, click the OK button.
- In the Permissions for <certificate> private keys window, click the service's name. Make sure the service only has Read permission, then click the OK button.