Administration > Groups > Edit group
You can create a new group on the memoQ server here.
How to get here
Sign in to memoQWebNext as an administrator.
On the left sidebar, click the Admin icon.
On the Admin screen, click the Groups button. The Groups screen opens.
In the Name list, click a group. The Edit group screen opens.
What can you do?
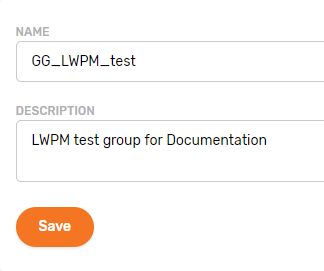
Change the name and description for the new group

Change the Full name and Description of the group as needed. To save your changes to this section: Click the Save button at the bottom of the section.
Change permission settings for the group

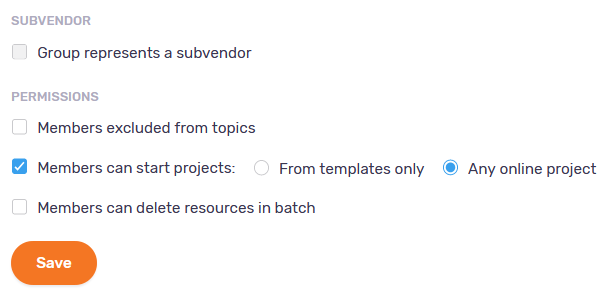
The Group represents a subvendor check box is not editable: you cannot turn a subvendor group into a regular one, and vice versa.
To prevent users in this group from using discussion topics (for example, for security and confidentiality reasons): Check the Members excluded from discussions check box. Members will not see topics, regardless of their memberships in other groups. To allow group members to use discussion topics: Clear the Members excluded from discussions check box.
To make users in this group light-weight project managers (who do not have all PM permissions): Check the Members can start projects check box. To allow members to create online projects freely, choose Any online project. To allow them only template-based project creation, choose From templates only.
To turn light-weight project managers in this group into regular users: Clear the Members can start projects check box.
Note: When you check Members can start projects, the Assigned groups section appears with the list of other custom groups on the server. Check the check box next to a group to make its members available on projects started by the light-weight PM group. Built-in groups are not listed here, but subvendor groups are.
When you clear Members can start projects, the Assigned groups section disappears from the bottom of the page.
To allow users in this group to delete more than one resource at once: Check the Members can delete resources in batch check box.
Users need permission on resources, too: Members of groups that have this setting enabled cannot delete every resource: they still need Update or Admin permission on the resources to be able to delete them.
Change members of the group
In memoQ, permissions tell if a user can access a resource and what they can do with it. Use groups to make this easier. A group allows to treat multiple users together: If a group has access to something, all of its members do. Adding a user to a group is much simpler than changing their permissions. To improve security, give permissions to groups instead of single users.
To change members of the group: Click the Add/remove members link. In the Select members window, check and clear the users' check boxes as needed. To save your changes: Click the Apply button. To discard your changes: Click the Cancel link.
If the list is too long: Above the list, start typing into the search bar. You will only see items that match the characters you typed.
Change language pairs for the group

To add another language pair: Click the Add language pair link. A new row appears.
To delete a language pair: Click the Delete ![]() icon on the right of the row.
icon on the right of the row.
Change groups that members can manage (Light-weight PM groups only)
In the Assigned groups section, click the Add assigned group link. Check the check boxes of the groups you want to assign to the members of the group you are creating. To save your changes: Click the Apply button. To discard your changes: Click the Cancel link.
Disable or delete the group

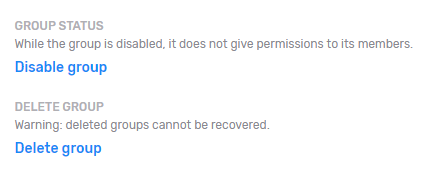
To prevent group members from signing in: Click the Disable group link. To allow members to sign in again: Click the Enable group link.
To delete the group: Click the Delete group link. A warning window opens. Check the check boxes, and click the Delete group button.
As a safeguard, you cannot disable the Administrators group.
When you finish
Currently, memoQWebNext saves the changes you make to group members, language pairs, and assigned groups.
To return to the Users screen without saving: Use your browser's Back button.