Multilingual XML files
When you need to translate or localize text that is created and stored in databases rather than document files, you will often receive multilingual XML (eXtensible Markup Language) files.
memoQ can import multilingual XML files into multilingual projects in one step. This allows you to set up multilingual projects faster.
Multilingual projects only: Use this filter only if you are setting up a multilingual project in memoQ project manager.
Can't import in LiveDocs: You can't import a multilingual XML file into a LiveDocs corpus.
To learn more about XML in general: See the topic on importing XML files.
How to get here
- Start importing a multilingual XML file.
- In the Document import options window, select the XML files, and click Change filter and configuration.
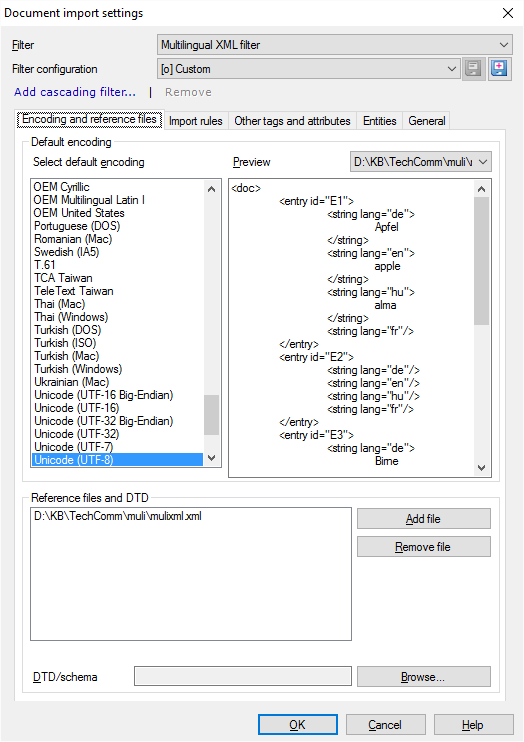
- The Document import settings window appears. From the Filter drop-down list, choose Multilingual XML filter.

What can you do?
Start on the Encoding and reference files tab.
- Check the encoding. Normally, an XML document contains a header that sets the encoding. If this is missing, or it's incorrect, you need to choose another one in the Select default encoding list. You can check the actual text in the Preview box.
- Set up reference files. Normally, memoQ uses the files you're importing. When you need to set up rules or tags, memoQ shows you the contents from the same files.
If the project is larger, and there are many files that you don't have to work on right now, but they were - or will be - part of the project, you can add them. Under Reference files and DTD, click Add file.
Alternatively, if you have the document type definition (DTD) or the XML schema that specifies all the tags and attributes, you can use those too. Next to the DTD/Schema text box, click Browse, and choose the DTD or schema file.
Next, set up import rules to handle the different languages in the multilingual XML file.
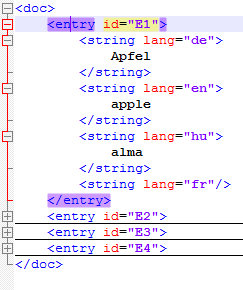
A very simple example looks like this:

An entry in a multilingual XML file has the same text in several languages. An import rule tells memoQ where to find the text for one of these languages.
The import rule also tells memoQ if there is a context, a comment, and maybe a length limit for the text in that language. Practically, you need one import rule for each language.
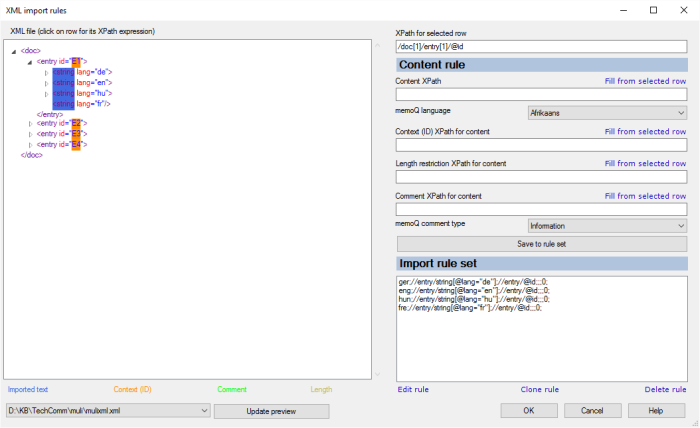
- To set up the import rules: Click the Import rules tab. At the bottom, click Edit import rules. The XML import rules window appears.

- On the left, expand all the elements in the first entry.
To add a rule for one language:
- Click the tag that contains the text. Don't click the text itself, and don't click any of the attributes. In the example above, click 'string' in <string lang="de">. memoQ fills in the XPath for selected row box.
Rules are written with XPath expressions. An XPath expression points to a place in an XML file. In a way, it describes the "coordinates" of an element in an XML file.
- At the Content XPath box, click Fill from selected row. memoQ inserts an XPath expression that points to the element you clicked. That XPath expression won't pick up any other elements. At this point, you must edit it to make it more general, and to have sensible conditions (for example, pick up a 'string' for the German language if its 'lang' attribute is 'de').
To learn how to make the necessary edits to an XPath expression: See the topic about the XML import rules window.
- In the memoQ language drop-down box, choose the language of the text. In the example, you would choose German.
You can choose any language that memoQ supports. But if the project doesn't have that language, that element won't be imported.
There can be other elements in the XML file that serve as the context, the comment, and an optional length restriction for the text.
- Click the element that you need to use as context. In the example above, you would click the id (identifier) attribute of the entry tag: In the first <entry id="E1"> tag, click 'id'. Again, you must edit the XPath expression, so that it picks up all entry IDs, not just the first one.
- At the Context (ID) XPath for content box, click Fill from selected row.
- If there is another element or attribute within the entry that sets a maximum length for the text, click it. Then, at the Length restriction XPath for content box, click Fill from selected row.
- If there is yet another element or attribute within the entry that contains a comment for the text, click it. Then, at the Comment XPath for content box, click Fill from selected row. You can also set the comment type (severity) for memoQ in the memoQ comment type drop-down box.
- When all these are filled in, click Save to rule set.
Most parts of the rule are optional. The text (content) must be there, of course. memoQ shows a warning if you try to set a rule that has no context.
If you need to change a rule, the best thing you can do is select the rule in at the bottom, click Delete rule, and set up the rule again.
To learn more about setting up XML import rules: see this topic.
Normally, the rules should be enough to work with multilingual XML files. By nature, they are less complex in structure than 'traditional' monolingual XML files.
That said, you may need to deal with inline tags and unusual character entities. In some cases, you may even need to set up conditions for translating an element or another. You can set these up on the Other tags and attributes and the Entities tabs.
To learn about dealing with tags, attributes, and entities in XML files: See the topic about importing XML files.
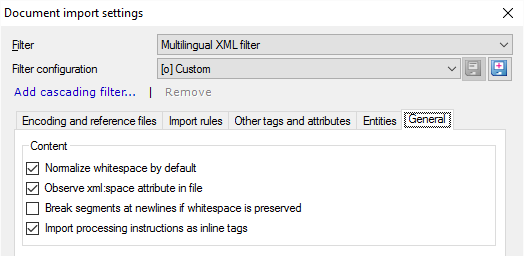
When you import multilingual XML files, you can set other options on the General tab.

- Normalize whitespace by default: Normally, memoQ converts sequences of tab, space, and newline characters into a single space character. In addition, memoQ deletes any white space at the beginning and the end of elements. Usually, XML documents use white space for better readability. But if the spaces are part of the structure or the content, you can turn this off: To do that, clear this check box.
- Observe xml:space attribute in file: XML documents can contain attributes that determine if white space should be normalized in a specific element (see the option above). Normally, memoQ follows these instructions when it finds them. To ignore these, and treat white space the same way everywhere: Clear this check box.
- Break segments at newlines if whitespace is preserved: Normally, memoQ doesn't start a new segment when there is a newline character. (Normally, memoQ doesn't even notice the newline character because it gets normalized into a space.) But if the Normalize whitespace by default check box is cleared, and newline characters do mean the start of a new segment, you can check this check box. It is recommended to check the Break segments at newlines check box if the Normalize whitespace by default check box is cleared.
- Import processing instructions as inline tags: Normally, memoQ imports processing instructions (starting with '<$' in the form of inline tags (of the type 'mq:pi'). Don't clear this check box.
When you finish
To confirm the settings, and return to the Document import options window: Click OK.
To return the Document import options window, and not change the filter settings: Click Cancel.
If this is a cascading filter, you can change the settings of another filter in the chain: Click the name of the filter at the top of the window.
In the Document import options window: Click OK again to start importing the documents.
Can be chained: