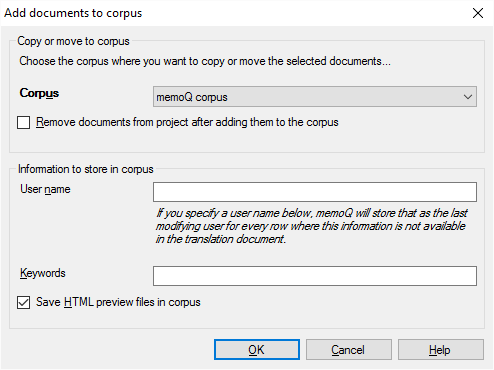
Add documents to corpus
After a document or a view is translated, you can add them to a LiveDocs corpus - from the Translations pane of Project home. memoQ copies the selected bilingual documents to the LiveDocs corpus you select. You may copy or move the documents: If you move them, they will be removed from the list of Translations.
How to get here
Open a project. In Project home, choose Translations. Select the documents or views that you need to add to the LiveDocs corpus. On the Documents ribbon, click Add to LiveDocs.

What can you do?
Choose the LiveDocs corpus where you need to put the documents (or views): Select one from the Corpus drop-down box. This is the only choice you must make. memoQ will automatically choose the first corpus in the project - if there is one.
Move the documents to the corpus instead of copying: Select the Remove documents from project after adding them to the corpus checkbox. memoQ will remove the selected documents from the project.
Add extra information to the document:
- Type a user name in the User name box to save that name with the documents. Later, when memoQ returns matches from these documents, this name will appear as the author of the entry. This name won't work for segments where a user name is already saved.
- Add keywords to the documents: Type the keywords in the Keywords box. Separate them with commas.
Later, you can use them to filter the list of documents in the LiveDocs corpus.
Save the formatted preview of the documents: Select the Save HTML preview files in corpus checkbox. memoQ will show this preview when you open a document for editing from the LiveDocs corpus. Don't save the preview in if you want to save disk space.
When you finish
Click OK to add the selected documents to the LiveDocs corpus, with the options you chose.
Click Cancel to close this window without adding the documents to a LiveDocs corpus.