Terminal server - Auto-update
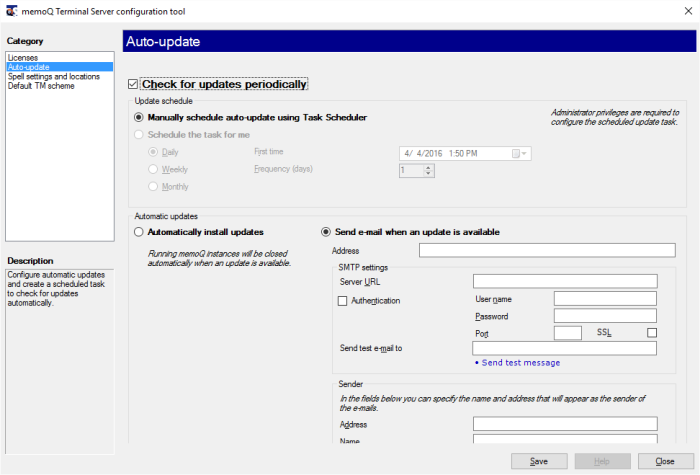
On a terminal server, you can schedule automatic updates for memoQ. Automatic updating does not need user interaction: it is possible that none of the memoQ users on the terminal server are allowed to update installed programs.
On the Terminal server configuration tool's Auto-update page, you can set the update schedule. You can also set up e-mail notifications for the server administrator when updates are installed.
How to get here
Open the memoQ Terminal Server configuration tool. Choose Auto-update.

What can you do?
Normally, memoQ checks for updates automatically. To turn this off, clear the Check for updates periodically checkbox.
Use the settings in the Update schedule section to schedule checking for updates. Click one of the radio buttons:
- Manually schedule auto-update using Task Scheduler: Schedule the update using the Task Scheduler Windows service. Do not choose this option unless you are very familar with scheduling tasks in Windows. You need to schedule a program called TSAutoUpdate.exe that resides in the C:\Program files\memoQ\memoQ-9 folder.
- Schedule the task for me: This is the default setting. Choose a starting time and a frequency using the controls below the radio button.
if you choose the Automatically install updates radio button in the Automatic updates section, the memoQ auto-update service will automatically install any new updates. With this setting, new updates are always installed shortly after they are released.
For more control over the installation of updates, choose to be notified when an update is available, and install the update manually: log in to the terminal server, and start the process. If you choose this, the auto-update service sends an e-mail to the specified address when a new update is available.
To start setting up notifications: Click Send e-mail when an update is available.
Fill in these boxes to configure sending the e-mail:
- Address: Type the e-mail address where the notifications are sent.
- SMTP settings section: Type the address of your e-mail server in the Server URL box. If the e-mail server uses authentication, fill in the User name and Password boxes. If the port number is different from the default, type it in the Port text box. If the e-mail server uses SSL encryption, select the SSL checkbox.
- To test the SMTP settings, type your own e-mail address in the Send test e-mail to text box, and click Send test mail.
- Sender section: Type the name and e-mail address of the notification e-mails' sender in the Address and Name boxes. You might want to set an e-mail address that accepts replies.
When you finish
To save your changes in this category: Click Save. The Terminal server configuration tool window remains open, so you can change other categories.
To see the settings in another category: Click a category on the left.
To return to Windows: Click Close. If you have not saved all changes, the program will remind you.