Set up OIDC-based single sign-on (SSO) for customer portal
To allow users to log in to customer portal with an OIDC identity provider's (IDP's) account, for example, with a Google account, you must set it up separately from what memoQ TMS is using.
What you need
Before you start configuring, gather the information below. You will need these at different points during the process.
-
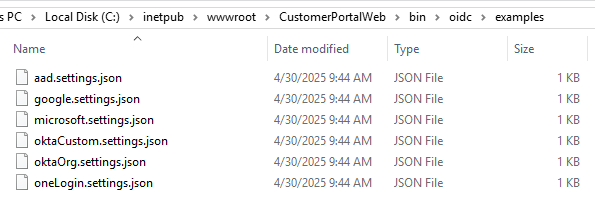
A settings.json file for your identity provider (IDP) (find them in the C:\inetpub\wwwroot\CustomerPortalWeb\bin\oidc\examples folder)
-
A name for the IDP - this needs to be unique for each IDP you configure.
If you run the configuration tool and configure another IDP with the same name, it will overwrite your previous settings without warning.
-
A display name - the text on the Log in with (IDP) button on the login page.
Configure the memoQ TMS environment for customer portal SSO
-
Download the latest version of memoQ TMS.
customer portal SSO is available in version 11.3 and newer.
-
In the memoQ TMS deployment tool, install memoQ TMS and customer portal.
You don't need to install memoQweb for this purpose.
-
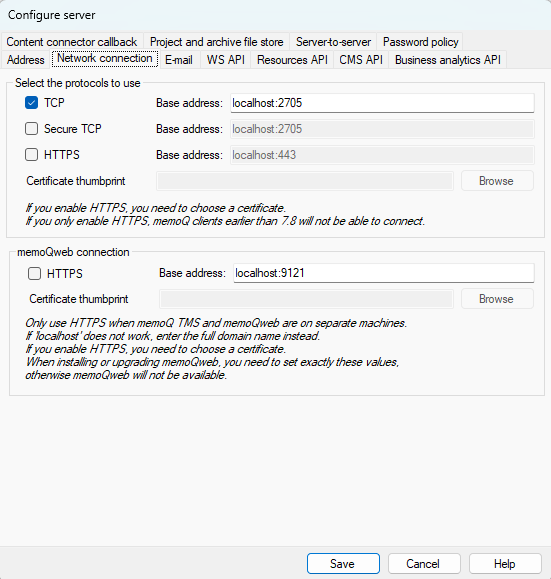
After installing or updating memoQ TMS, in the deployment tool's memoQ TMS section, click Advanced -> Configure server, and go to the Network connection tab:
-
Select the Use API key checkbox at the bottom of the window, under Customer portal API key.
-
Click Generate new API key, and in the confirmation message, click OK.
-
A new customer portal API key appears in the text field. Copy the value and click Save.
-
In the deployment tool's customer portal section, click the Configure link. The Configure customer portal window opens:

-
In the Login options dropdown, choose the SSO or the memoQ or SSO option. If you choose SSO, users can only log in with OIDC users.
-
Paste the API key from the previous step into the API key field. Click Save.
-
In the IIS manager Windows app, restart customer portal's application pool.
customer portal and memoQ TMS are now configured for SSO to customer portal.
Set up an OIDC provider
Set parameters for your IDP
As of March 2026, customer portal supports Azure AD (Microsoft Entra), Google, Microsoft, Okta (both standard and custom), and OneLogin instances. If your company uses another OIDC-based ID provider service, contact memoQ Business Services, who can provide the resources you need.
The customer portal app is installed in the c:\inetpub\wwwroot folder. The bin subfolder contains CustomerPortal.SsoConfig.Tool.exe. You can use this tool to generate a JSON file for your IDP.
From the bin folder, double-click oidc, then examples. Choose the settings file for your company’s IDP type (aad.settings.json, google.settings.json, microsoft.settings.json, oktaCustom.settings.json, oktaOrg.settings.json, or oneLogin.settings.json), and copy it to a temporary folder. Open it in a text editor, and add your values:
| Parameter | Description |
|---|---|
|
The template file that you are filling in with the parameter values. DO NOT CHANGE! |
|
|
|
See each sub-key's description below. |
Name
|
A unique name for the IDP. Change as needed. |
|
|
The text on the IDP's button you’ll see on the login page. Change as needed. |
|
|
The Client ID that the IDP generated for your memoQ TMS. You need to change the default value. |
ClientSecret
|
The client secret or secret key you received when registering your memoQ TMS at this IDP. You shouldn't keep your client secret in this unencrypted JSON file for long. Delete the file right after you finished configuring SSO with this IDP. |
|
|
The last part of the callback URL that you registered at the IDP. You need to change the default value. |
| Parameter | Description |
|---|---|
|
|
Your Microsoft Azure tenant. You need to change the default value. |
TenantId
|
Your OneLogin tenant. You need to change the default value. |
|
|
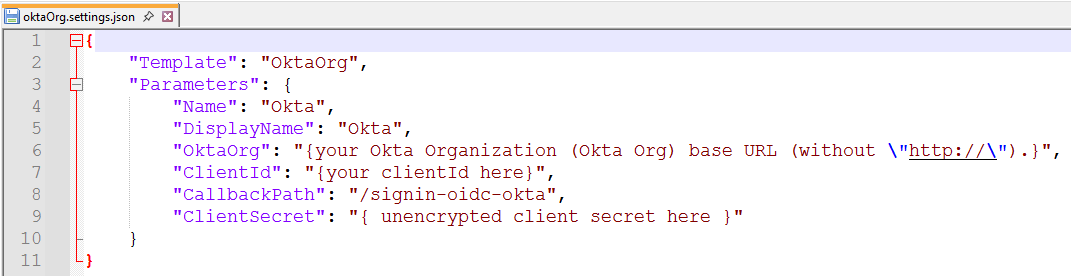
Your Okta domain. You need to change the default value. |
|
|
Your Okta authorization server's ID. You need to change the default value. |
|
|
Your Okta organization's base URL (without |
Example: Configure the Google IDP
-
Go to the
C:\inetpub\wwwroot\CustomerPortalWeb\bin\oidc\examples\folder. Copygoogle.settings.jsonto another folder, and open it in a text editor: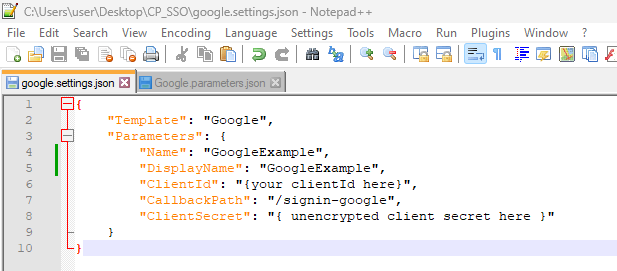
-
Change the values as needed. If you need help, see the tables above.
Don't change
Template.Usually, you don't need to change
CallbackPatheither. -
When you're ready, save the file.
-
Open a Command Prompt or Windows Powershell window, and go to the
c:\inetpub\wwwroot\CustomerPortalWeb\binfolder. -
Run the configuration tool:
.\CustomerPortal.SsoConfig.Tool.exe path_of_the_newly_edited_settings_fileThe screenshot below assumes that the settings file is on your desktop, in a folder called
CP_SSO.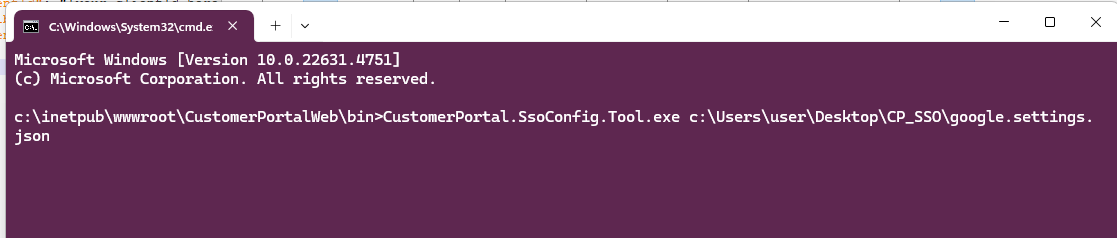
Result should be as follows:
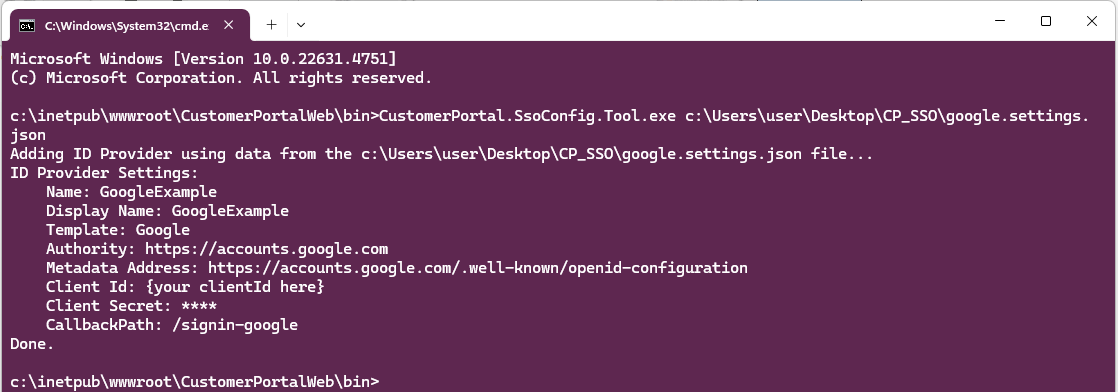
-
The tool created a JSON file in the
C:\ProgramData\CustomerPortalWeb\oidc\providersdirectory for the new OIDC provider, with the name you set in theNamefield.This JSON file contains your client secret in an encrypted form. Because it can be decrypted only on the same PC, you can't reuse it to set up customer portal SSO on another machine: you need to complete this procedure again.
-
Go back to the folder where you copied the settings file in step 1, and delete it: Don't leave the client secret stay unencrypted on your computer.
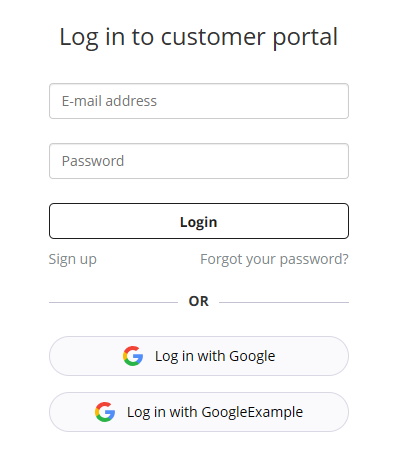
If everything is set up correctly, a new login button (in our case, GoogleExample) appears on customer portal's login screen:
You successfully configured SSO for customer portal. Good job!