New entry
You can add new entries to the term base in this pane.
How to get here
-
Open memoQweb in a web browser. Log in as an administrator, project manager, terminologist, or external user.
-
Click the Qterm tab. The Qterm - Home page appears.
-
Click the term base you want to browse.
-
When opening a term base for the first time, a language selection flyout appears.
Choose languages from the First language and Second language dropdowns.
If you want to open this term base always with the same filter, choose it from the Filter dropdown.
-
Click Browse term base. The Browse terms page opens.
-
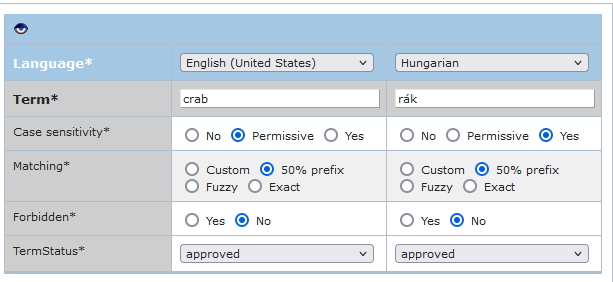
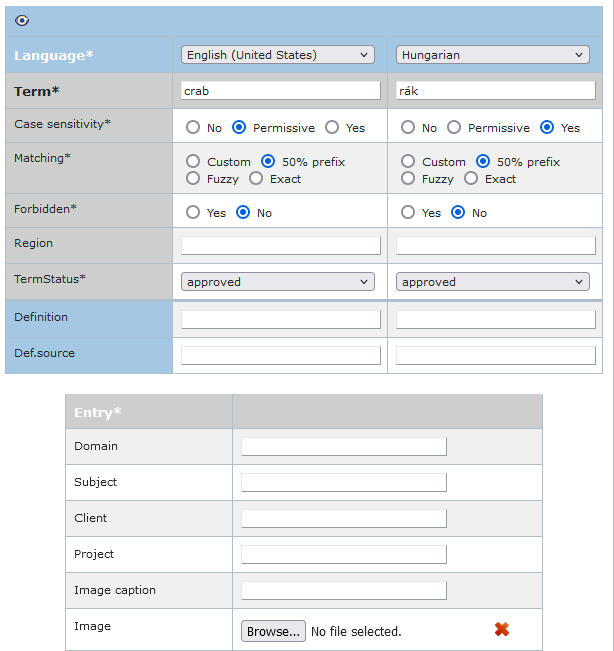
In the top right corner, click New entry. The New entry pane opens:

To see all fields: Click the eye
 icon at the top of the pane.
What can you do?
To add a new entry:
-
In the Language row, select two languages.
-
In the Term row, type the terms in the selected languages.
-
In the Case sensitivity row, tell Qterm how to handle differences in lower- and uppercase letters when matching this term. Possible values are:
- Yes: Choose this option to make the term fully case-sensitive.
The term will only match if it appears exactly as you typed it in the term base, including uppercase and lowercase letters.
For example: If you add the term "Will", it will only match "Will", not "will" or "WILL". This setting is useful for proper names or terms where case matters.
-
Permissive: Choose this option to tell memoQ that uppercase letters must match and lowercase letters are flexible.
-
Uppercase letters in the term must match exactly in the text.
For example, "ALPAC" in the term base will only match "ALPAC" in the text).
-
Lowercase letters are flexible, they can match either uppercase or lowercase.
For example, "Alpac" in the term base will match "ALPAC", "Alpac", "AlPac" etc., as long as the first letter "A" is uppercase. The word "alpac" won't match because the first letter isn't uppercase.
-
-
No: Use this option to ignore capitalization (make the term case-insensitive).
The term will match regardless of how it appears in the text - uppercase, lowercase, or mix. This option is useful for regular words or imported glossaries that use initial uppercase letters.
For example: If the term is "memoQ", it will match "memoQ", "MEMOQ", or "Memoq".
- Yes: Choose this option to make the term fully case-sensitive.
-
In the Matching row, tell Qterm how to handle word variants when matching this term. Possible values are:
- Fuzzy: Use this when the beginning of a term can change in different forms.
For example (German), the plural of "Mutter" is "Mütter". With Fuzzy matching, both forms will match.
It’s also useful for compound words. If your term base contains "Festplatte" and "speicher", they will be highlighted in a word like "Festplattenspeicherplatz".
-
50% prefix (default): Allows partial prefix matching.
For example, with "project", it will match "project" and "projects", but not "project-specific".
This is the standard setting for most terms.
-
Exact: Matches only the exact form of the term.
For example, with "project", it will match only "project", not "projects" or "subproject".
-
Custom: Lets you use wildcards for more advanced matching.
For example:
"Wassert|urm" → matches "Wasserturm" and "Wassertürme", but not "Wasserschutz".
"bankovn|í operac|e" → matches "bankovních operací" and "bankovními operacemi".
No matter which option you choose, matches only occur when the term appears at the start of the expression - it must be a prefix of the word or phrase.
- Fuzzy: Use this when the beginning of a term can change in different forms.
-
In the Forbidden row, choose if the term you entered is forbidden or not.
-
In the Definition row, enter a definition for the term.
If the term base has more than two languages: Save the entry, then edit it to add the terms for the other languages.
When you finish
-
Save the changes and add another entry to the term base: In the upper right, click Save and add new.
-
Save the changes and return to the Browse terms page: In the upper right, click Save.
If you don't want to save them and go back to the Browse terms page: click Cancel.
-
Return to the Qterm - Home screen: At the top left, click Qterm - Home.
-
Sign out of Qterm: In the top row, click Sign out.