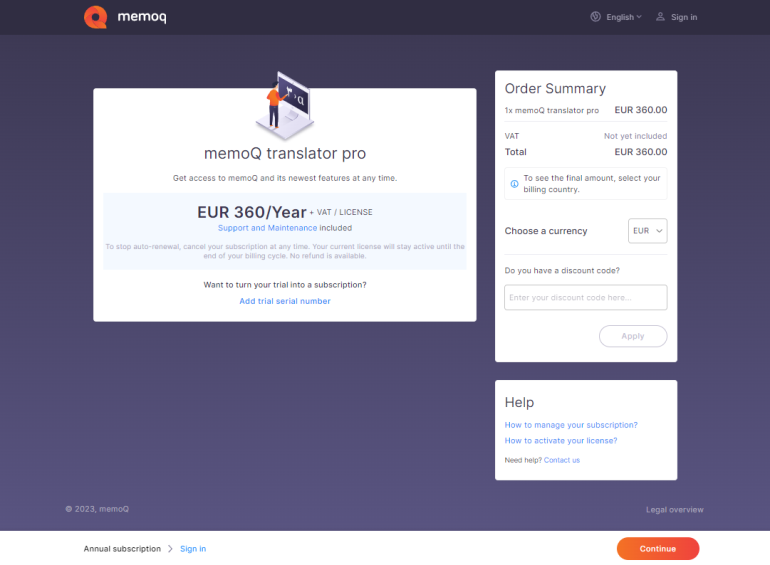
memoQ translator pro annual subscription
Where to start?
-
memoQ redirects you to the my memoQ page for the translator pro license.

Here you can:
-
In the Order summary section - check your order, choose your currency, and add a discount code.
Discount codes can be available in certain currencies only - the ones that you use with your paymnent in USD, can't be used with EUR.
You can use only one code with each purchase.
-
In the main section - check a new billing date for your license and your serial number, and learn about our Support and Maintenance.
-
If you previously used a trial license, you can remove and subscribe with another serial number: Click Remove trial serial number. memoQ removes your serial number and displays the Add your trial serial number link.
-
If you already have a trial serial number and want to upgrade to a perpetual translator pro license: Click Add your trial serial number and follow the steps mentioned in the pop-up window.
-
-
In the top right corner - change the language, or if you have an account, sign in.
-
To confirm, at the bottom of the page, click the Continue button.
2. Create your account
memoQ redirects you to the Sign in or create your account page.

-
If you already have an account, click the Sign in button (or click the Sing in icon in the top right corner), memoQ redirects you to the Language Terminal page, where you can sign in.
-
If you don't have an account yet, click the Create a new account link. memoQ redirects you to the Registration page.
Enter your registration data, country, and category (Freelance translator, Educational institution, Translation service provider, etc.), and accept all the legal information.
Make sure to pay special attention to the language in which you want to receive your documents. This is especially important for non-English speakers.
-
To confirm, at the bottom of the page, click the Continue button.
At this point, you are almost done. memoQ will send you an email with all the important details and confirmation link. To confirm your registration process, follow the steps listed in the email. If you haven't received an email from us, contact our Support team.
3. Add your billing details
Once registration is complete and you are logged in, memoQ will redirect you to the Add your billing details page.

Here you can:
-
Choose between Legal entity and Natural person. Based on your choice, the form shows different fields to fill in.
Fill in your contact info, and all the necessary billing data.

If you are a Natural person (you don't have a VAT or tax number), you must provide:
- Your full name.
- Your current address (street name, city, postal/zip code).
- Country that you reside in (state or province is optional).
- The currency that you prefer during the billing process.

If you are a Legal entity (your business has a VAT/tax number), you must provide:
- Your company name.
- Your full name.
- The address the company is registered under (street name, city, postal/zip code).
- Country that your company resides in (state or province is optional).
- The currency that you want to use during the billing process.
- Your national or EU VAT number.
-
Use another email to receive your invoices - click the Send my invoices to another email slider.
If you purchased memoQ licenses before, your contact details will appear here automatically. You can edit your details at any time.
To confirm your billing details, at the bottom of the page: Click the Continue button.
To learn more, read the topic about Billing details.
4. Complete your purchase
You can pay with Debit or Credit card - choose from MasterCard, Visa, or American Express.
To use our secure payment provider and complete the payment process: In the bottom right corner, click the Complete order button.
After the payment, memoQ displays the Purchase summary page with your serial number and a few helpful links. You can find your serial number on your invoice, too.
Use this serial number to activate memoQ and start working right away.