Discover memoQ 8.3
These are the most important new features of memoQ 8.3.
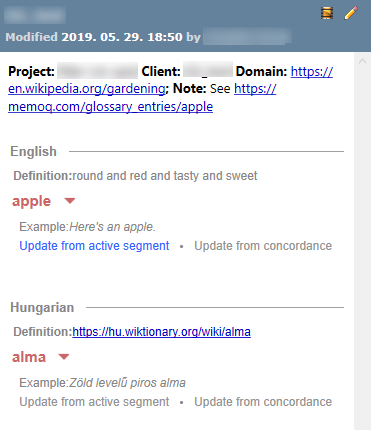
You can export term bases from both memoQ and Qterm into Excel files. Hand them out for review, and import the reviewed XLSX files back into memoQ or Qterm.
To export a term base from memoQ to XLSX:
- Open a project. In Project home, choose Term bases.
From the Resource console: Open the Resource console. Choose Term bases.
From an online project: As a project manager, you can open an online project for management. In the memoQ online project window, choose Term bases.
- Right-click the name of the term base you need to export. From the menu, choose Export Terminology.
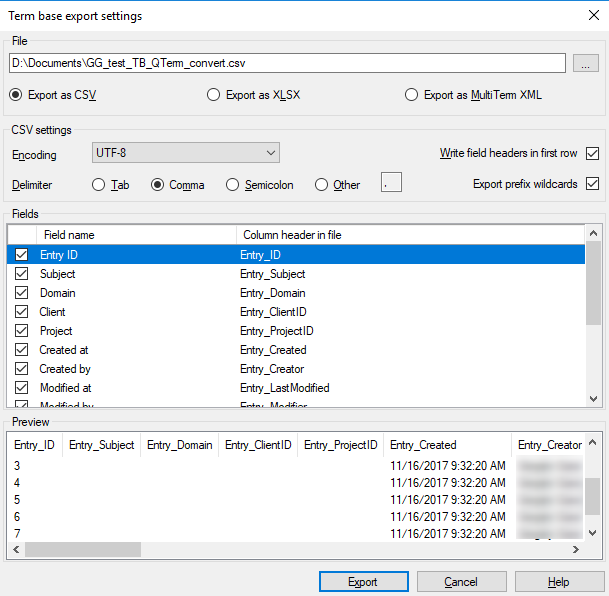
- Under the File field, select the Export as XLSX radio button. Choose fields one by one: Normally, memoQ exports the Entry ID, Term text (with wildcards), and Example of use fields from the term base. If you're preparing the term base for human reading, this is the simplest option - but you can add any other field as needed. If the other end is memoQ or Qterm, you may want to add all other fields. To add a field, check its check box.
Watch the preview: As you set the options, memoQ shows how your file will look like under Preview.
- When you are done, click Export.
To import a reviewed XLSX file back into a memoQ term base:
- Open a project. In Project home, choose Term bases.
From the Resource console: Open the Resource console. Choose Term bases.
From an online project: As a project manager, you can open an online project for management. In the memoQ online project window, choose Term bases.
- Right-click the name of the term base you need to import the terms into. From the menu, choose Import Terminology.
- An Open window appears. Find the file you need to import. Click Open. The Term base Excel import settings window opens.
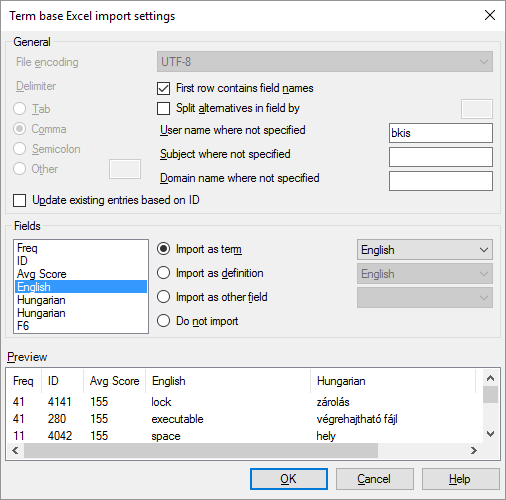
- Check the Update existing entries based on ID check box. memoQ recognizes the data fields if they were not removed from the Excel sheet.
- Click OK.
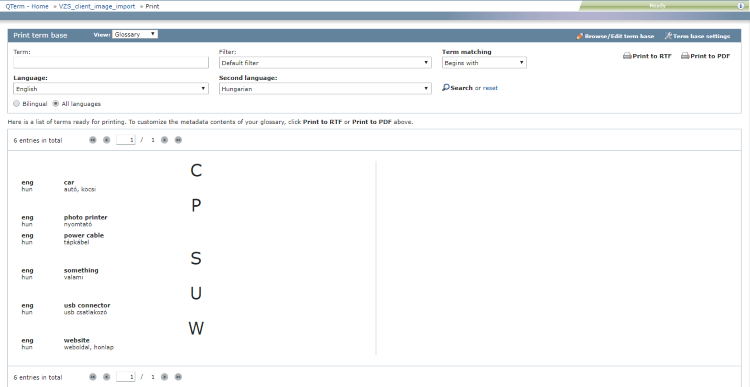
To export a term base from Qterm to XLSX:
- Open memoQweb (legacy) in a web browser. Log in as an administrator, project manager, terminologist, or external user.
- Click the Qterm tab. The Qterm - Home page appears.
- In the list, find the term base you want to export.
- In the term base's row, in the Operations column on the left, click the Export
 icon.
icon. - The Term base export wizard opens. Select the XLSX option and click Next.
- On the Type page, choose the one entry per line or the multiline entries option. Click Next.
- The Select term base languages to be exported page appears. By default, all languages in the term base are selected. Click the languages you want to leave out.
Note: You need to select at least 2 languages.
- Click Next.
- The Select metadata to be exported page appears. By default, no metadata fields in the term base are selected. Click the fields you want to include.
- Click Export.
- On the last page, click the link to download the exported file, then click Close.
To import a reviewed XLSX file back into a Qterm term base:
- Open memoQweb (legacy) in a web browser. Log in as an administrator, project manager, terminologist, or external user.
- Click the Qterm tab. The Qterm - Home page appears.
- In the list, find the term base you want to import the XLSX back into.
- In the term base's row, in the Operations column on the left, click the Import
 icon. The Import term base wizard opens.
 - On the Select file(s) to be imported page, on the Excel data tab, click Choose file and browse to the XLSX file you want to import. Click Next.
- On the Set file properties page, choose a Layout. The Preview appears. In the header, check the First line contains field names check box. Click Next.
- On the Define mappings between file columns and term base metadata page, the mappings are automatically set because Qterm recognized the field names on the previous page. Click Next.
- On the Import options (updating based on entry ID; default values) page, check the Update based on entry ID check box. Click Next.
- After the import analysis finished running, on the Import summary page, review the analysis results. If everything is OK, click Import.
This release has a lot of little improvements in Qterm to make the lives of terminologists easier:
You now have more options to sort the term base list: by languages and number of entries.
Quickly select or deselect all items when merging or deleting entries, searching for text in specific entries, etc.
Qterm can show more than 100 (up to 500) items per page, so that you can do batch operations more efficiently.
Qterm term bases can be renamed.
The term extraction editor has new fields (length, examples), a candidate statistics feature, a freezeable active row, and warns when you are about to accept a duplicate term. If you start more than one term extraction session on the same day, they are automatically numbered. You can export accepted term candidates and their example sentences into Excel (for human review without memoQ) or into a term base.
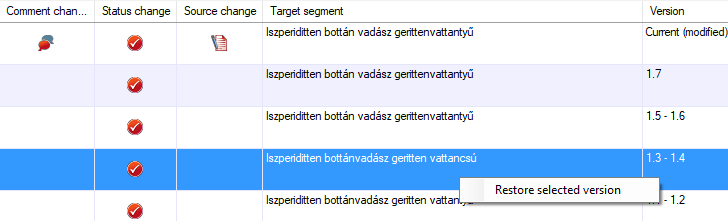
When you edit a translation, you can restore an earlier version of a segment.
In memoQ 8.2 and earlier, you could only view the history of a segment. Now you can go back to an earlier state of the segment.
To do that:
- Open a project, and open a document for translation.
- Find the segment where you need an earlier version.
- Right-click the segment, and choose Row history. The Row history window opens.
- In the Row history window, right-click the version you need to restore, and click Restore selected version.
memoQ 8.3 takes WordPress integration one big step further: memoQ is available as a translation provider in the WordPress WPML plugin. Configure a memoQ TMS: define project templates in memoQ's Resource console, set up a CMS connection in Server Administrator, and create workflows on the CMS Dashboard. Then you can send translation jobs from WPML directly to your memoQ TMS, where they can be processed automatically, and after translation is finished, the jobs can even be delivered fully automatized.
When you use Muses, memoQ will give you useful hints in predictive typing. A Muse guesses the next one-two-three words of the translation.
Before memoQ 8.3, only local Muses existed. If you had to work on an online project, it could not bring a Muse to you. You had to train and add your own local Muse.
- In memoQ 8.3, you can share Muses on a memoQ TMS from the Resource console.
- You can create, train, and use online Muses in online projects.
memoQ 8.3 comes with an improved SDLXLIFF filter that takes care of inline tags at the beginning and the end of segments. As a result, after the SDLXLIFF document is added to a LiveDocs corpus, you will receive more and better matches.
Excel or Word files often contain HTML or XML markup, too. In this case, you need to import the Excel or Word document by chaining an HTML or an XML filter after them.
However, the chained HTML or XML filter will not work if the previous filter returns text with inline formatting.
In memoQ 8.3, if you chain HTML or XML after Word or Excel, you can ignore these. To import a document this way, do the following:
- In a project, begin to import an XLSX or a DOCX document. Use Import with options.
- In the Document import options window, click Change filter and configuration. The Document import settings window opens for XLSX or DOCX (depending on the type of document you are importing).
- At the top, click Add cascading filter. The Select filter to chain window opens. Choose the HTML or the XML filter, or whichever filter you need.
- The Document import settings window changes (the screenshot shows the settings of the Excel filter):
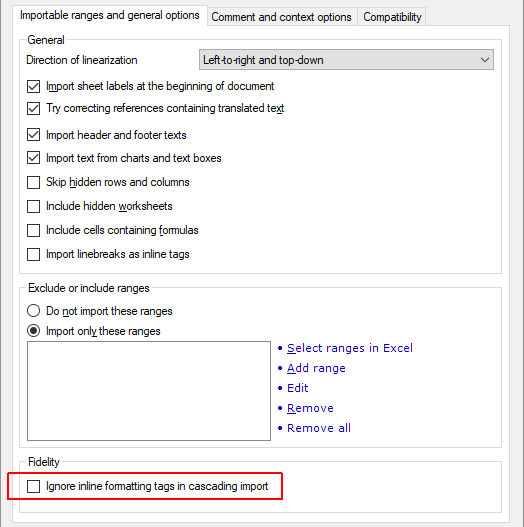
- At the bottom of the first tab, check the Ignore inline formatting tags in cascading import check box. Then proceed with the import.
XLIFF documents may contain mrk tags that do not start a new segment, and memoQ does not know how to handle them. This depends on the other tool that exported the XLIFF document.
Normally, memoQ will import these tags as inline tags, complete with all attributes. This is different from earlier versions.
To import a plain XLIFF document without the custom 'mrk' tags:
- In a project, begin to import a plain XLIFF document. Use Import with options.
- In the Document import options window, click Change filter and configuration. The Document import settings window opens for XLIFF documents:
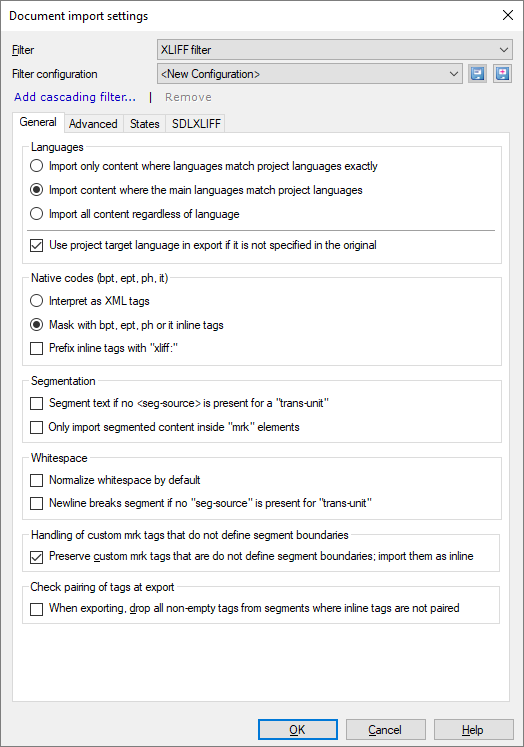
- At the bottom, clear the Preserve custom mrk tags that do not define segment boundaries; import them as inline check box.
When these mrk tags are imported, there may be several tags in each segment. They need to be copied to the target segment, according to the translation. In the process, paired tags may become mixed up, and some pairs may be missing. To export a valid XLIFF document even in this case, check the When exporting, drop all non-empty tags from segments where inline tags are not paired check box.
This change applies to plain XLIFF documents only: From SDLXLIFF, WorldServer XLZ, or XLIFF:doc files, memoQ will still import 'mrk' tags it can process, and it will drop all other 'mrk' tags - like before.
If you have richly formatted multilingual Excel workbooks, memoQ 8.3 can preserve the formatting in them.
Normally, memoQ will still import multilingual Excel files without formatting. However, you can turn this on in the Document import settings window:
- In a project, begin to import a multilingual Excel workbook. Use Import with options.
- In the Document import options window, click Change filter and configuration. The Document import settings window opens.
- In the Document import settings window, choose Multilingual delimited text filter.
- Click the Excel options tab:
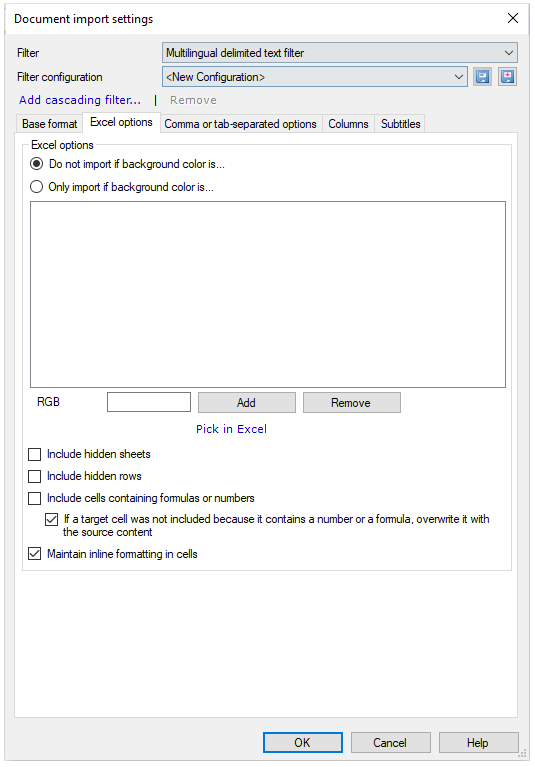
- Check the Maintain inline formatting in cells check box.
- Click OK, and OK again.
After you import a multilingual Excel workbook with this setting, memoQ will export the translations (and the source text) with the same formatting as it was imported.
Earlier memoQ versions will not keep formatting: If you import a multilingual Excel file with formatting, but then you transfer the bilingual document to an earlier memoQ version (or open the project in an earlier version), the earlier version will export the file without the inline formatting.
We are continually working on making sure that users with very high-resolution displays receive a good user experience, without user interface issues. In memoQ 8.3, several pages in the memoQ TMS deployment tool were updated to display correctly when used with high-DPI settings.
When you work on an online project through the webtrans translation editor, you can now sort and filter the segments.
Open the document in webtrans. Then, at the top right, click the funnel ![]() icon. The filtering and sorting boxes appear:
icon. The filtering and sorting boxes appear:

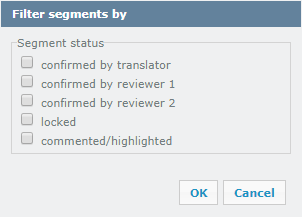
You can filter for text in the source cells or in the target cells. You can also click the funnel icon next to the filtering boxes to filter for segments with certain statuses:
With memoQ 8.2 and earlier, webtrans broke up the document into pages. You had to click the page controls to get to the next or the previous page..
This is now gone: In memoQ 8.3, webtrans shows every row on one single page. You can oversee the entire document in one page.