Microsoft MT plugin settings
Set up the Microsoft Translator Text API to work with memoQ.
How to get here
For a local profile:
- At the top of the memoQ window, in the Quick Access toolbar, click the Options
 icon. The Options window opens.
 - On the Default resources pane, click the MT
 icon. The MT settings pane appears.
 - Select the MT profile you are using and under the list, click Edit.
- On the Services tab, find the plugin and click its row. If it is turned on, click its row to open the Microsoft MT plugin settings window. If it is turned off, click its row once to turn it on, then click it again to open the settings.
For an online profile:
- At the top of the memoQ window, in the Quick Access toolbar, click the Resource console
 icon. The Resource console window opens.
 - In the Server URL list, choose or type the server's address. Click the Select
 button.
 - In the left-side pane, click the MT settings icon. The MT settings pane appears.
- Select the MT profile you are using and under the list, click Edit.
- On the Services tab, find the plugin and click its row. If it is turned on, click its row to open the Microsoft MT plugin settings window. If it is turned off, click its row once to turn it on, then click it again to open the settings.
What can you do?
- Obtain your access: Start a new Azure subscription. Click Sign up for a new subscription. You can sign up for a one-month free trial. Although Microsoft will ask for credit card details, the lowest plan gives you 2,000,000 (two million) characters for free each month.
- Start managing your subscription. In the Microsoft Azure dashboard, click the green plus sign. Under Intelligence + analysis, click Cognitive Services APIs. From the API type drop-down box there, choose Microsoft Translator Text API. Fill in the rest of the boxes, then click Create. You will get a subscription key.
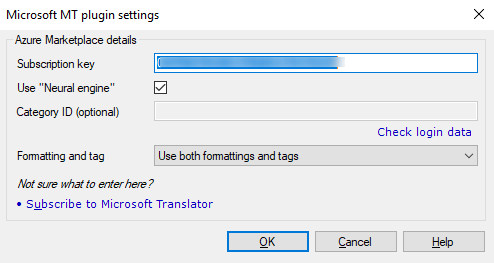
- Return to memoQ. In the Microsoft MT plugin settings window, under Azure Marketplace details, enter the Subscription key you received in the Azure Marketplace. Optionally, enter a Category ID, too.
- If Microsoft offers neural machine translation for your language combinations, check the Use "Neural engine" check box. Neural machine translation provides slightly better accuracy and a more fluent translation in some cases. To learn which languages are supported by each service, visit this web page: https://www.microsoft.com/en-us/translator/languages.aspx.
- Click Check login data.
- To use no formatting and no tags: Choose Use plain text only.
- To use formatting but use no tags: Choose Use text and formatting.
- To use both formatting and tags: Choose Use both formattings and tags.
Normally, when memoQ sends text to Microsoft, the tags are not sent. The translation you get back from Microsoft will not contain any tags. memoQ will insert all the tags at the end of the machine-translated text. Choose how to handle tags with the Formatting and tag dropdown.
When you finish
To save the settings, and return to the Default resources tab of the Options window (or to the Resource console): Click OK, then click OK again.
To return to the Default resources tab of the Options window (or to the Resource console), but not save the new settings: Click Cancel, then click Cancel again.
To use the MT output in the translation editor:
- Open a project with a supported language pair.
- On the left side of the Project home or memoQ online project screen, click Settings.
- In the top bar, click the MT settings icon.
- Choose the MT profile in the project, or one you want to add to the project. Below the list, click Edit.
- On the Services tab of the Edit machine translation settings window, check the plugin's check box on the left.
- On the Settings tab of the Edit machine translation settings window, in the Translation results area, choose a setting other than Off.
- Open a document for editing, and see the machine-translated suggestions.
To use the MT output in pre-translation:
- Open a project with a supported language pair.
- On the left side of the Project home or memoQ online project screen, click Settings.
- In the top bar, click the MT settings icon.
- Choose the MT profile in the project, or one you want to add to the project. Below the list, click Edit.
- On the Services tab of the Edit machine translation settings window, check the plugin's check box on the left.
- On the Settings tab of the Edit machine translation settings window, select the plugin from the Pre-translation dropdown.
- Run Pre-translate. In the Pre-translate and statistics window, check the Use machine translation if there's no TM match check box. (memoQ will remember this.)