You can run many tasks automatically at various points in a project. This works for local projects as well as online ones.
Can't do this without templates: You can do this in projects created from project templates only. Set up a template first. Configure the automated actions. Then, create a new project from that project template.
For example, this is how memoQ can automatically pre-translate documents, and run statistics on them after they are imported.
This topic doesn't list all possible options - there are way to many of those, but it shows on an example how you can set up your template for automated actions.
How to get here
Open Resource console. Choose Project templates.
To set up a template for online projects: Use an online template for this. Choose your memoQ server at the top of Resource console. Click Select.
Select the project template that you want to set up with automated actions that use custom scripts. Right-click the selection, and click Edit.
In the Edit project template window, choose Automated actions. Click the Project automation tab if you don't see it at first.

What can you do?
 For example, pre-translate and analyze documents after they are imported; and export them automatically when the project is wrapped up
This example shows how to set up automated actions for a fairly normal project. You can try this in local projects, as well as online ones.
You need to set up the following actions:
- Edit the project template: Choose Automated actions, and click the Project automation tab.
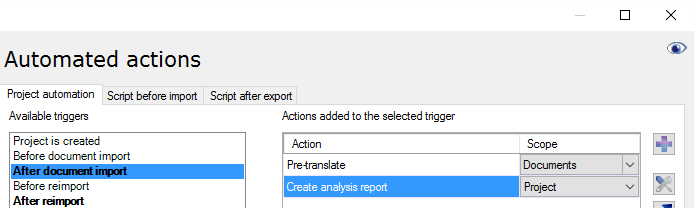
- Under Available triggers, click After document import. Now you will set up tasks for newly imported documents.
- Next to the Actions added to the selected trigger list, click the + sign. The Select actions you want to add to the trigger window appears.
- You need to pre-translate, and then run statistics. Click Pre-translate. Click Add. The Automated pre-translation and statistics settings window appears.
- Make sure that memoQ automatically locks segments that have an exact match or a context match: Click the Confirm/lock tab. Under Rows to confirm, click the Exact match with context radio button. At the bottom, check the Make rows locked check box. Click OK. The Edit project template window returns.
Need translation memories or LiveDocs to pre-translate: Pre-translate will work if the project has translation memories or LiveDocs corpora. Make sure that this project template sets them up: Check the settings under LiveDocs and Translation memories.
- Next, you need to add statistics: Click the + sign again. In the Select actions you want to add to the trigger window, click Create analysis report. Click Add.
- The Automated analysis report settings window appears. Review the settings, and click OK. The Edit project template window returns. The Create analysis report task is added to the list on the right.
- Each time a document is imported, you need to update the analysis report for the entire project. Next to the Create analysis report item, in the Scope column, choose Project from the drop-down list. With this setting, the entire project is analyzed again after a document is imported.
Now, set up the tasks for documents that were just reimported. It's almost the same as with newly imported documents. But before anything else, you need to get the existing translations from the previous version of the document.
- Under Available triggers, click After reimport.
- Next to the Actions added to the selected trigger list, click the + sign. The Select actions you want to add to the trigger window appears.
- Click X-Translate. Click Add. The X-Translation settings window appears.
- Click the Mid-project update radio button. There are no other settings in this case. memoQ preserves the status of the original segments. For example, segments that were confirmed and locked in the previous version of the document, will be confirmed and locked in the reimported version, too.
- Set up pre-translation and analysis the same way as with newly imported documents. Repeat steps 3-8.
Finally, the documents must be exported automatically after the project is finished.
If the project template is for local projects, do this:
- Under Available triggers, click After project wrap-up.
- Next to the Actions added to the selected trigger list, click the + sign. The Select actions you want to add to the trigger window appears.
- Click Export document on this PC or Language Terminal. Click Add.
- The Export document on this PC or Language Terminal - settings window appears. Review the settings, and click OK.
If the project template is for an online project, do this:
- Under Available triggers, click Document completes workflow. (This event doesn't happen in local projects.)
- Next to the Actions added to the selected trigger list, click the + sign. The Select actions you want to add to the trigger window appears.
- Click Export target documents on server. Click Add. The Export target documents - settings window appears.
- Review the settings, and click OK.
From an online project, the memoQ server exports the documents to a folder on the server. The server's owner accesses the exported documents from the file store in memoQ. The project manager needs to open the project for management, and then look at the files for that project.
- To save the project template: In the Edit project template window, click OK.
To try the automated actions: Create a local or an online project from the project template. Import a document. Make the document go through the entire workflow. In the meantime, reimport the document at least once. At the end, either wrap up the project (local projects) or deliver the document from the last workflow role (online projects).
Add a new automated action
memoQ runs automated tasks when an event happens in the project. Choose an event and tell memoQ what it should do when that happens. See the example earlier in this topic.
- Under Available triggers, click an event. If the event already has automated tasks, they are listed under Actions added to the selected trigger.
Not all events happen in local projects: Some of the events happen in online projects only. If you set up a task for an online-only event, and you create a local project from the project template, that task won't run. To see what events are available in local projects, close the eye at the top right of the Edit project template window. (Click it if it's open.)
Events with existing actions are bold: If an event already has automated actions, it appears in bold under Available triggers. In the example above, the After document import, After reimport, and Project wrap-up events are already set to start some automated tasks.
- Next to the Actions added to the selected trigger list, click the + sign. The Select actions you want to add to the trigger window appears.
- Click the task you want memoQ to run, and click Add. A window appears with the settings of that task. The settings depend on the actual task.
- Review the settings, and change them if necessary. Click OK.
The order matters: The task is added to the end of the Actions added to the selected trigger list. When the selected event happens, memoQ runs the tasks in the order they are listed here. To change the order: Select the task you want to move, and click the Move up  or the Move down
  button to move it forward or backward in the list.
See the available actions
For each event in the project, you can choose from the tasks below. Some of them are available in online projects only. But a few of them work in local projects only.
When you finish
To save the project template, and return to Resource console: Click OK.
Possible next step: After you finish working on the template, close the Resource console, and create a project from the template.
To continue working on the project template: choose another category, and fine-tune other settings.
To return to Resource console, and not save the project template: Click Cancel.