Adobe InDesign Markup Language (IDML) documents
Fine-tune the settings that tell memoQ how to import Adobe InDesign Markup Language (IDML) documents.
memoQ imports ICML and INDD, too: The INDD format is Adobe's native InDesign format. The ICML format is a subset of Adobe's IDML file format specification.
Need Language Terminal to import INDD: If you import an INDD document, memoQ automatically turns to Language Terminal to convert it. If you don't have Language Terminal profile, or it isn't saved in memoQ, the import won't work. To track the import: In Project home, choose Translations. Click the InDesign import/export tab.
To learn more about importing documents with options: See the Document import settings main page. Or, see the page about the Document import options window.
How to get here
- Start importing an Adobe InDesign Markup Language (IDML) or an Adobe InDesign Document (INDD) with options.
- In the Document import options window, select the INX documents, and click Change filter and configuration.
- The Document import settings window appears with the Adobe InDesign Markup Language (IDML) settings.

What can you do?
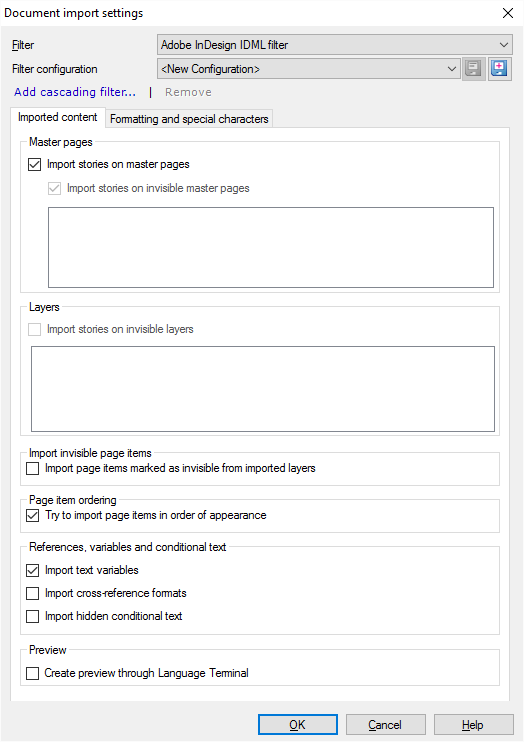
An Adobe InDesign document contains text in stories. Stories are laid out on master pages and document pages. You can control how memoQ imports stories from master pages.
This is on the Imported content tab. In the Master pages section, you have these options:
- Import stories on master pages: Clear this check box to omit all master pages from the import. By default, memoQ imports all stories from all master pages.
- Import stories on invisible master pages: Clear this check box to skip importing stories from master pages that do not appear in the document. (They are invisible master pages). By default, memoQ imports all stories from all invisible master pages. To import stories from some of the master pages: Check both check boxes. Then, select the individual invisible master pages that you want to import. In complex materials of several documents, a master page may be invisible in one document, but visible in another.
This is on the Imported content tab.
Normally, memoQ doesn't import any stories from invisible layers. To import some or all of the stories: In the Layers section, check the Import stories on invisible layers check box. To select individual invisible layers for importing: Check the check box of each layer you want to import. In complex materials of several languages, some languages may be there on an invisible layer.
This is on the Imported content tab.
Normally, memoQ try to determine the visual order of text elements in the document, and imports them in that order. To import document contents simply as they occur in the document: Clear the Try to import page items in order of appearance check box.
This is on the Imported content tab. In the References, variables and conditional text section, you have these options:
- Import text variables check box: Check this to import the contents of the text variables to translate. If the value of the variable changes in InDesign, the translation will not follow. Normally, memoQ imports variables.
- Import cross-reference formats check box: Check this to import the cross-reference formats into the document skeleton. This will preserve the formatting of cross-references for the exported document. Normally, memoQ doesn't do this.
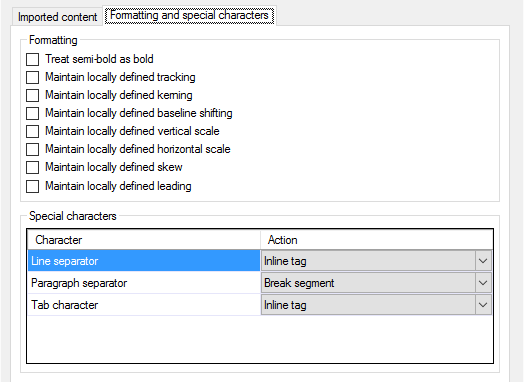
Click the Formatting and special characters tab to see options for this.

- Treat semibold as bold: Check this check box to import semibold text as bold text.
Note: If you check this check box, semibold text imported as bold will also be exported as bold. This means that the semibold formatting – treated differently in InDesign – will be replaced with bold formatting.
- Maintain locally defined tracking: Check this to keep locally defined spacing between character pairs where available. Normally, memoQ uses its own definitions for spacing between character pairs.
- Maintain locally defined kerning: Check this to keep locally defined whitespaces between characters where available. Normally, memoQ uses its own definitions for whitespaces between characters.
- Maintain locally defined baseline shifting: Check this to keep locally defined baseline shifting (locally defined vertical shifting of characters), where available. Normally, memoQ uses its own definitions for baseline shifting.
- Maintain locally defined vertical scale: Check this to keep the locally defined vertical scale (locally defined modification of the height of characters), where available. Normally, memoQ uses its own definitions for vertical scale.
- Maintain locally defined horizontal scale: Check this to keep the locally defined horizontal scale (locally defined modification of the width of characters), where available. Normally, memoQ uses its own definitions for horizontal scale.
- Maintain locally defined skew: Check this to keep the locally defined skew (the locally defined slanting of characters), where available. Normally, memoQ uses its own definitions for skew.
- Maintain locally defined leading: Check this to keep the locally defined leading (line spacing), where available. Normally, memoQ uses its own definitions for line spacing.
- Click the Formatting and special characters tab to see options for this.

- Special characters in IDML files are the line separator (line break), the paragraph separator (paragraph break), and the tab character.
- Click the one you want to set up. Click Line separator or Paragraph separator.
- To set what happens: In the Action drop-down box, choose one of the following settings:
Normally, memoQ doesn't create a preview for Adobe InDesign documents. But it can, through Language Terminal.
To convert the IDML document through Language Terminal, and get a preview in the process: In the Preview section, check the Create preview using Language Terminal check box.
Register your Language Terminal profile first: In the My memoQ page, check if your Language Terminal profile is saved in memoQ. If it isn't, click My Language Terminal Account.
When you finish
To confirm the settings, and return to the Document import options window: Click OK.
To return to the Document import options window, and not change the filter settings: Click Cancel.
If this is a cascading filter, you can change the settings of another filter in the chain: Click the name of the filter at the top of the window.
In the Document import options window: Click OK again to start importing the documents.