MS Office (MSG) files
MSG files are used in Microsoft Outlook and Exchange. They contain an e-mail thread, appointment, contact, task, or note. memoQ can import such MSG files.
Only e-mails have filter settings: memoQ always uses default settings to import calendar items, contacts, tasks, and notes.
How to get here
- Start importing an Outlook file.
- In the Document import options window, select the Outlook file, and click Change filter and configuration.
- The Document import settings window appears. From the Filter drop-down list, choose MSG filter.
What can you do?

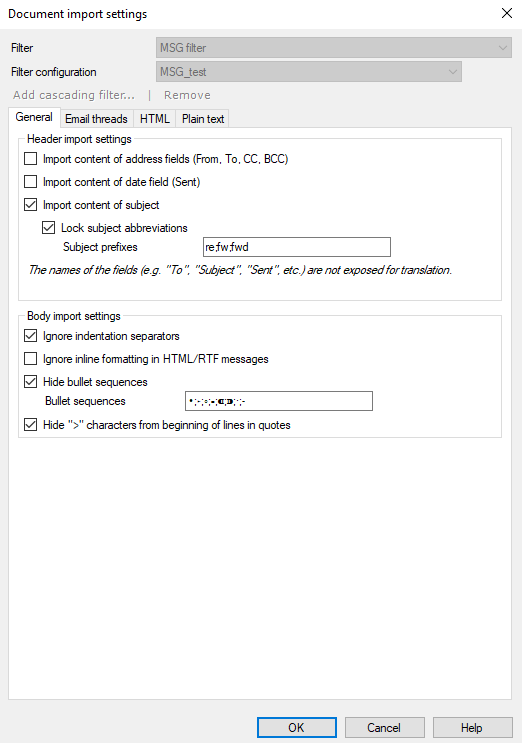
E-mails have data outside the actual e-mail text (for example, sender, recipient, subject, date). Tell memoQ how to import these in the Header import settings region.
- If the Import content of subject check box is checked, memoQ also imports the e-mail's subject.
- To translate common abbreviations (like RE: or FW:): clear the Lock subject abbreviations check box.
- To make these non-translatable, leave the check box checked. List these abbreviations in the Subject prefixes text box.
Tell memoQ how to import the actual content of the e-mail in the Body import settings region.
- Plain text e-mails: lines can be 80 characters at most. Longer text is broken into new lines. Normally, memoQ does not break the text. To see the breaks: clear the Ignore indentation separators check box.
In plain text e-mails, quoted parts begin with a ">" character. Normally, memoQ hides these. To show them: clear the Hide ">" characters from beginning of lines in quotes check box. - RTF e-mails: memoQ converts them to HTML before importing.
- HTML e-mails: Normally, memoQ imports such e-mails with the HTML document filter. To import as plain text: check the Ignore inline formatting in HTML/RTF messages check box.
When the e-mail text has bullet lists, memoQ hides the bullets in the imported document. To show them: clear the Hide bullet sequences check box. To tell memoQ what characters are bullet points: Edit the Bullet sequences text box.

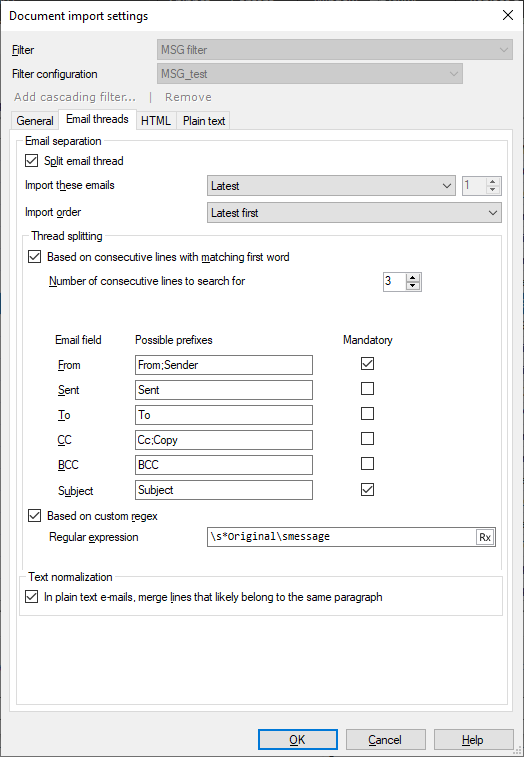
E-mail threads are made of a series of replies. memoQ can import these replies as separate documents. (To import the whole thread as one document, clear the Split email thread check box.) The settings under Email separation tell memoQ which e-mails of the thread you want to import, and in which order:
- To import every item: In the Import these emails dropdown, choose All. To import only the last e-mail: Choose Latest. To import the last, say, 5 items: choose Top, then set the number on the right to 5.
- To import the items in the order as they appear in the e-mail thread: In the Import order dropdown, choose Latest first. To import them in the order they were written: Choose Oldest first.
To tell memoQ how to separate the e-mails, use the settings under Thread splitting.
- To look for words that often appear in e-mail headers: Check the Based on consecutive lines with matching first word check box. For the fields you want to look for, select the Mandatory check box. If the e-mails' sender used Outlook in a different language, the fields' names will be different, too. For example, in German, From is Von, and To is An. Enter these names into each mandatory field's Possible prefixes text box.
-
To look for custom text patterns: Check the Based on custom regex check box. Enter a regular expression into the text box. memoQ splits the e-mail thread wherever the text matches the regex.
If you need assistance, open the Regex Assistant: Click the
 icon on the right, and create a regex, or choose one from the regex library. Then click the Insert regex button. memoQ inserts your regex into the text boxes as needed.
Longer text in plain text e-mails is usually wrapped into several lines. Normally, memoQ merges these lines into a paragraph. To leave them as separate lines: Under Text normalization, clear the In plain-text e-mails, merge lines that likely belong to the same paragraph check box.
This tab contains the same settings as memoQ's HTML import filter.
memoQ detects the encoding of the e-mail's text. Normally, it's UTF-8. If this is not right, choose another in the Select encoding list.
Currently, the Preview region is empty. The preview is under construction.
When you finish
To confirm the settings, and return to the Document import options window: Click OK.
To return the Document import options window, and not change the filter settings: Click Cancel.
If this is a cascading filter, you can change the settings of another filter in the chain: Click the name of the filter at the top of the window.
In the Document import options window: Click OK again to start importing the documents.