DeepL MT plugin settings
DeepL is a popular neural machine translation provider for 26 different languages (as of December 2021). Glossary use is available in English, French, German, and Spanish in specified language combinations.
To learn about how DeepL handles your data: Read their privacy policy.
How to get here
For a local profile:
- At the top of the memoQ window, in the Quick Access toolbar, click the Options
 icon. The Options window opens.
 - On the Default resources pane, click the MT settings
 icon. The MT settings pane appears.
 - Select the MT profile you are using and under the list, click Edit.
- On the Services tab, find the plugin and click its row. If it is turned on, click its row to open the DeepL MT plugin settings window. If it is turned off, click its row once to turn it on, then click it again to open the settings.
- At the top of the memoQ window, in the Quick Access toolbar, click the Resource console
 icon. The Resource console window opens.
 - In the Server URL list, choose or type the server's address. Click the Select
 button.
 - In the left-side pane, click the MT settings icon. The MT settings pane appears.
- Select the MT profile you are using and under the list, click Edit.
- On the Services tab, find the plugin and click its row. If it is turned on, click its row to open the DeepL MT plugin settings window. If it is turned off, click its row once to turn it on, then click it again to open the settings.
What can you do?
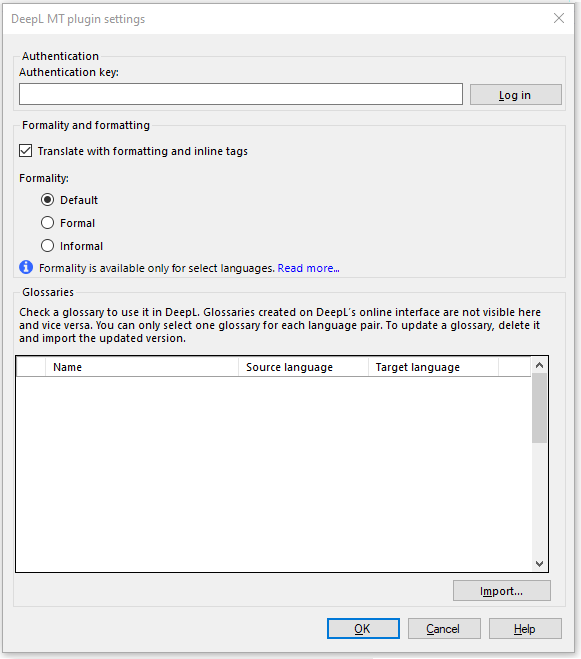
When you subscribe to the DeepL translation service, you get an authentication key. To start using the service, copy and paste it into the Authentication key text box.

Normally, when memoQ sends text to DeepL, memoQ sends tags with the source text. (This also means that you are sending more characters, which might cost you more.) The translation you get back from DeepL will contain tags, but they might be in the wrong place.
To exclude tags and formatting from translation: Clear the Translate with formatting and inline tags check box. You will need to insert all tags into the target text manually.
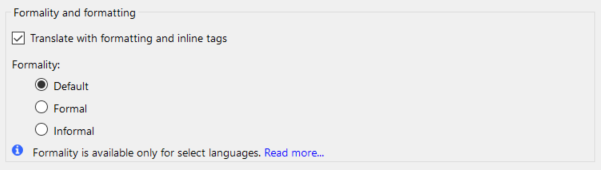
To choose a formality level for the translation: Choose the Default, Formal, or Informal radio button.
When set to Default, the DeepL plugin returns translations in the formal level.
For some languages (for example, English or Swedish), DeepL offers only one formality level. For other languages (for example French or German), the plugin returns different translations depending on this setting. For example, in German, "Who are you?" can become "Wer sind Sie?" (formal) or "Wer bist du?".
Using glossaries
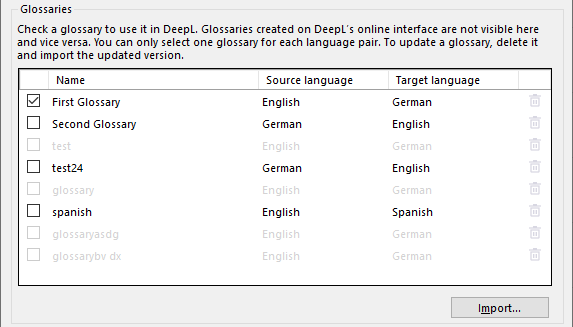
The Glossary list shows the glossaries you can use when translating with the DeepL plugin. Terms in the glossary's source column will always be translated as the term in the target column.
To select a glossary: Check its check box. Other glossaries for the same language pair become gray - you can only select one glossary for each language pair.
To add a glossary to the list: At the bottom of the window, click the Import button. The Import glossarywindow opens:
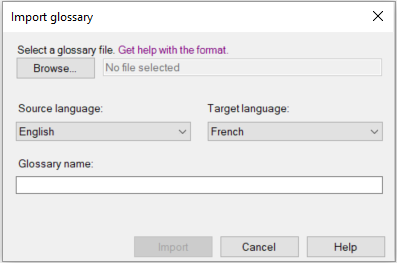
Click the Browse button, and find the glossary file you want to use. Choose a source and a target language, and change the glossary name as needed. This name appears in the glossary list.
To delete a glossary from the list: Click its Delete ![]() button.
button.
To update a glossary: Delete it and import the updated version. Importing always creates a new glossary.
To learn more about DeepL glossaries: Read this article in DeepL's documentation.
When you finish
To save the settings, and return to the Default resources tab of the Options window (or to the Resource console): Click OK, then click OK again.
To return to the Default resources tab of the Options window (or to the Resource console), but not save the new settings: Click Cancel, then click Cancel again.
To use the MT output in the translation editor:
- Open a project with a supported language pair.
- On the left side of the Project home or memoQ online project screen, click Settings.
- In the top bar, click the MT settings icon.
- Choose the MT profile in the project, or one you want to add to the project. Below the list, click Edit.
- On the Services tab of the Edit machine translation settings window, check the plugin's check box on the left.
- On the Settings tab of the Edit machine translation settings window, in the Translation results area, choose a setting other than Off.
- Open a document for editing, and see the machine-translated suggestions.
To use the MT output in pre-translation:
- Open a project with a supported language pair.
- On the left side of the Project home or memoQ online project screen, click Settings.
- In the top bar, click the MT settings icon.
- Choose the MT settings resource in the project, or one you want to add to the project. Below the list, click Edit.
- On the Services tab of the Edit machine translation settings window, check the plugin's check box on the left.
- On the Settings tab of the Edit machine translation settings window, select the plugin from the Pre-translation dropdown.
- Run Pre-translate. In the Pre-translate and statistics window, check the Use machine translation if there is no TM match check box. (memoQ will remember this.)