Server Administrator: CMS connections
memoQ server can receive translation jobs directly from content management systems (CMS) such as WordPress. Before a CMS system (such as a WordPress web site) can send translation jobs, you need to set up a connection for it in Server Administrator.
A CMS connection is a permission for a specific CMS system to sent translation jobs to memoQ server. Most of the time, a CMS system is a web server or a web site. Currently, memoQ server can accept translation jobs from WordPress web sites.
Before you set up a connection: Turn on the CMS API in the memoQ server deployment tool. To learn more: See the CMS API section of the Configure server topic from the memoQ server deployment tool help pages.
Requires memoQ project manager: You need the project manager edition of memoQ to manage a memoQ server or a memoQ cloud.
You need to be a project manager or an administrator: You may manage the server only if you are a member of the Project managers or Administrators group on the memoQ server. To change most settings, you must be member of the Administrators group.
How to get here
- At the very top of the memoQ window - in the Quick Access toolbar
 -, click the Server Administrator (cogwheel in a cloud)
  icon. The Server Administrator window opens, with the Connection pane.
Or: On the Project ribbon, click Server Administrator.
- Type or choose the address of the memoQ server, and click the Select button.
You may need to log in to the memoQ server: If you have not used the server before, the Log in to server window opens. Type your user name and password for that server, and click OK.
- Under Category, click CMS connections. The CMS connections pane appears.

What can you do?
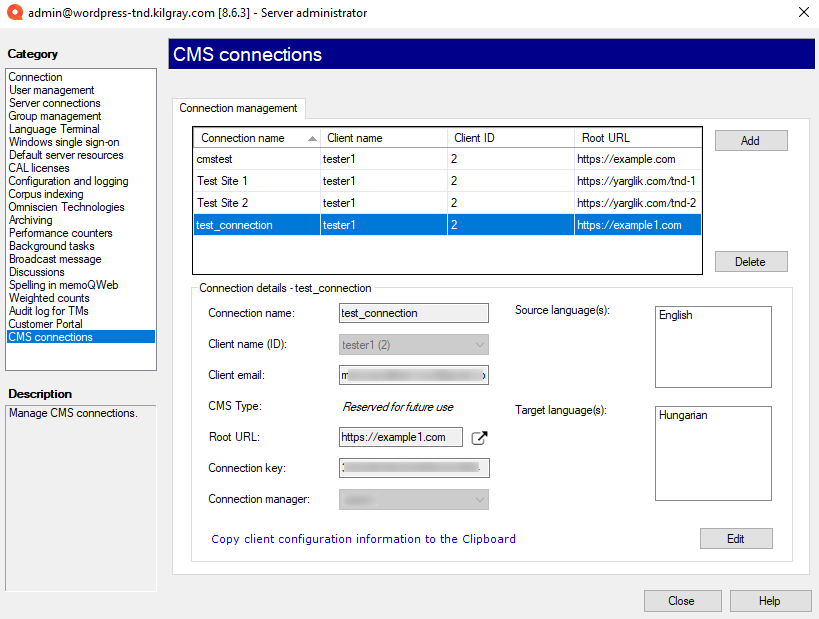
At the top of the window, there is a list of CMS connections. For each CMS system, there is a connection. Most of the time, a CMS system is a web server or a web site.
Before you add a CMS connection, you need to know the following:
- The name of the connection. Choose a name that refers to the CMS system you are allowing to connect.
- Details of the client who owns the CMS site. This includes the name of the client, a numeric identifier, and the e-mail address of the contact person of the client.
- The root URL (web site address) of the content management system. You can get this from the owner of the CMS site.
- A connection key. The CMS site will need to use this key when it connects to memoQ server. You can generate a new key when you add the connection.
- A connection manager: The connection manager is a user on memoQ server who will manage the jobs sent by the CMS site. This user must be member of the Project managers or the Administrators group.
To add a connection, click Add. The Add new CMS connection window opens. Fill in the fields, and click Save. To learn more: See Help about the Add new CMS connection window.
To change the details of an existing CMS connection: At the top of the window, select the CMS connection. Then, at the bottom, click Edit:

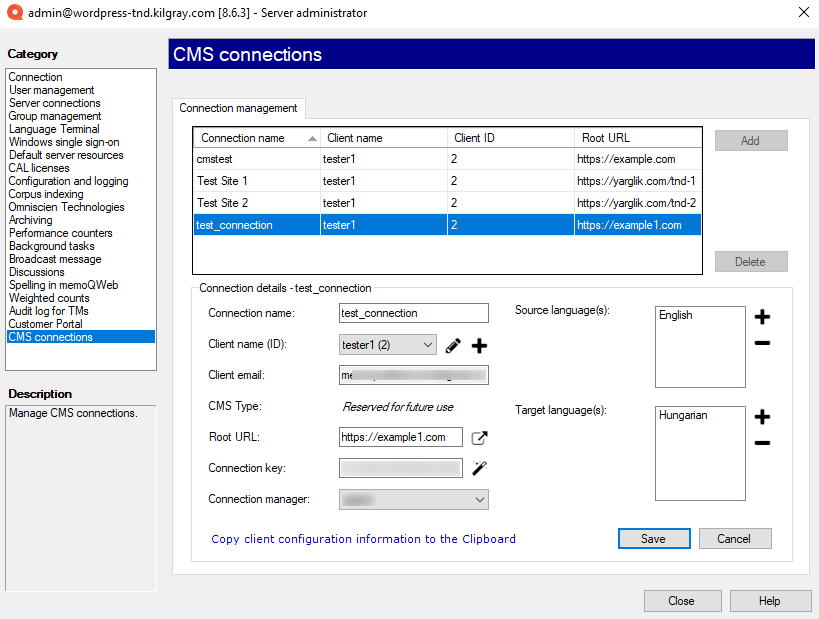
The boxes under Connection details become editable.
- To change the Connection name or the Root URL: Simply type a different name or URL.
- To change the Connection key: Next to the Connection key box, click the magic wand
 icon.
icon. - To choose another client: Click the Client name (ID) drop-down box, choose another item.
- To change the details of the current client: Next to the Client name (ID) drop-down box, click the pencil
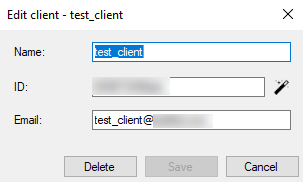
 icon. The Edit client window opens. Change the details as needed, and click Save.
- To delete a client: Next to the Client name (ID) drop-down box, click the pencil
 icon. The Edit client window opens. Click Delete. After this, you need to chose another client.
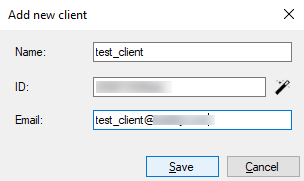
 - To add a new client: Next to the Client name (ID) drop-down box, click the plus + sign. The Add new client window opens. Fill in the name, the ID, and the e-mail address. The ID must be unique. To make sure the new ID is unique, click the magic wand
 icon next to the ID box. When you finish, click Save.
A connection also defines the languages of the translation jobs. memoQ server can accept a translation job if the source language is one of the source languages listed with the connection, and every target language is listed among the accepted target languages.
- To add a new source language: Next to the Source language(s) list, click the plus + sign. The Select language window opens. Choose the source language, and click OK.
- To remove a source language: In the Source language(s) list, select the language, and click the minus - sign. Make sure at least one source language remains on the list.
- To add a new target language: Next to the Target language(s) list, click the plus + sign. The Select language window opens. Choose the target language, and click OK.
- To remove a source language: In the Target language(s) list, select the language, and click the minus - sign. Make sure at least one target language remains on the list.
To save the details: Click Save.
If you do not want to make changes after all: Click Cancel.
Caution, the CMS may lose the connection: If you change the root URL or the connection key, the CMS system may lose the connection to memoQ server. In WordPress, you need to open the Translation management page, deactivate the memoQ service, and activate (authenticate) it again.
If a CMS system will not send translation jobs in the future, delete it from the CMS connections list.
To remove a CMS connection: At the top of the CMS connections pane, select the connection. Next to the list, click Delete.
After you do this, the CMS system will lose connection to the memoQ server. If you delete a CMS connection and create it again, you may need to set it up again in the CMS system. For example, in WordPress, you need to deactivate the memoQ service, and then activate (authenticate) it again.
After you create a connection, you need to set up the CMS system to use it. You will need a lot of details.
To get the details: At the top of the window, select the connection you need. At the bottom, click Copy client configuration information to the Clipboard.
Open a text editor such as Notepad, and press Ctrl+V to paste the details in a new text document. Save the document. If someone else needs to set up the CMS system, send this document in e-mail to the other person.
To set up WordPress, you need two items: the memoQ Server CMS Adapter address and the Connection key.
When you finish
After you set up a new connection, you need to configure the CMS system to use it. Before you do it, select the connection in the CMS connections page, and click Copy client configuration information to the Clipboard. Paste the details in a text document, and send it to the person who will configure the CMS system.
- Open the admin page of the WordPress site (open https://web-address/wp-admin). Sign in as an administrator of the WordPress site.
- In the menu on the left, point to WPML, and click Translation management. The Translation management page opens.
- On the Translation management page, click Translators.
- Under Available Translation Services, find memoQ.
- Click Activate. The page reloads, and the memoQ service moves up. It will appear directly below the Available Translation Services heading.
- Next to the memoQ logo, click Authenticate. In the window that appears, paste first the Connection key, then the memoQ server CMS Adapter address. Before you do this, you need to save these details from memoQ server (see the Copy the details of a connection to the clipboard section above). Click OK.
At this point, memoQ is authorized to receive translation jobs from this WordPress site.
To return to memoQ: Click Close.
Or, choose another category to manage:
- Connection (choose this to manage a different server)
- User management
- Server connections
- Group management
- Language Terminal
- Windows single sign-on
- Default server resources
- CAL licenses
- ELM licenses
- Configuration and logging
- Web service interface
- Corpus indexing
- Omniscien Technologies
- Archiving
- Performance counters
- Storage
- Background tasks
- Broadcast message
- Discussions
- Spelling in memoQWeb
- Weighted counts
- Audit log for TM
- Customer Portal
- CMS connections