New connection (Content connector)
In this window, you can specify the contents and the settings of a new content connection. A content connection corresponds to a memoQ project, and it contains a number of settings that control how memoQ or memoQ server creates a project from the connection.
A connection is very much like a project. You need to know what folders and files will be imported, how they will be exported, and what the languages are. A content connection always has a source language and one or more target languages.
How to get here
- Open the memoQ Content connector client program.
- Make sure you know all the details of the connection (or the underlying project):
- The type of the source (file folder or Subversion repository)
- The folder where all the documents are (if it is a folder)
- The path and extensions of the files that need to be imported - and/or the path and extensions of the files that must not be imported.
- Rules to produce the folder path and the name of the exported files.
- Source language and target languages
- In case of a Subversion repository, the network address of the repository, a user name and a password.
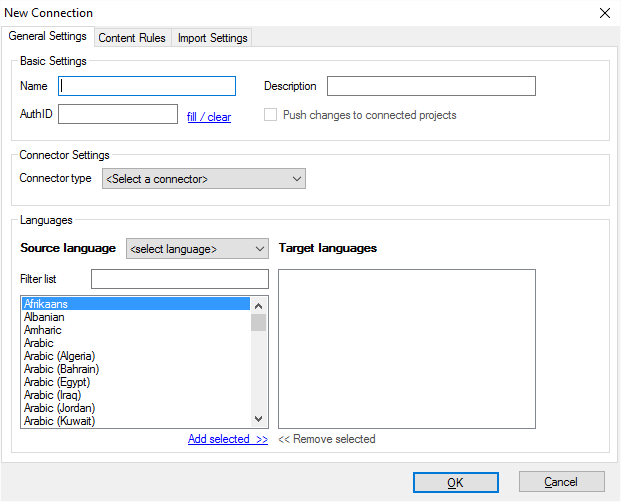
- At the bottom of the list, click New connection. The New connection window opens:
What can you do?
On the General Settings tab, fill in the boxes under Basic settings. Type a name and a description for the connection. Do not fill in the AuthID box: click fill / clear instead. A cryptic authorization identifier will appear in the AuthID box. The user of memoQ or memoQ server will have to use this ID to use the connection you are creating.
- Under Connector Settings, choose the File system connector in the Connector type drop-down box. The New connection window changes. The Root folder box appears, where you can choose the folder that you want memoQ to watch.
- Next to the Root folder text box, click the ellipsis button. The Select folder window opens. Find and choose the folder that contains every source folder and document. After you find the folder, click its name, and click OK. Check the Recursive check box.
- Under Languages languages, select one source language (in the Source language drop-down box) and one or more target languages. When memoQ creates a project from this connection, it will create a project with the same languages. In a way, you are setting up the future memoQ project in the memoQ content connector.
-
To select the target languages, double-click each language on the left. To filter the list of languages, type letters in the box above the list. Then double-click one or more target languages.
Content connector languages are stronger than template languages: When you create a template-based project using a connection, memoQ will use the source and target languages in the connection, and not the ones in the template. When you create a content-connected project from a template, memoQ will ignore the source and target languages that were set up in the template.
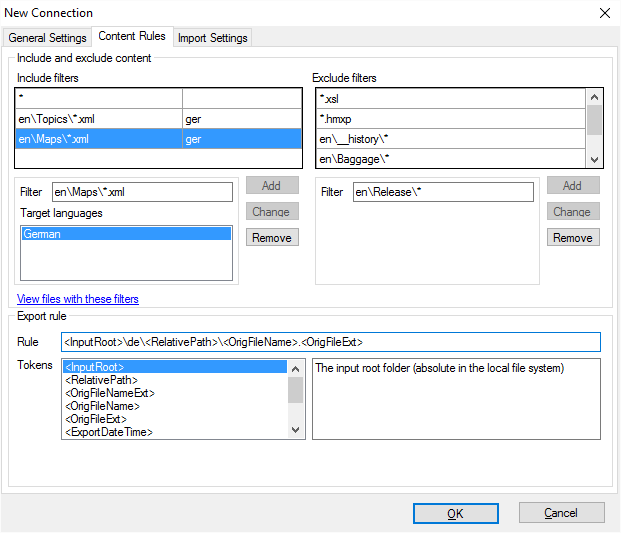
- At this point, do not click OK. Click the Content rules tab. On this tab, you can specify the set of files that will be imported in the translation project. You need this because from a content folder, not all files need translation. Some of them are extra files (reference files, code files, images). In addition, the translated (exported) files will also be saved inside this folder.
- For example, you may select a folder that has two subfolders: source and target. The source folder contains files with the .html and the .png extensions. You need to translate the .html documents from the source folder, and the finished translations should be saved to the target folder.
- You can specify this under Include and exclude content, using a single pattern in the Include filters list. Under Include filters, select the single asterisk (*). In the Filter box, type source\*.html. Under Target languages, select all target languages that these files must be translated into. (Do not forget this.) Click Change. This is how you read this pattern: From the folder called source right under the root folder, take all files whose names end in .html.
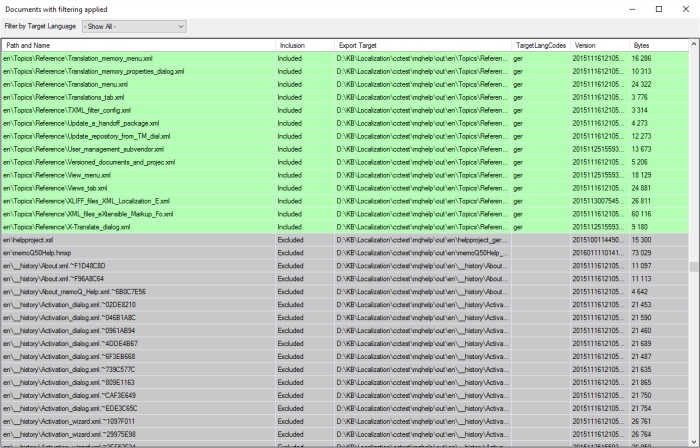
- To check what files will be imported, click View files with these filters. The Documents with filtering applied window opens. Files that will be sent to memoQ are higlighted in green. Files that will not be sent to memoQ are highlighted in red. Files that are explicitly excluded will be highlighted in grey. Here is an example:
- When there are new files, these rules are applied automatically: If you add new files to the folder that match at least one of the include patterns, they will automatically be sent to memoQ through the connection.
- You can also exclude files that match specific patterns. Add these patterns to the Exclude filters list. Suppose your folder contains three types of files: .html, .properties, and .png. Of those, .png files are not known to memoQ, and should not be offered for translation. To filter for "real" translatable files, first you use the * pattern in the Include filters list: this will include all files from all folders under the root folder. However, you also add *.png to the Exclude filters list, which removes the .png files from the list of files to be imported.
- When setting up the include and the exclude filters, always check what types of files memoQ can process. If the filter sends a file to memoQ that memoQ does not recognize, memoQ will not be able to set up the project at all.
- The Content connector can also take care of exporting the finished translations. Within the folder you are watching, you can specify where the translated files must be saved, and what their names should be. To do this, write up an export rule under Export rule. Practically, you type a template for the folder path and name for the exported files. This template is put together from characters and predefined placeholders. You can insert these placeholders by typing them, or by double-clicking them in under Tokens.
- For example, if you are taking files from the 'source' folder within your root folder, and you want to save the translated files in the 'target' folder within the same root folder (see the screenshot above), you can use the following pattern:
<InputRoot>\target\<RelativePath>\<OrigFileName>_<TrgLangIso3>.<OrigFileExt>
Here is a list of placeholders you can use, including those in the template above:
- <InputRoot>: Inserts the folder path that leads to the topmost folder in the folder structure you are watching.
- <RelativePath>: Inserts the relative path of the exported file within the root folder.
- <OrigFileNameExt>: The name and extension of the original source file.
- <OrigFileName>: The name of the original source file, without the extension.
- <OrigFileExt>: The extension of the original source file.
- <ExportDateTime>: The date and time of exporting the translated file.
- <ExportDate>: The date of exporting the translated file.
- <ExportTime>: The time of day of exporting the translated file.
- <TrgLangIso3>: The 3-letter ISO code of the target language.
- <TrgLangIso2>: The two-letter ISO code of the target language.
- Specifying the export rule is simlar to editing export path rules in memoQ. For more information, read memoQ help about editing export path rules.
- Do not click the Import settings tab. Instead, use templates when you create online projects in memoQ. When you do this, the import filter configurations are specified in the project template. To learn more, see memoQ help about editing project templates.
You need this procedure when the source documents are not stored on, or copied to, the content connector server computer itself. The procedure works if both computers are in the same organization.
If your organization is a translation company, this happens if you keep receiving the source materials on a computer at the "edge" of your company network – for example, your client is uploading files to a public server of yours through FTP.
To retrieve files from another computer over the network, use the File System setting of the content connector.
The network in this case means the local network of your organization. Using the content connector, you will access files stored on another Windows machine. This is not FTP or Dropbox – you would manage those like local folders.
To set up the connection:
- Make sure that the remote folder you want to connect to is available from the computer that runs the memoQ content connector service.
Remote folder must be a Windows-style shared folder: The File System connector cannot connect to folders that are accessible through FTP/SFTP, or HTTP, or another protocol.
- Make note of the network path that leads to the remote folder. You need to use the network path itself: it consists of a server name and a folder name, optionally followed by further folders. The network path looks like this: \\server\folder. Do not assign a drive letter to the remote folder, because the drive letter will become invalid when you log off from the computer.
- In addition, make sure that both you and the memoQ content connector service have sufficient privileges to access the remote folder. If the two computers are not in the same Windows domain, or you are not using a domain user account, the same user name and password must exist on both the content connector computer, and the server that hosts the remote folders.
- Do this only if the memoQ content connector server service runs in the name of the local operating system (Local system account). This account will not be able to access the network. You may need to change the service user to one that has access to the network and also to the shared folder where the source contents must come from, as well as to the folder where the translated files are saved. Use the Services program in Windows (open the Start menu, click Run or Search, and type services.msc, then press Enter) to configure this user account for the service. Right-click the name of the memoQ content connector service, choose Properties, and click the Log On tab to specify the user account you selected. Restart the memoQ content connector server service for the change to take effect.
To learn more: Read Help about deploying the memoQ Content connector.
- After you restart the memoQ content connector service, follow the steps in the previous section on this page (Watch a folder on the local hard disk). When you need to specify the root folder for the connection, paste the network address you noted down in Step 2 in the Root folder box:
- Do not click the ellipsis button to select a folder.
From version 9.2, memoQ content connector has a module that can connect to a Git repository. Git is a widely known open-source source code version control system that can be used to store source code for programming, and the version history of that source code. Although Git is mainly intended to store programming source code, it is also suitable for storing a shared repository of generic documents such as text, spreadsheets, presentations, or other data.
Attention, you need an extra license: To make this work, you need a separate license for the Git connector: In the Content connector activation window, check if you have a license for the Git connector. If you do not, contact memoQ Ltd. to purchase one.
Needs configuration first: Before you can set up Git connections in the Content connector client, the memoQ server's system administrator needs to set up the way the Content connector is running on the memoQ server.
Git connections use the "smart HTTP" protocol for connecting to Git servers. For signing in to the server, you have these choices:
- GitHub: username+password or personal access token
- GitLab: username+password or personal access token
- Bitbucket: username+password or username+app password
Create a connection
- In the Content connector client, click New connection.
- Select an empty folder for the local clone of the repository.
- Set the Server URL.
- Enter login data.
- Click the Load branches button.
- Select the first branch you need.
- Clone the repository.
- On the Content rules tab, add target languages to the Include rules as needed. (See the instructions for local folder connections.)
- Click OK.
Create connections for different branches
You need separate connections for each branch of the same repository. There's a simple way that also uses less storage space:
- In the Content connector client, select the connection to the same repository - OR - create one as above if needed.
- Click Clone connection.
- Change the new connection’s name.
- Click the Load branches button.
- Select the second branch to be used.
- Click OK.
This way, you do not have to clone the new branch. If you use this connection, it will check out its branch to the same folder as the first one, overwriting that working copy.
memoQ content connector has another module that can connect to a Subversion repository. Subversion is an older, less popular open-source source code version control system than Git. It also can be used to store source code for programming, and the version history of that source code. Although Subversion is mainly intended to store programming source code, it is also suitable for storing a shared repository of generic documents such as text, spreadsheets, presentations, or other data.
Your client may use a Subversion repository to store files to translate. Through the memoQ content connector, memoQ server can retrieve source-language content directly from the Subversion repository, and send back the translated text to a different folder in the same Subversion repository.
In most cases, memoQ content connector will run on a separate computer, and it will access the Subversion repository over the network. In this case, you should operate memoQ content connector on the same computer as the memoQ server that creates the translation projects from the retrieved content.
Attention, you need an extra license: To make this work, you need a separate license for the Subversion connector: In the Content connector activation window, check if you have a license for the Subversion connector. If you do not, contact memoQ Ltd. to purchase one.
In New connection window, under Connector settings, choose SVN connector from the Connector type drop-down box. The New connection window changes as follows:
Before you can connect to a Subversion repository, you need to receive four details from your client:
- The address of the Subversion server. This is similar to a web address, and appears in the form of svn://servername/repositoryname.
- Whether or not the opening folder has subfolders that contain files to translate.
- A user name to access the Subversion repository.
- The password for this user.
Check if you need to use VPN or tunneling: The connection to the Subversion server may be encrypted using a virtual private network or another tunneling technology. If your client uses this kind of encryption, contact them for detailed instructions. You may need to establish a connection and keep it up permanently so that the memoQ content connector can regularly contact the Subversion server, and retrieve new or updated content.
Under Connector Settings, fill in the boxes from the details you received from your client.
For everything else, follow the instructions in the Watch a folder on the local hard disk section, earlier on this page.
When you need to specify a rule that controls where the translated files are saved (committed as Subversion calls it), and how they are named, there are two new placeholders you can use:
- <RepositoryRoot>: The svn:// address of the root folder of the entire Subversion repository, starting with the name of the server.
- <RootFolderUrl>: The svn:// address of the root folder as specified on the General Settings tab of the New connection dialog, starting with the name of the server.
The two will usually be different because the files to translate almost always reside in a subfolder within the root folder of the repository. However, using the <RepositoryRoot> placeholder, it is theoretically possible to save translated files anywhere in the Subversion repository – if the user specified in the Authentication section of the General settings tab has access to the intended target folder.
The rest of the procedure is described under Watch a folder on the local hard disk, earlier on this page.
When you finish
Click OK to finish creating the connection. The memoQ Content connector client window returns. The new connection will be on the list.
Connect to your memoQ server. Create a new online project from a template, connecting to the new connection. To learn more, read Help about creating a new online project from a template.