New memoQ project (Online project; legacy)
This wizard helps you create an online project on a memoQ server.
You can track online projects on Language Terminal. This helps you do the following:
- Check the availability of translators and reviewers
- See the costs of the project by calculating them from the prices used by the various participants
- Get reports from Language Terminal about the projects
Use templates instead: This is the old way to start a project. Create the project from a template instead, it takes less time. To learn more, see Help about creating an online project from template.
Requires memoQ project manager: You need the project manager edition of memoQ to create online projects.
You need to be a project manager or an administrator: You may create online projects only if you are member of the Project managers or Administrators group on the memoQ server.
Before you track the project on Language Terminal, you must prepare memoQ server: Use the Language Terminal pane in Server administrator to connect your memoQ server to Language Terminal. If you have no permission to do this, contact the administrator of the memoQ server. To learn more: See Help about the Language Terminal pane of Server Administrator.
How to get here
On the main memoQ window - the Dashboard -, connect to a memoQ server: At the top of the Dashboard, type the address of the server in the text box. Or, choose a server from the drop-down list.
Type name and password if this is the first time: If you haven't used that server before, the Log in to server window appears. Type your user name and password. On the server, you must have Project Manager or Administrator privileges at least.
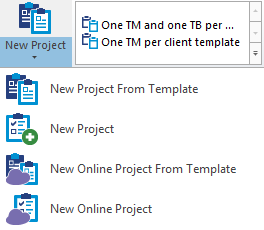
On the Project ribbon, click New Project, and from the menu, choose New Online Project. The New memoQ project window opens.
What can you do?
Go through the steps of the wizard, specifying the details and settings of the online project.

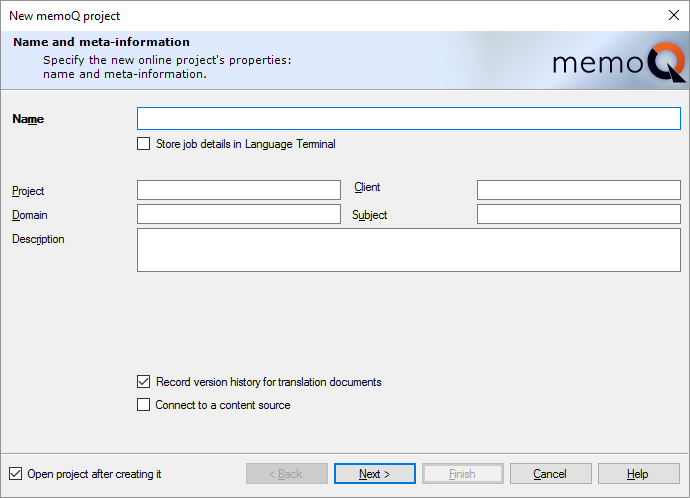
Type a name for the project.
You can also enter more details such as Project, Client, Domain, Subject, and Description.
Fill in as many details as you can: Later, you can search for these details when you try to find a specific project. The more details you fill in, the easier it will be to find the project.
Do not clear the Record version history for translation documents check box: memoQ will track the history of documents and segments in the project. Whenever a change is made to a segment, memoQ records the earlier version, so that you can view the changes, or even to revert to an earlier version. In addition, you can tag your project at a specific time, so that memoQ can always show how the project looked like at the time it was tagged. There is no reason to turn this off, unless you are running very low on free disk space.
To track the project on Language Terminal: Check the Store job details in Language Terminal check box. To learn more, see the next section on this page.
- Connect to a content source check box: Check this if you need memoQ server to watch a content source [such as a file folder or a content management system (CMS) on the server itself, or another computer], instead of adding files manually. If this check box is checked, and you click Next, memoQ will display the Content source page.
By connecting to a content source, you create a content-connected online project. You cannot add documents manually to a content-connected project. All documents in the project are received from the content source. There is no regular Export command either: when the translation is finished, documents will be sent back to the content source. The content source is always set up with rules that control how documents are imported and exported.
Cannot track content-connected projects on Language Terminal: If you check the Store job details in Language Terminal check box, you will not be able to connect the project to Language Terminal.
Cannot change the languages in a content-connected project: The languages are configured in the connection that is hosted in the content connector service.
To proceed to the next screen: Click Next.
To return to the Dashboard without creating a project: Click Cancel.
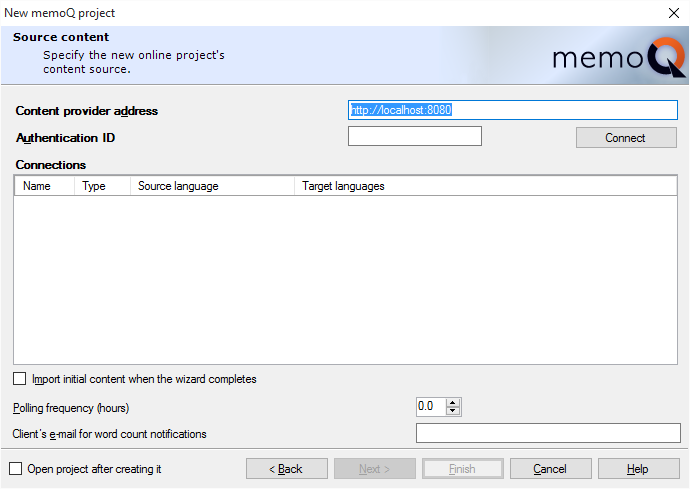
Type the address of the content source in the Content provider address box, and if the content source requires an authentication ID (practically, a password), type or paste it in the Authentication ID box. Then click Connect.
memoQ will list the available content sources in the Connections list. Click the content source you wish to use, and click Next.
memoQ will fetch the documents from the content source, and detect their language.
Content connector languages are stronger than template languages: When you create a template-based project using a connection, memoQ will use the source and target languages in the connection, and not the ones in the template. When you create a content-connected project from a template, memoQ will ignore the source and target languages that were set up in the template.
Template filter configurations are stronger than content connector filter configurations: When you use this template to create a content-connected project, memoQ will use the filter configurations in the template, and not the ones in the content source. When you create a content-connected project from a template, memoQ will ignore the filter configurations that were set up in the content connector.
To proceed to the next screen: Click Next.
To return to the Dashboard without creating a project: Click Cancel.
To go back to the previous page: Click Back.
To track the project on Language Terminal: Type a name for the project, then check the Store job details in Language Terminal check box.
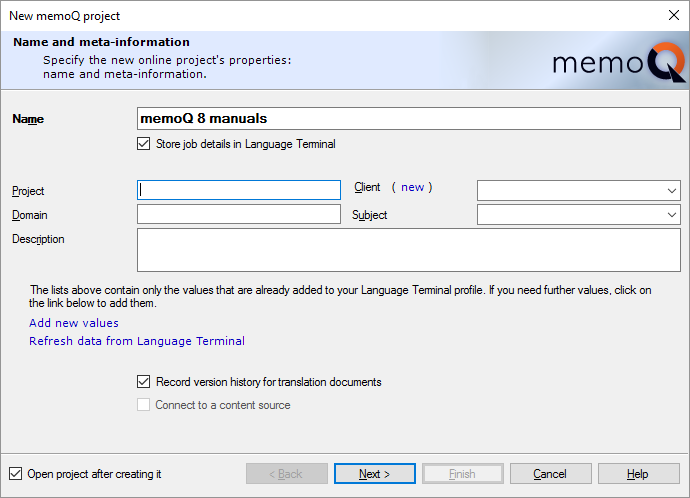
The Client and Subject boxes become drop-down lists. You must choose a client and a subject field from the Language Terminal profile of your organization.
To add a new client: Do not type a name in the Client box. Instead, click the (new) link before the box. The Add new customer window opens. In the Customer name box, type the name of the client. Click OK. Then, on the Name and meta-information page, choose the new client from the Client drop-down box.
To add a new subject field: Do not type a name in the Subject box. Instead, at the bottom, click Add new values. The Subject fields page opens from your Language Terminal profile. On that page, click Add, and type the name of the subject field. Then switch back to memoQ, and click Refresh data from Language Terminal. After this, you can choose the new subject field from the Subject drop-down.
Fill in the Project and Domain boxes, too. In addition, write a short description for the project, so that others will be able to identify it more easily.
To proceed to choose languages: Click Next.
To return to the Dashboard without creating a project: Click Cancel.
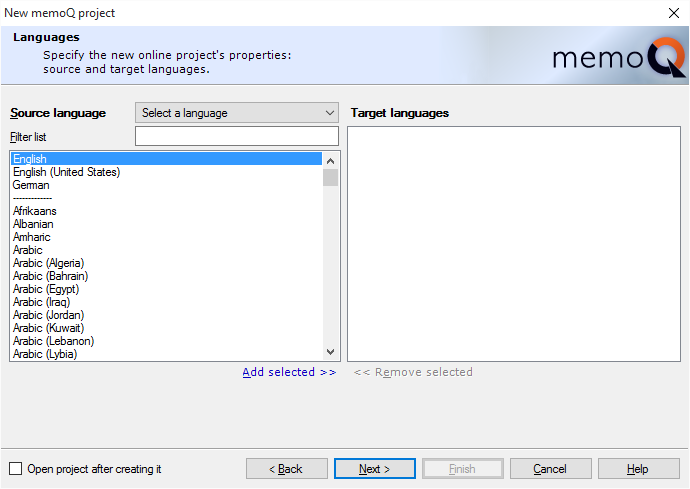
Select the languages for the project.
From the Source language drop-down box, choose the source language.
To add target languages: Click the name of the language in the language list. You can select two or more languages: Click the first language, then press and hold down Ctrl, and click the other languages. Under the list, click Add selected. The selected language appears in the Target languages list on the right. You can also double-click the name of each language.
To find a language: In the Filter list box, start typing the name of the language. memoQ will narrow down the list to the languages that match the characters you typed. For example, if you type 'glish', the list will contain the English language (and its sublanguages) only.
Using Language Terminal, and unable to find the languages you need?
If you are connecting the project to Language Terminal, the choice of languages will be restricted to those that you have in the Language Terminal profile of your organization.
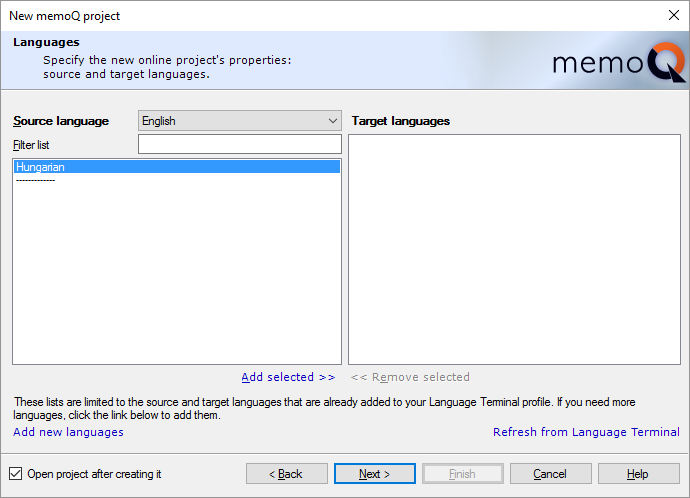
To add new languages:
- At the bottom, click Add new languages. The organizational profile opens from Language Terminal, in a web browser.
- Scroll down to the Languages section, and add source languages and target languages as you see fit.
- Switch back to memoQ. At the bottom of the Languages page, click Refresh from Language Terminal.
- The new languages will appear in the Source language and Target languages lists.
Now you can select the languages.
To proceed to the next screen: Click Next.
To return to the Dashboard without creating a project: Click Cancel.
To go back to the previous page: Click Back.
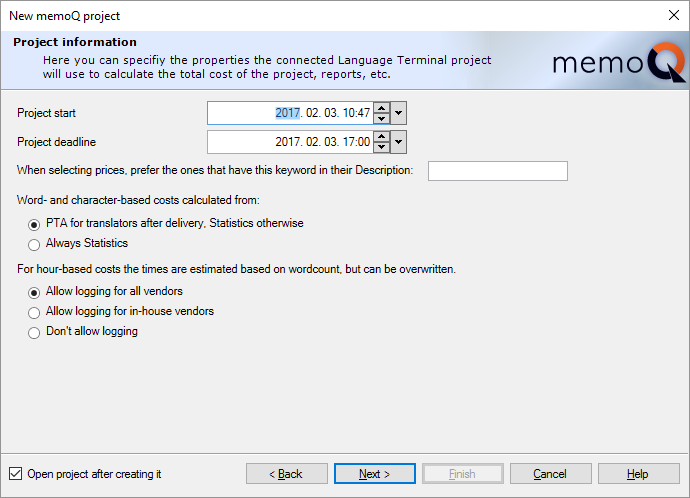
- Set the start date and the overall deadline for the project. Choose two dates in the Project start and in the Project deadline boxes.
- memoQ can calculate the costs of the project. Your profile may contain several pricing strategies, which can be used for calculating the cost of translation or reviewing, and it can depend on the language pair, the vendor, and on keywords that are there in the description of the pricing strategy. You can use the keywords to categorize the pricing strategies, and on the Project information page, you can type keywords to choose the right pricing strategies.
To view and change pricing strategies: Visit the Pricing strategies page of your Language Terminal profile.
- Choose how memoQ should calculate the costs. Before the documents are translated, all you have is the analysis. Those numbers must be multiplied with the prices in the pricing strategies. However, after the documents are translated, you can use the post-translation analysis. The post-translation analysis tells you what matches have actually been used, rather than what matches could be used (that's what the analysis says). Normally, memoQ will use the post-translation analysis. If you need to use the analysis all along, click the Always Statistics radio button.
- Choose how hours should be calculated. Sometimes reviewing is paid by the hour. (It happens in translation, too, but it is not as common.) To calculate the cost, memoQ must be able to count the hours. memoQ will calculate the hours from the word count, but participants can also log time in the project. Normally, memoQ allows everyone to do this. If you want to restrict this to in-house translators and reviewers, click the Allow logging for in-house vendors radio button. To prevent people from logging time at all, click the Don't allow logging radio button.
Click Next.
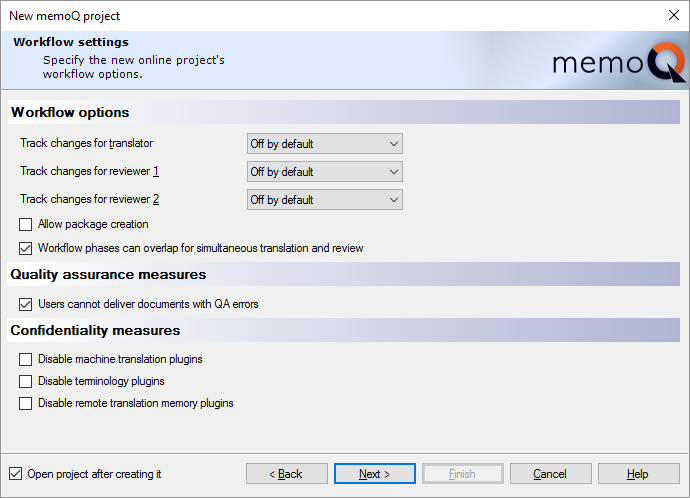
By checking or clearing the check boxes under Workflow options, you can answer this question:
Question: Do translators and reviewers need to see their changes tracked?
Normally, tracking changes is off for all participants, but they can turn it on. Translators do not need if they translate most segments from scratch. They may need Track changes if they have matches or machine translation in most segments.
For every role, you can choose from four settings. Use the Track changes for translator, Track changes for reviewer 1, or the Track changes for reviewer 2 drop-down boxes.
- Off by default: This is the default setting. Tracking changes is off, but the translator or reviewer can turn it on.
- On by default: Tracking changes is on, but the translator or reviewer can turn it off.
- Off: Tracking changes is off, and the translator or reviewer cannot turn it on.
- On: Tracking changes is on, and the translator or reviewer cannot turn it off.
Question: Do translators and reviewers work on the same document at the same time?
- Yes: Clear the Allow package creation check box. Or, make sure it's cleared. Check the Workflow phases can overlap for simultaneous translation and review check box.
Default is yes: At first, a project template - and an online project - is set up like this. But there's a price: Every user needs to be online all the time while they work on the job.
- No - or they would, but there are users who can't be online all the time: Check the Allow package creation check box. This clears the Workflow phases can overlap for simultaneous translation and review check box. If you allow package creation, users can download handoff packages from the online project. It's imported on their own computers, and they can continue working on the project offline.
Must prepare package creation: Allowing package creation in the online project is not enough. Each user must be allowed to use packages. You can give them permission in their memoQ server user account.
Sending work to subvendor groups? Do not use packages: Make sure the Allow package creation check box is cleared. Otherwise memoQ will not allow you to assign subvendor groups to documents.
By checking or clearing the check box under Quality assurance measures, you can answer the following question:
Question: Who will go through quality assurance warnings? The translator or the reviewer?
- Translator: To force the translator to look at all quality assurance warnings: Check the Users cannot deliver documents with QA errors check box. This is the default setting: You need to clear the check box if you don't want this. The translator won't be able to click Deliver before all automatic QA warnings are corrected or dismissed.
- Reviewer: Clear the Users cannot deliver documents with QA errors check box. The translator can click Deliver, no matter how many active QA warnings there are in a document. Use this if reviewers in your organization have the capacity to tackle the warnings.
By checking or clearing the check boxes under Workflow settings, you can answer the following question:
Question: Is the source material confidential or even secret?
memoQ can use various online resources (machine translation, terminology services, online translation memories) to help with translation. But then memoQ sends complete segments to public websites. If the source material is confidential, this may be a breach of your non-disclosure agreement with your client. You can prevent the translators and reviewers from using these services in that project.
- Confidential or secret materials: Check the Disable machine translation plugins, Disable terminology plugins, and Disable remote translation memory plugins check boxes. At first, memoQ allows users to turn to these. But if these check boxes are checked, the individual memoQ copies of your users won't reach out to these services. If you are concerned about confidentiality, you should turn on these settings together.
You may want to prevent the use of these services if you want control over what resources translators and reviewers use. You may need this for better quality control.
- Materials are not confidential, but you don't want to allow machine translation: Check the Disable machine translation plugins check box, and leave the rest cleared.
- Not confidential materials: Leave all the check boxes cleared, unless you want to control what resources translators use, for quality reasons.
To proceed to the next screen: Click Next.
To return to the Dashboard without creating a project: Click Cancel.
To go back to the previous page: Click Back.
In this wizard page (Checkout and communication options), you can control what team members can do with documents they check out along with this project. The options are essentially the same as with handoff packages. If you have checked the Allow package creation, the Resources in packages options are also visible.
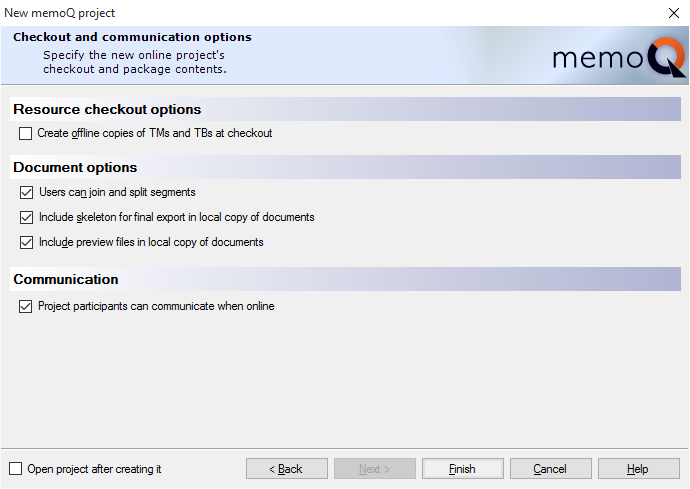
If the network might be slow between the translator and your server, check the Create offline copies of TMs and TBs at checkout check box. When the project is checked out, memoQ downloads the translation memories and term bases. The checkout will take longer, and the users will need more disk space on their computers - but memoQ will offer suggestions more quickly. Normally, memoQ does not download translation memories and term bases.
LiveDocs corpora are never downloaded.
The Document options normally allow every user to join and split segments; to export the finished translation; and to see the preview for each document they downloaded. Most of the time, there is no reason to turn off any of these. Here are some of the exceptions:
- If it's important that source segments stay the same in all target languages: Clear the Users can join and split segments check box. This can be useful in projects with several target languages.
- If the documents are so confidential that you want to prevent users from exporting them on their computers: Clear the Include skeleton for final export in local copy of documents check box. In this case, you must export every document from the memoQ online project window.
- If you need to minimize the network load when checking out projects: Clear the Include skeleton for final export in local copy of documents and the Include preview files in local copy of documents check boxes.
Checkout is leaner in memoQ 7.8.153 and higher: The "skeleton" (data required for document export) and preview data are not downloaded when the project is checked out. memoQ downloads them later, when they are needed. The preview is downloaded when the user opens a document for the first time. The "skeleton" is downloaded when the user exports the translated document.
When a project works with packages, users can either check out the project, or they can download a package that is imported on their computers like a handoff package. In this case, a Resources in packages section is also there on this wizard page:

You can decide what is included in a package. You have three choices:
- Create and include project TM and TB: A project TM is a translation memory that contains segments from the TMs in the project. They are those segments that match at least one segment in the project. The Project TB is a term base that contains entries from all the TBs in the project. They are the entries that return from the TBs as a lookup result from the documents. In short, users can download a minimum-size TM and TB that give them everything there is at the beginning of the project. But these TMs and TBs don't include entries that are saved in the 'live' TMs and TBs during the project. And a lot of entries will be missing from the TMs that could be used for concordancing. But the user will have access to the 'original' TMs and TBs over the network. This is the default choice.
- Include copies of entire TMs, TBs and LiveDocs corpora: All the project's TMs, TBs and LiveDocs corpora are downloaded with the package. This can be an immense amount of data, taking a long time to download, and occupying a lot of disk space. Choose this only if the network connection between the users and the memoQ server is so bad that otherwise they couldn't receive suggestions. Term bases from QTerm are not added to the package, only linked (just like if you chose the next option).
- Link remote TMs, TBs and LiveDocs corpora: There won't be any resources in the package itself. But when you import the project, memoQ will connect to the online translation memories, term bases, and LiveDocs corpora. Translators must be online to receive results. But this package will be the fastest to download, and occupy the least disk space.
All other settings are the same for all online projects. To learn more, see the previous section in this topic.
Finally, you can decide if participants can reach out to each other inside memoQ. Normally, memoQ allows users to chat and to start discussions in an online project. If, for any reason, you cannot allow this: Under Communication, clear the Project participants can communicate when online check box.
After you complete the wizard, memoQ will create an empty online project on the memoQ server.
When you finish
To create the online project on the memoQ server: Click Finish.
Continue setting up the project in the memoQ online project window: After the project is created, memoQ will open it for management in the memoQ online project window. (Unless you turn this off in the wizard.) There you can import documents and assign them to participants. You can also add LiveDocs corpora, translation memories, term bases, and other resources. To learn more, see Help about the memoQ online project window.
To return to the Dashboard, and not create a project: Click Cancel.
To go back to the previous page, and change settings: Click Back.
Most of this will happen in the memoQ online project window.
- Import documents into the project. Choose Translations. On the Online Project ribbon, click Import. Or, click the Import label below the Import icon, and choose Import with Options or Import Folder Structure.
- Add translation memories, LiveDocs corpora, and term bases to the project as necessary.
If you need to check the documents (for example, check if the segmentation or pre-translation is correct): Check out a local copy, and do whatever you have to do in the translation editor. The rest happens in the memoQ online project window.
- Add translators and reviewers to the project. To do this, use the People pane of the memoQ online project window. If you use Language Terminal, you may want to add internal translators and reviewers mostly. If you use Language Terminal, you can check how busy each participant is.
- Still on the People pane of the memoQ online project window, use the Languages and roles tab to tell memoQ about the role and language pair of each participant.
- On the Translations pane, assign or auto-assign translators and reviewers to each document. If you use Language Terminal, you can check how busy each participant is.
- Using Language Terminal? Check the costs. Use the Finances pane to check and choose the prices.
- Finally, launch the project: On the Online Project ribbon, click Launch Project. All participants will receive an e-mail about the work they need to do, and memoQ server will start tracking the status of each document.