Publish project wizard
The Publish project wizard turns your local project into an online project. You use this wizard after you prepare a translation job in a local project.
Requires memoQ project manager: You need the project manager edition of memoQ to manage online projects.
You need to be a project manager or an administrator: You may manage online projects only if you are a member of the Project managers or Administrators group on the memoQ server – or if you have the Project manager role in the project.
You can publish any local project on a memoQ server. Before you publish the project, you may assign documents to users, even in all three roles (Translator, Reviewer 1, and Reviewer 2). You can freely type user names. The Publish project wizard will match them to the users on the server.
- All documents and views in your local projects will be uploaded as memoQ XLIFF documents. Views will become ordinary documents because online projects do not support views.
- All local resources (translation memories, term bases etc.) will be uploaded to the memoQ server and published.
- The local project remains on your computer after the online copy is created.
Cannot connect project to Language Terminal: If you need to connect your project to Language Terminal, do not publish it. Instead, export the documents (and resources) you need, and set up a new online project from them. You will be able to connect that new project to Language Terminal.
How to get here
On the Dashboard, right-click a project. Choose Publish On Server.
Or:
- Open the project.
- In Project home, choose Overview.
- Click the Handoff/delivery tab.
- Click Publish current project on a server.
The Publish project wizard starts.
What can you do?
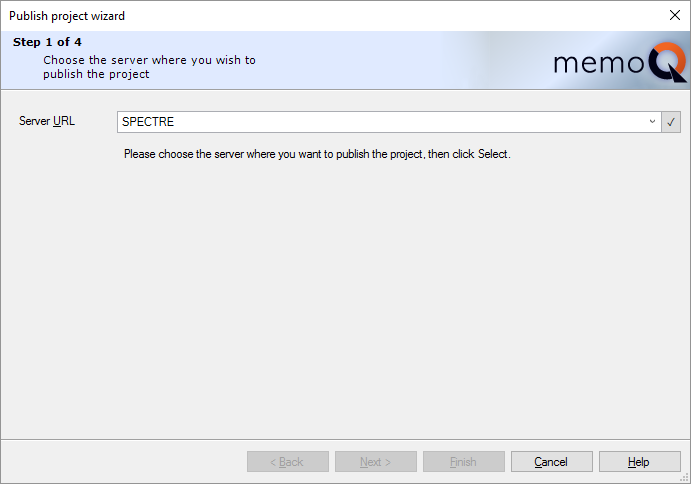
In the first page of the Publish project wizard, you can choose the server where the project will be published. You need a user account (a user name and a password) to access the server. To publish a project, you must be member of the Administrators or the Project managers group on the server.
Type the address of your memoQ server in the Server URL box. memoQ remembers the servers that you used in the past, and the address of the most recently used server will appear automatically. After you type or choose the server address, click Select ![]() .
.
memoQ connects to the server. If you have not connected to the server before, you will need to log in.
After you select the server, more options appear in the first wizard page:
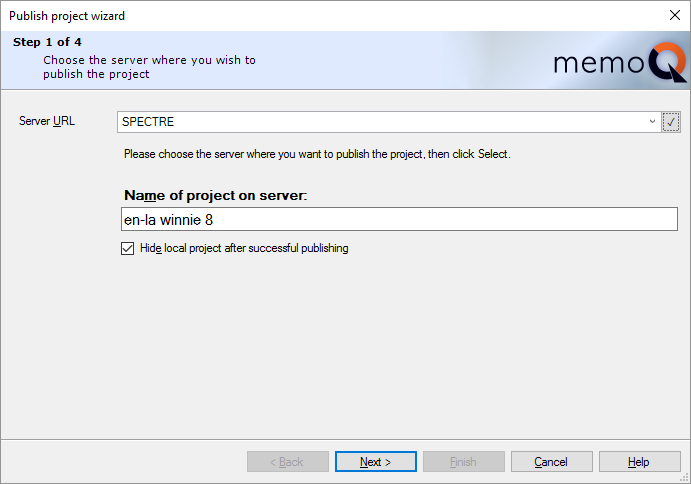
In the Name of project on server box, type a name for the project. The project will be published under that name on the memoQ server. By default, the name is the same as the name of your local project.
If you check the Hide local project after successful publishing check box, memoQ will hide the original local project from the project lists in the Dashboard and the Manage projects window. In that case, you will see the online copy only. This prevents you from accidentally mixing up the original local copy and the online version of the project. The original local project will still be available – you can still open it by choosing the Open project command, and finding the project folder.
Click Next to proceed to the second wizard page. To publish the project using the default settings, click Finish. Click Cancel to leave the wizard without publishing the project.
In the second page of the Publish project wizard, you need to match the user names in your local project to the user names that exist on the memoQ server. This is necessary because in a local project, you do not choose users from a memoQ server. There you can type any name next to a document. For each 'local' user name in your original project, memoQ displays a drop-down list where you can choose from users on the memoQ server.
If there are matching names, memoQ will use them: If there is a user on the memoQ server with the same name as a local user, the wizard automatically selects that user in the drop-down box.
You can also create new users on the server from here: At the bottom, click Create new user. The User properties window opens where you can enter the details of the user. When you create a new user, they will automatically be selected in the drop-down list in the selected row.
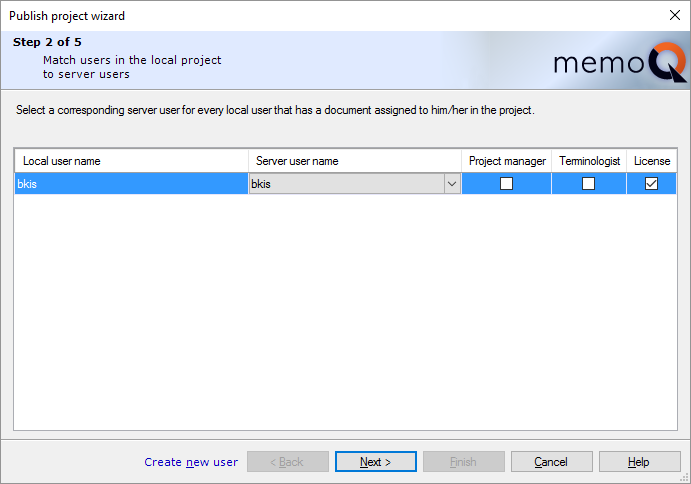
- You can set the project-wide role of the user using the check boxes next to each user name. If you click the Project manager check box for a user, memoQ will grant the user project manager privileges. If you check the Terminologist check box, the user will have terminologist privileges. This gives these users extra permissions over the resources in the project - as long as the user is a participant of the project, and the resource is included in the project.
- Through the License check box, you can lend a mobile license to each user. This can be CAL or ELM, depending on the configuration of the server. When the user checks out the project, memoQ checks if the current edition permits the user to work with online projects. If the user is not permitted to connect to an online project, memoQ will obtain a mobile license from the memoQ server. The license will be valid until the deadline of the project expires.
Note: When a user accesses the project through memoQWeb (legacy), memoQ server will always use a license. This license can be a regular mobile (CAL/ELM) license, or a web license, which is available for memoQWeb (legacy) servers in memoQ 2015 (7.8.100) and later.
Click Next to proceed to the third wizard page. Click Cancel to leave the wizard without publishing the project.
You cannot click Back here: If you need to publish the project on a different server, click Cancel to leave the wizard, and start over.
The third page of the Publish project wizard lists the local LiveDocs corpora, translation memories, and term bases in your project. For each resource, you can choose whether or not to publish them on the server. Resources you publish will be available in the online project; resources you choose not to publish will not be uploaded to the server, and they will not be available to those checking out the online copy of the project.
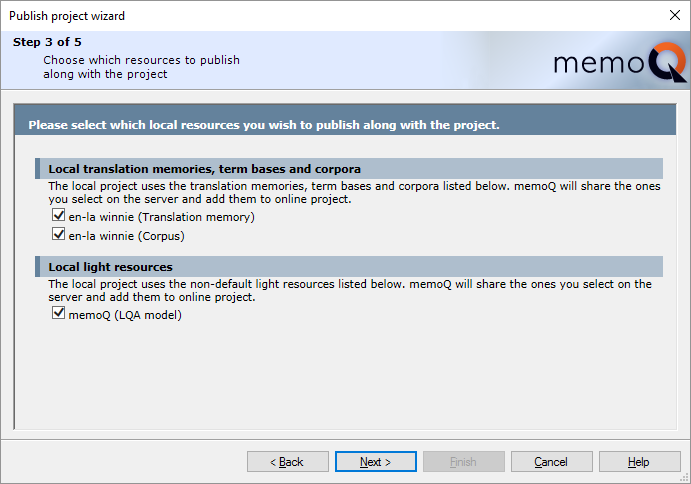
Normally, all local resources are selected for publishing. Clear the check box for each resource you do not want to publish.
Resources from other servers will not be published: A local project may use several online resources from two or more servers. However, an online project must use all its resources from the same server where the project is. If you are publishing a local project that uses a resource from a different memoQ server, it will not be there in the online project.
Click Back to return to the third wizard page. Click Next to proceed to the fourth wizard page. Click Cancel to leave the wizard without publishing the project.
It ends here for template-based projects: If you publish a local project that was created from a template, the 4th and 5th wizard pages will not appear. The project will be published with the settings from the template.
In the fourth page of the Publish project wizard, you can set the project workflow options for your project.
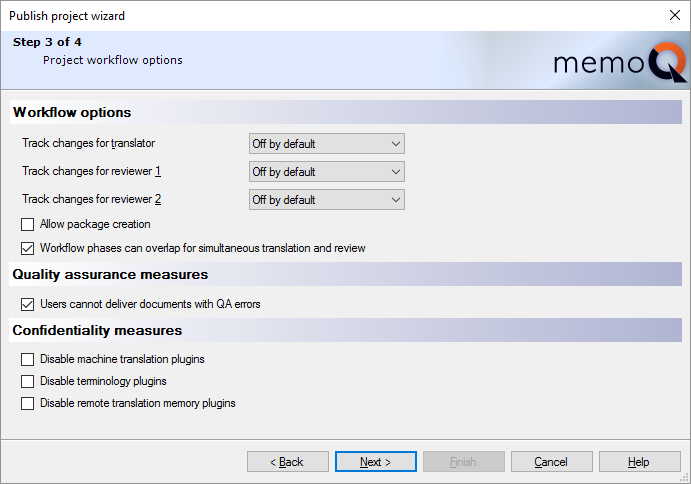
By checking or clearing the check boxes under Workflow options, you can answer this question:
Question: Do translators and reviewers need to see their changes tracked?
Normally, tracking changes is off for all participants, but they can turn it on. Translators do not need if they translate most segments from scratch. They may need Track changes if they have matches or machine translation in most segments.
For every role, you can choose from four settings. Use the Track changes for translator, Track changes for reviewer 1, or the Track changes for reviewer 2 drop-down boxes.
- Off by default: This is the default setting. Tracking changes is off, but the translator or reviewer can turn it on.
- On by default: Tracking changes is on, but the translator or reviewer can turn it off.
- Off: Tracking changes is off, and the translator or reviewer cannot turn it on.
- On: Tracking changes is on, and the translator or reviewer cannot turn it off.
Question: Do translators and reviewers work on the same document at the same time?
- Yes: Clear the Allow package creation check box. Or, make sure it's cleared. Check the Workflow phases can overlap for simultaneous translation and review check box.
Default is yes: At first, a project template - and an online project - is set up like this. But there's a price: Every user needs to be online all the time while they work on the job.
- No - or they would, but there are users who can't be online all the time: Check the Allow package creation check box. This clears the Workflow phases can overlap for simultaneous translation and review check box. If you allow package creation, users can download handoff packages from the online project. It's imported on their own computers, and they can continue working on the project offline.
Must prepare package creation: Allowing package creation in the online project is not enough. Each user must be allowed to use packages. You can give them permission in their memoQ server user account.
Sending work to subvendor groups? Do not use packages: Make sure the Allow package creation check box is cleared. Otherwise memoQ will not allow you to assign subvendor groups to documents.
By checking or clearing the check box under Quality assurance measures, you can answer the following question:
Question: Who will go through quality assurance warnings? The translator or the reviewer?
- Translator: To force the translator to look at all quality assurance warnings: Check the Users cannot deliver documents with QA errors check box. This is the default setting: You need to clear the check box if you don't want this. The translator won't be able to click Deliver before all automatic QA warnings are corrected or dismissed.
- Reviewer: Clear the Users cannot deliver documents with QA errors check box. The translator can click Deliver, no matter how many active QA warnings there are in a document. Use this if reviewers in your organization have the capacity to tackle the warnings.
By checking or clearing the check boxes under Workflow settings, you can answer the following question:
Question: Is the source material confidential or even secret?
memoQ can use various online resources (machine translation, terminology services, online translation memories) to help with translation. But then memoQ sends complete segments to public websites. If the source material is confidential, this may be a breach of your non-disclosure agreement with your client. You can prevent the translators and reviewers from using these services in that project.
- Confidential or secret materials: Check the Disable machine translation plugins, Disable terminology plugins, and Disable remote translation memory plugins check boxes. At first, memoQ allows users to turn to these. But if these check boxes are checked, the individual memoQ copies of your users won't reach out to these services. If you are concerned about confidentiality, you should turn on these settings together.
You may want to prevent the use of these services if you want control over what resources translators and reviewers use. You may need this for better quality control.
- Materials are not confidential, but you don't want to allow machine translation: Check the Disable machine translation plugins check box, and leave the rest cleared.
- Not confidential materials: Leave all the check boxes cleared, unless you want to control what resources translators use, for quality reasons.
Click Back to return to the second wizard page. Click Next to proceed to the third wizard page. Click Cancel to leave the wizard without publishing the project.
In the fifth page of the wizard (Resource checkout options), you can control the document options for checking out this project and enable communication.
When a translator or a reviewer checks out a project, memoQ downloads the documents they need to work on. Depending on the settings, translation memories and term bases are also downloaded.
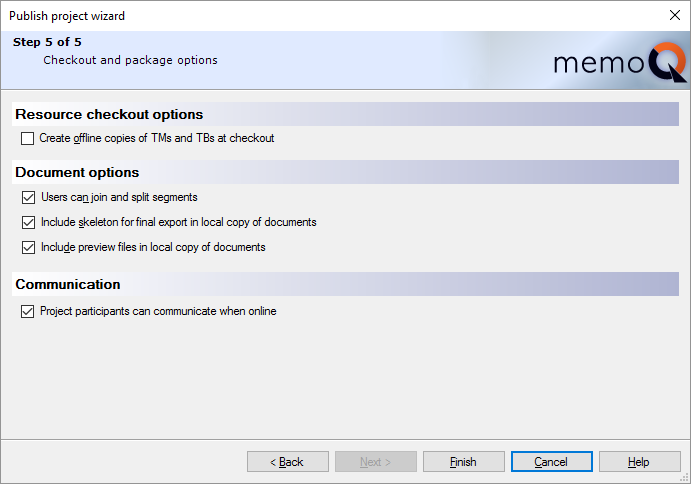
If the network can be slow between the translator and your server, check the Create offline copies of TMs and TBs at checkout check box. When the project is checked out, memoQ downloads the translation memories and term bases. The checkout will take longer, and the users will need more disk space on their computers - but memoQ will offer suggestions more quickly. Normally, memoQ does not download translation memories and term bases.
LiveDocs corpora are never downloaded.
The Document options normally allow every user to join and split segments; to export the finished translation; and to see the preview for each document they downloaded. Most of the time, there is no reason to turn off any of these. Here are some of the exceptions:
- If it's important that source segments stay the same in all target languages: Clear the Users can join and split segments check box. This can be useful in projects with several target languages.
- If the documents are so confidential that you want to prevent users from exporting them on their computers: Clear the Include skeleton for final export in local copy of documents check box. In this case, you must export every document from the memoQ online project window.
- If you need to minimize the network load when checking out projects: Clear the Include skeleton for final export in local copy of documents and the Include preview files in local copy of documents check boxes.
Checkout is leaner in memoQ 7.8.153 and higher: The "skeleton" (data required for document export) and preview data are not downloaded when the project is checked out. memoQ downloads them later, when they are needed. The preview is downloaded when the user opens a document for the first time. The "skeleton" is downloaded when the user exports the translated document.
To allow translators, reviewers, and project managers to chat and discuss the job: Check the Project participants can communicate when online check box.
After reviewing these options, click Finish.
If the project works with packages, the Checkout options page is different:
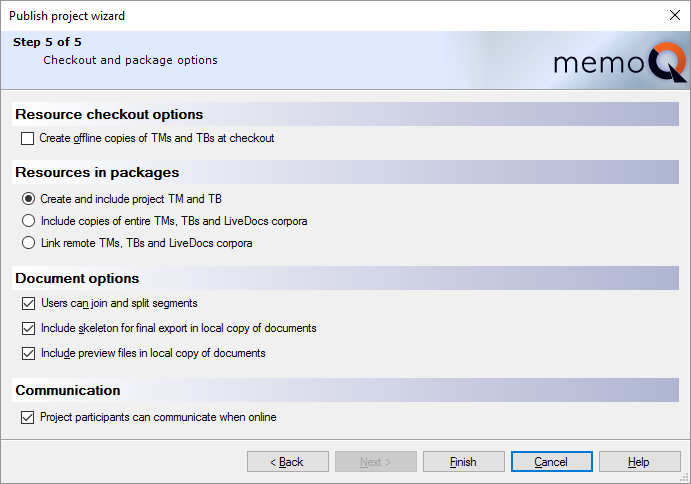
To work with packages: On the previous page, check the Allow package creation check box.
When a project works with packages, users can either check out the project, or they can download a package that is imported on their computers like a handoff package.
You can decide what is included in a package. You have three choices:
- Create and include project TM and TB: A project TM is a translation memory that contains segments from the TMs in the project. They are those segments that match at least one segment in the project. The Project TB is a term base that contains entries from all the TBs in the project. They are the entries that return from the TBs as a lookup result from the documents. In short, users can download a minimum-size TM and TB that give them everything there is at the beginning of the project. But these TMs and TBs don't include entries that are saved in the 'live' TMs and TBs during the project. And a lot of entries will be missing from the TMs that could be used for concordancing. But the user will have access to the 'original' TMs and TBs over the network. This is the default choice.
- Include copies of entire TMs, TBs and LiveDocs corpora: All the project's TMs, TBs and LiveDocs corpora are downloaded with the package. This can be an immense amount of data, taking a long time to download, and occupying a lot of disk space. Choose this only if the network connection between the users and the memoQ server is so bad that otherwise they couldn't receive suggestions. Term bases from QTerm are not added to the package, only linked (just like if you chose the next option).
- Link remote TMs, TBs and LiveDocs corpora: There won't be any resources in the package itself. But when you import the project, memoQ will connect to the online translation memories, term bases, and LiveDocs corpora. Translators must be online to receive results. But this package will be the fastest to download, and occupy the least disk space.
All other settings are the same for all online projects. To learn more, see the previous section in this topic.
After reviewing these options, click Finish.
When you finish
To publish the project on the memoQ server: Click Finish. memoQ will upload all necessary data to the server, and display the online project in the memoQ online project window.
To return to the Dashboard or to Project home, without publishing the project: Click Cancel.