Set a safer working folder for the Authentication Manager (optional)
Because of a known issue with the .NET Framework, the program files for the Authentication Manager and the OIDC Configuration Tool might be deleted by 3rd-party software, for example, an anti-virus app. To avoid this: Create an environment variable called DOTNET_BUNDLE_EXTRACT_BASE_DIR, with Machine or System scope. Set its value to %PROGRAMDATA%\Temp\.net.
This may affect other .NET-based software on the machine. Before this step, check if there are any other programs on the server that use self-extracting single-file executables. If yes, check if the change can disrupt them.
This step will not be necessary later: When memoQ is updated to .NET 5, this issue will be solved automatically.
Set parameters for your ID provider
Note: As of December 2020, memoQ supports Azure AD, Google, Microsoft, and Okta (both standard and custom) instances. If your company uses another OIDC-based ID provider service, contact our Business Services department, who can provide the resources you need.
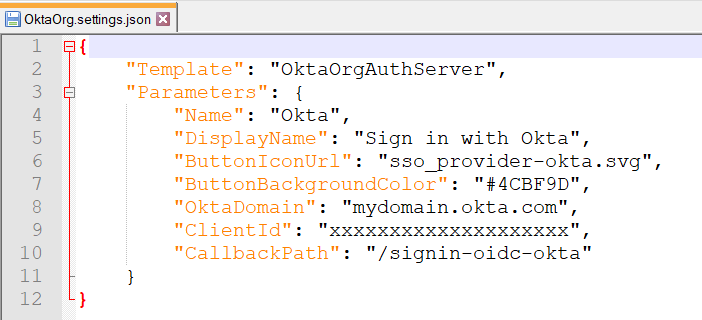
Choose the settings file for your company’s ID provider type (AzureAD.settings.json, Google.settings.json, Microsoft.settings.json, OktaCustom.settings.json, or OktaOrg.settings.json), and put it into the %PROGRAMFILES%\Kilgray\MemoQ Server\Oidc folder. Open it in a text editor, and add your values:
Generic keys (in all settings files)
| Parameter |
Description |
| Template
|
The template file that you are filling in with the parameter values.
DO NOT CHANGE!
|
| Parameters
|
See each sub-key's description below. |
| Name
|
The ID provider’s name in the database, the key value in the oidc.IDProviderSettings table.
Change as needed.
|
| DisplayName
|
The text on the ID provider's button you’ll see on the login page.
Change as needed.
|
| ButtonIconUrl
|
URL for the ID provider’s icon that appears on the login page. There is a default icon URL, but you can set another one.
|
| ButtonBackgroundColor
|
Color for the ID provider’s button that appears on the login page. There is a default color, but you can set another one. |
| ButtonTextColor
|
Text color for the ID provider’s button that appears on the login page. There is a default color, but you can set another one. |
| ClientId
|
The Client ID that the ID provider generated for your memoQ server.
You need to change the default value.
|
| ClientSecret
|
The client secret or secret key you received when registering your memoQ server at this ID provider.
You should not save the client secret into this unencrypted json file - unless it is absolutely necessary. Leave this value blank, and enter the client secret only when you set up the ID provider with the configuration tool.
|
| CallbackPath
|
The last part of the callback URL that you registered at the ID provider.
You need to change the default value.
|
| Scope
|
The OIDC scope that the Authentication Manager will send to the ID provider. By default, it includes all standard scope values. You can remove values as needed, but the scope must contain the openid value. Else, single sign-on will not work. |
IDP-specific keys
| Parameter |
Description |
| Tenant
|
Your Microsoft Azure tenant. You need to change the default value.
|
| OktaDomain
|
Your Okta domain. You need to change the default value.
|
| AuthServerId
|
Your Okta authorization server's ID. You need to change the default value. |
| OktaOrg
|
Your Okta organization's base URL (without http://). You need to change the default value. |
The OIDC Configuration Tool is a command-line application that is designed to:
- Register an identity provider connection
- Configure connection details
- Install the Authentication Manager as a Windows service
- Start the service
It is in the %PROGRAMFILES%\Kilgray\MemoQ Server\Oidc folder. Open a Command prompt or PowerShell window with admin rights in this folder.
Add your ID provider configuration with the Configuration Tool's AddIdProvider command:
MemoQ.Security.Oidc.Backend.ConfigTool.exe AddIdProvider
-f [<absolute_or_relative_path>\]<your_settings_file>.json
If you are setting up a new icon for the ID provider, add its path (on your computer) with the -i parameter.
Examples:
MemoQ.Security.Oidc.Backend.ConfigTool.exe AddIdProvider
-f AzureAD.settings.json
MemoQ.Security.Oidc.Backend.ConfigTool.exe AddIdProvider
-f C:\SSO-Ingredients\OktaOrg.settings.json
-i C:\SSO-Ingredients\OktaIcon.png
Set the client secret you received from the IDP
The client secret is a password, so it is not secure to save it to a config file. Set it manually with the Configuration Tool:
MemoQ.Security.Oidc.Backend.ConfigTool.exe SetClientSecret
-s <client_secret> -n Okta
| Parameter |
Parameter’s name
|
Required or not |
Description |
| -n
|
Name
|
required
|
Use the same value as “Name” in the settings file.
|
| -s
|
ClientSecret
|
required
|
The client secret value you received when registering the in the ID provider service.
|
The client secret will be stored in hashed form in the database.
Set the base URL for the Authentication Manager
Do this with the Configuration Tool's SetBackendBaseUrl command. Required option: -u for the URL.
MemoQ.Security.Oidc.Backend.ConfigTool.exe SetBackendBaseUrl
-u <auth_man_base_url>
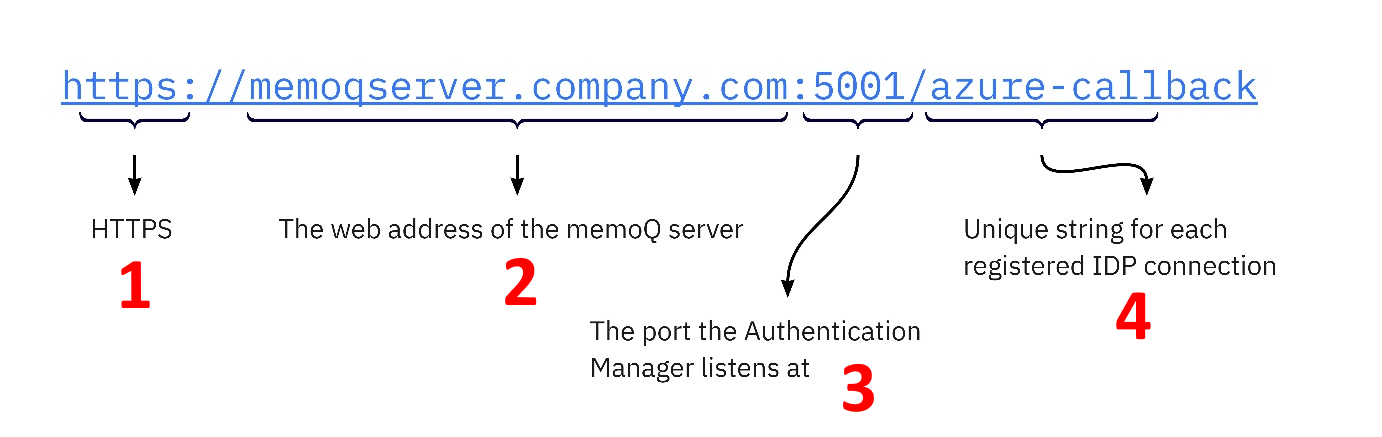
The base URL is constructed: 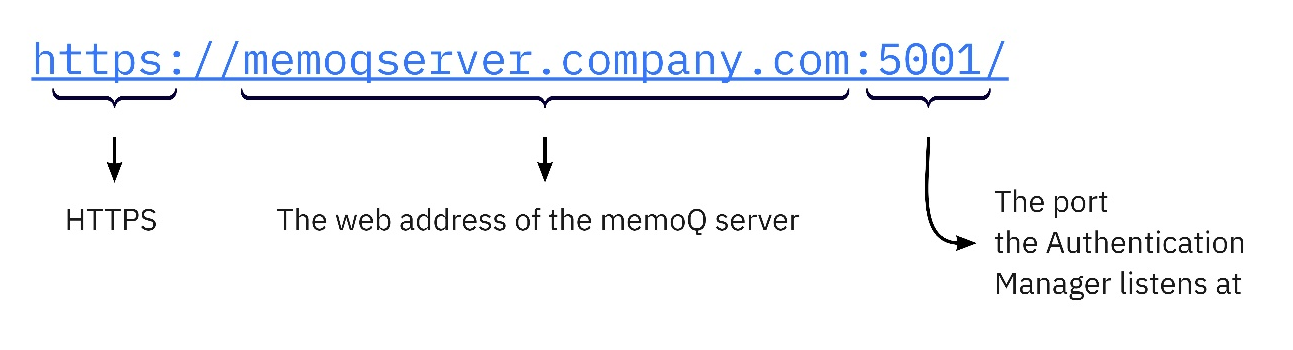
Example:
MemoQ.Security.Oidc.Backend.ConfigTool.exe SetBackendBaseUrl
-u https://memoqserver.mycompany.com:5001
Set base URLs
This information is important as this tells the Authentication Manager from what URLs it should accept calls as from . Login attempts from this URL will be processed as logins.
Set the same URL you use for logging in to . It can be found on the Server administrator > Configuration and logging > Web addresses tab.
Use the Configuration Tool's SetMemoQWebBaseUrls command. Required option: -u for the URL.
MemoQ.Security.Oidc.Backend.ConfigTool.exe
SetMemoQWebBaseUrls -u <memoqweb_base_url>
Example:
MemoQ.Security.Oidc.Backend.ConfigTool.exe SetMemoQWebBaseUrls
-u https://memoqserver.mycompany.com/memoqweb
Install the Authentication Manager service in Windows
Do this with the Configuration Tool's InstallService command.
Note: The account that you choose for running the service needs to have read and write access to the memoQ server database, and read access to the certificate you set up in the appsettings file. This is true for all account types (LocalSystem, NetworkService, VirtualService, or ServiceUser).
We recommend:
- having the in a domain,
- in that domain, having a dedicated user account who runs all memoQ services (the service and the MemoQ OIDC Backend Service)
- this dedicated user account should have access to the certificate.
| Parameter |
Parameter’s name
|
Required or not |
Description |
| -t
|
AccountType
|
required |
The type of the account which will run the service. Possible values: LocalSystem, NetworkService, VirtualService, ServiceUser. In general, use a virtual service to run the Authentication Manager - also runs this way. But if your 's database is on another server, you may need to use a service user instead. |
| -a
|
Account
|
optional |
The account which will run the service. Required and used only if the AccountType option is ServiceUser. |
| -p
|
Password
|
optional |
The password for the account which will run the service. If not specified, and the AccountType option is ServiceUser, the application will ask for the password interactively. |
| -s
|
Start
|
optional |
If true, starts the service after installation. Default value is false.
Depending on other options, the service may not start automatically, After installation, run the services.msc command in Windows, and start the MemoQ OIDC Backend Service manually, if it is not running.
|
Examples:
MemoQ.Security.Oidc.Backend.ConfigTool.exe InstallService
-t VirtualService
MemoQ.Security.Oidc.Backend.ConfigTool.exe InstallService
-t ServiceUser -a AuthMan -p L0ngEn0ughIsStr0ngEn0ugh
-s true
Grant the Authentication Manager service read access for the certificate
Restart software components
At this point, you need to restart:
- the service
- the IIS application pool that runs
-
the Authentication Manager service (called MemoQ OIDC Backend Service in Windows's Services console
Make sure this service is set to Automatic, so that you do not need to start it manually after server machine restarts.
Authentication Manager is now configured on your memoQ server. The server accepts:
- SSO logins: Users choose an ID provider service, and sign in with the usernames and passwords they have at that ID provider.
- Legacy SSO logins: Users sign in with the usernames and passwords they have in the company's Windows Active Directory. From the OIDC point of view, these users behave like local logins, and from version 9.7, they can be changed to OIDC-based SSO.
- Local logins: Users who have neither ID provider credentials nor Windows AD accounts can still use their memoQ usernames and passwords.
You can now tell a memoQ admin user to start creating or updating users on the (see Part 2 of this document).