Further info about OIDC-based single sign-on
Troubleshooting
What to do after upgrading an OIDC-enabled to version 9.6
In version 9.6, we separated the settings in appsettings.json into two files:
- %PROGRAMDATA%\MemoQ Server\Oidc Backend\appsettings.User.json contains all the settings which stay unchanged when you update or upgrade .
- %PROGRAMFILES%\Kilgray\MemoQ Server\Oidc\appsettings.json contains the settings which revert to their default values when you update or upgrade .
The upgrade does not touch the appsettings.json file you used in version 9.5. To start the Authentication Manager's service again, you need to do clean things up:
- In the %PROGRAMDATA%\MemoQ Server\Oidc Backend folder, open the files appsettings.json and appsettings.User.json in a text editor.
- Copy everything from appsettings.json to appsettings.User.json, except the parts under the Serilog key.
- If you changed any of the logging settings, copy the parts under the Serilog key to %PROGRAMFILES%\Kilgray\MemoQ Server\Oidc\appsettings.json.
- Delete appsettings.json from the %PROGRAMDATA%\MemoQ Server\Oidc Backend folder.
- Restart the MemoQ Server service using the Deployment Tool or the services.msc Windows management console.
- Start the MemoQ OIDC Backend Service.
What to do after updating an OIDC-enabled within a minor version
In this case, you only need to start the Authentication Manager's service. Run the services.msc command, right-click MemoQ OIDC Backend Service in the list, and in the menu, click Start.
What to do if the .exe file for the Authentication Manager or the configuration tool is missing?
This is caused by a known issue of the .NET Framework. The exe files in the %PROGRAMFILES%\Kilgray\MemoQ Server\Oidc folder are self-extracting archives. Their contents (the actual programs) are extracted to (and run from) a subfolder of the user's %TEMP% folder. It can happen that something (for example, anti-virus software, a .NET update, etc.) cleans up the %TEMP% folder, and then the Authentication Manager and its config tool cannot run.
To avoid this: Create an environment variable called DOTNET_BUNDLE_EXTRACT_BASE_DIR, with Machine or System scope. Set its value to %PROGRAMDATA%\Temp\.net. Then start the Authentication Manager service again: Run the services.msc command, right-click MemoQ OIDC Backend Service in the list, and in the menu, click Start.
What to do after upgrading an OIDC-enabled to version 9.7
Before you try to migrate Windows SSO users to OIDC, you need to upgrade the OIDC database. To do this, execute any command with the MemoQ.Security.Oidc.ConfigTool. The safest one is GetBackendBaseUrl, as it does not change anything in the configuration.
In a command prompt with admin rights, run these commands:
cd "\Program Files\Kilgray\MemoQ Server\Oidc"
MemoQ.Security.Oidc.Backend.ConfigTool.exe GetBackendBaseUrl
After the command prompt returns, the database upgrade is done. Windows SSO users can now start signing in to with their OIDC accounts (see details in the next section).
Migrating users from Windows-based SSO to the new, OIDC-based solution
From version 9.7, users can migrate their accounts from Windows-based SSO to the OIDC-based one. This happens the same way as with accounts:
-
Users sign in to the with their OIDC-based account.
-
They choose the I worked on this server before option when asked, and enter their Windows AD username and password.
-
links the two accounts, and afterwards, users can only sign in with their OIDC account.
Users who switch to an OIDC provider keep their previous permissions and group memberships. When a memoQ administrator synchronizes with Windows Active Directory, group memberships of such users will be updated.
If the organization keeps the Windows-based SSO even after setting up OIDC-based SSO, you can migrate a user back to the Windows-based system. Delete their account in or , then sync your with Windows Active Directory. The account will appear in the user list again as a Windows AD user.
General schema of the OIDC-based user authentication
The new way of approving users’ identity is based on the OpenID Connect protocol that is supported by leading ID providers - also known as Identity and Access Management (IAM) systems.
These schemas show how the user authentication flow happens in the memoQ desktop app and in .
Login from the memoQ desktop app
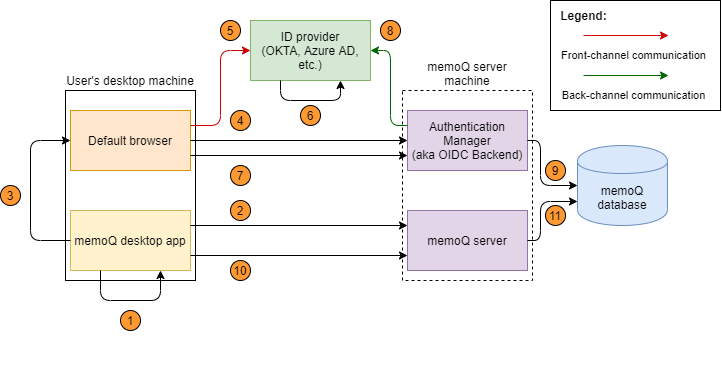
- In memoQ, the user chooses to log in with an external ID provider (Okta, Azure AD, etc.)
- The memoQ desktop app requests and gets the URL of the Authentication Manager's login page (to choose an ID provider).
- The memoQ desktop app generates a random login ID for identifying the login session. It opens the login URL (received in step 2) in the machine's default browser, and passes the hash of the generated login ID to the login page. This page is served by Authentication Manager over HTTPS.
- On the login page, the user chooses an ID provider. The login function of the Authentication Manager passes the login ID hash and the ID provider's name. As a response, it receives a redirect to the ID provider's login page, with the login ID hash and a callback path as parameters.
- The browser is redirected to the ID provider, forwarding the login ID hash and the callback path as parameters.
- The ID provider authenticates the user, and generates an auth code. Then it redirects the browser to the callback path, and passes the generated auth code.
- The browser is redirected to the callback path, and forwards the login ID hash and the auth code to the Authentication Manager as parameters.
- The Authentication Manager calls the ID provider to exchange the received auth code to an ID token. This happens via a more secure back-channel communication.
- The Authentication Manager receives and validates the received ID token which contains the user claims (the authenticated user's details), and saves it into the memoQ database, using the ID token as the record's key.
- The memoQ desktop app sends the login ID to the memoQ server, and requests a memoQ session.
- The memoQ server creates a hash from the login ID, and tries to get the ID token based on that hash. If successful, it creates a memoQ session for the ID token's authenticated user.
Login from memoQweb
The login flow from memoQweb follows the same logic as the desktop:
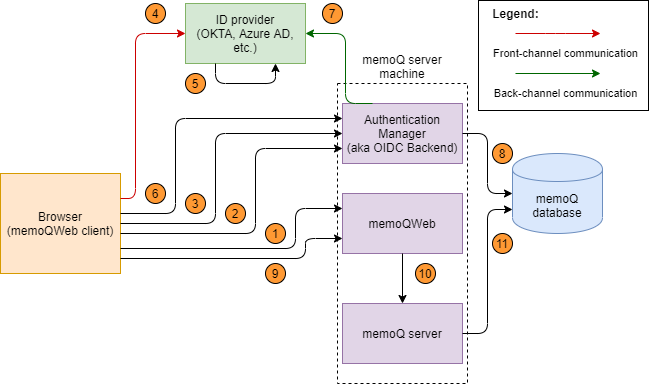
- The user opens (practically, the central web-based login module) to work in webTrans or webPM. The login screen shows the list of the registered ID providers below the traditional memoQ login form.
- On the login page, the user chooses an ID provider. The web client generates a random login ID for identifying the login session.
- The browser is redirected to the ID provider, forwarding the login ID hash and the callback path as parameters.
- The ID provider authenticates the user, and generates an auth code. Then it redirects the browser to the callback path, and passes the generated auth code.
- The browser is redirected to the callback path, and forwards the login ID hash and the auth code to the Authentication Manager as parameters.
- The Authentication Manager calls the ID Provider to exchange the received auth code to an ID token. This happens via a more secure back-channel communication.
- The Authentication Manager receives and validates the received ID token which contains the user claims (the authenticated user's details), and saves it into the memoQ database, using the ID token as the record's key.
- The front-end sends the login ID to the memoQ server, and requests a memoQ session.
- The memoQ server creates a hash from the login ID, and tries to get the ID token based on that hash. If successful, it creates a memoQ session for the ID token's authenticated user.
Identifying the user in the memoQ user database
- If the user is found in the user database, memoQ’s normal authorization flow starts, and the user gets their license and permissions (that is, they are logged in).
- If the user is not found, it means this is the first time they try to log in with these IDP credentials. Depending on whether the user has worked before on this memoQ server, the Authentication Manager will create a new user for them, or update the old one (see the details later).
Tips for test environments
There are two things that can simplify SSO setup, but should not be used in production environments. However, when you first try out this feature, you might want to get through the setup faster.
Use a self-signed certificate for the Authentication Manager
In a test environment, you can use a self-signed certificate instead of a commercial one.
- Download, unpack and run the CreateAndInstallSelfSignedCert.ps1 PowerShell script file in admin mode. This step will create a self-signed certificate, register it as trusted certificate and export it to a password protected .pfx file to the current folder.
- Open the Manage Computer Certificates application and on the Certificates - Local Computer/Personal/Certificate and Certificates - Local Computer/Trusted Root Certification Authorities/Certificate nodes you should see the newly created certificate.
- Edit the appsettings.json file, set the Kestrel.Certificates.Default.Subject property to the value used previously as <dns name for the certificate>.
On each client machine where someone will use the memoQ desktop app or memoQweb, you need to register the certificate as trusted:
- Copy the certificate file created on the server machine to the client machine.
- Double click on the file and the Certificate Import Wizard will open.
- Select Current User as store location and click Next.
- Click Next again.
- Enter the certificate file's password (the one you set when exporting the certificate), and click Next.
- Click Next again.
- Click Finish.
If you need to use the Authentication Manager on the server machine, with self-signed certificates, you also need to do this on the server machine, starting from Step 2.
Use a certificate file
In a test environment, you can use a certificate file instead of a certificate store.
Replace the Kestrel section at the beginning of the file %PROGRAMDATA%\MemoQ Server\Oidc Backend\appsettings.json with this:
"Kestrel": {
"Certificates": {
"Default": {
"Path": "<absolute-path-of-certificate-file>",
"Password": "",
},
},
},

Grant the Authentication Manager read access on this certificate: