Multilingual Excel and delimited text files
You can import text from multiple-column formats including Excel sheets, CSV and text files with comma or tab-separated values. These files usually contain several columns, and each column has the same text in a different language.
In this window, you can control how memoQ imports multilingual Excel or delimited files. You can import text from multiple columns into the project's source language, as well as into its target languages. You can also export multiple target languages in one go, into a single export file - if you have a project manager license for memoQ.
Can't import in LiveDocs: You can't import a multilingual Excel or text file into a LiveDocs corpus.
Normally, only text is imported: Normally, memoQ will not import numbers or formulas from Excel workbooks. However, you can tell memoQ to import them: Use the Excel options tab for that.
How to get here
- Start importing a multilingual Excel or text file.
- In the Document import options window, select the Excel or text files, and click Change filter and configuration.
- The Document import settings window appears. From the Filter drop-down list, choose Multilingual delimited text filter.
What can you do?
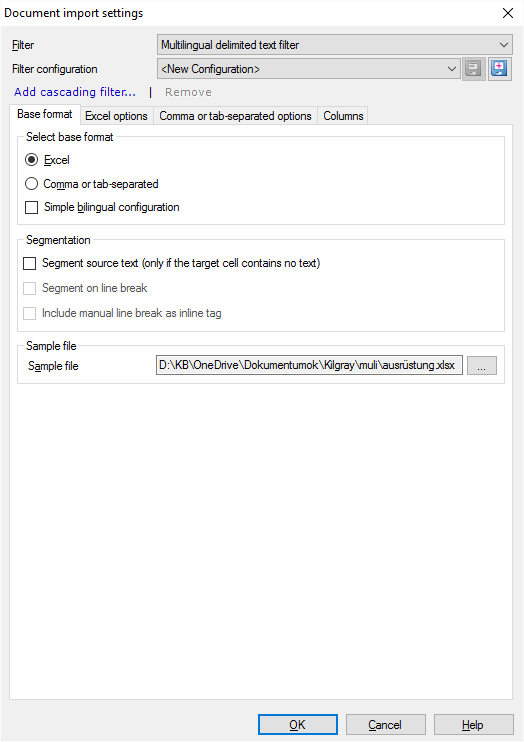
The settings are a bit different for Excel files and for CSV or tab-separated files. In the Base format tab, you can choose: Excel or Comma or tab-separated.
If you translate into one target language only: Check the Simple bilingual configuration check box. Normally, memoQ uses the multilingual setting. With the simple bilingual configuration, only the Base format tab will be there. In this case, you can deal with the columns at the bottom of the window. For more details, see the Dealing with columns section later in this topic.
No segmentation in the multilingual setup: If you import the document with the multilingual setting, memoQ doesn't segment the source text. The contents of each cell will be a single source or target segment in memoQ. You can't join segments across cell boundaries. But you can split segments that belong to a single cell.
You can tell memoQ to segment the source text in source cells - if there are no translations in the same row. To do this: Check the Segment source text (only if the target cell contains no text) check box. But if an imported row contains translated text, segmentation will not happen. memoQ doesn't know how to segment the translation along with the source. Normally, this is turned off.
If you want memoQ to segment the source text, you have two more options:
- Segment on line break: If you check this, memoQ will start a new segment each time there is a line break in the cell. (This can happen in Excel only.)
- Include manual line break as inline tag: If you check this, memoQ will insert an inline tag for each manual line break in the cell (this is the one you insert in Excel with Alt+Enter).
Under Select base format, click the Excel radio button. Then click the Excel options tab.
On the Excel options tab, you can set the following:
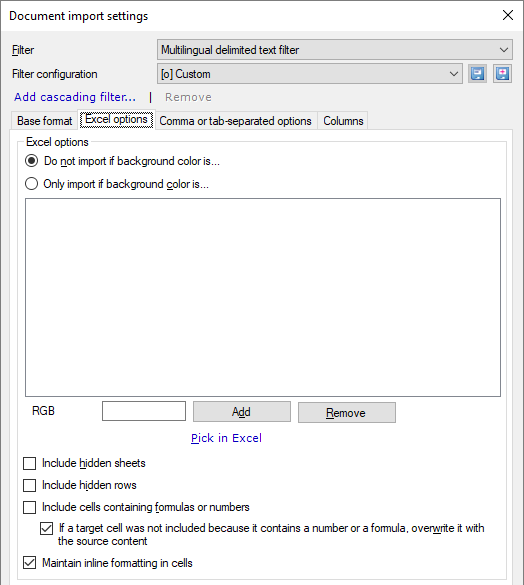
You can import content that is formatted – or not formatted – with specific background colors. You can list the colors in the box under the two radio buttons.
- Do not import if background color is: This is the default setting. While importing the document, memoQ will skip rows where the source cell is formatted with the background you choose.
- Only import if background color is: Click this radio button if you want memoQ to import content that has the background colors you set in the list below the radio button.
To add colors to the box below the radio buttons:
- Type a color code in the RGB text field, and click Add. The color code is a six-digit hexadecimal number: the first two digits are for blue, the third and fourth for green, and the last two are for red. For example, the code 00FF00 stands for pure green.
- It's easier if you pick the color in Excel. Click the Pick in Excel link. memoQ opens the source document in Excel. (Excel must be installed.) Then the Add colors from file window appears:

In Excel, select a range that contains the background colors you want to use. Then click Add colors of selection. The colors appear on the list in the Document import settings window. You can select a new range, and click Add colors of selection again. When there are no more colors to add, click Finish. This closes the Add colors from file window, and Excel, too.
- To remove a color from the list, click the color, and then click Remove.
- To import text from hidden worksheets: Check the Include hidden sheets box.
- To import text from hidden rows: Check the Include hidden rows check box.
- Check the First row contains column names check box if your Excel file contains column names in the first row.
Normally, memoQ will not import numbers or formulas from Excel workbooks. However, you can import them:
- To import numbers or formulas in source and target cells, check the Include cells containing formulas or numbers check box.
- The target cells may already contain (different) numbers or formulas. Normally, memoQ will overwrite these by copying the number or formula (or text) from the source cell. If you want to keep the previous formula or number in the target cell, clear the If a target cell was not included check box.
Formatting in the source cells? To keep extra formatting inside cells, check the Maintain inline formatting in cells check box. memoQ will export the translations (and the source text) with the same formatting as it was imported.
Earlier memoQ versions will not keep formatting: If you import a multilingual Excel file with formatting, but then you transfer the document to an earlier memoQ version, the earlier version will export the file without the inline formatting.
Under Select base format, click the Comma or tab-separated radio button. Then click the Comma or tab-separated options tab.
On the Comma or tab-separated options tab, you can set the following:
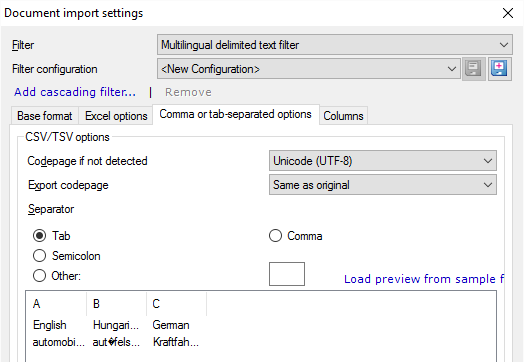
- Choose an encoding: Normally, memoQ detects the encoding (the code page) of the files you are importing. If the encoding cannot be detected, memoQ uses Unicode (UTF-8). To use a different encoding, choose it from the Codepage if not detected drop-down box.
- If the source encoding is not Unicode, and you're translating into a language with a different writing system (for example, from English into Japanese): You need to choose a different encoding (code page) for the exported translation. Normally, memoQ uses the same encoding to export the translation. To export the translation in a different encoding, choose it from the Export codepage drop-down box.
- Choose the character that separates the columns: Normally, memoQ uses the Tab character. This is probably the most frequent one. You can choose any other character, though: Use radio buttons to choose other common separator characters like the Comma or the Semicolon. If your file uses a different separator from the three common ones, click the Other radio button, and type the character in the text box to the right.
- Watch the preview: At the bottom of the window, you can see how memoQ would import your file with the current settings. Check if the characters appear correctly, and if the columns are separated properly. If you are importing several files, memoQ shows the preview from the first one. If it's too small, or not typical enough, choose a different file for preview: Click Load preview from sample file, and choose the file to use for the preview.
Dealing with columns
Always use this in bilingual projects: If your project has just one target language, or you are using memoQ translator pro, always use this setting.
On the Base format tab, under Select base format, check the Simple bilingual configuration check box.
The Columns settings you need appear at the bottom of the Base format tab.

- Choose the column that has the source text: In the Source text box, type the letter of the column. Use the letters of the English alphabet. The first column is A, the second is B, the 27th is AA, and so on.
- Choose the column where the translation should go: In the Translation text box, type the letter of the column.
If the Translation column already has translations: memoQ will import them as target text. If you don't want to import these, clear the Import target text check box.
- Choose the column where there are comments: In the Comments text box, type the letter of the column.
- Choose the column that has the context: In the Context text box, type the letter of the column. memoQ uses the contents of this column for context matching, and return 101% matches from translation memories or LiveDocs corpora.
If the table has a header row, and you don't want to import it: Check the First row contains column names check box. Normally, the check box is cleared.
Multilingual projects only: Use this setting in memoQ project manager only, and only when you're preparing a multilingual project for several translators.
MQXLIFF export for one target language at a time: In the project, you must select a target language before you can export a multilingual document in MQXLIFF. This means that an MQXLIFF export of such files can contain one of the target languages only.
- On the Base format tab, make sure that the Simple bilingual configuration check box is cleared.
- Then set the meaning of each column in the Columns tab.
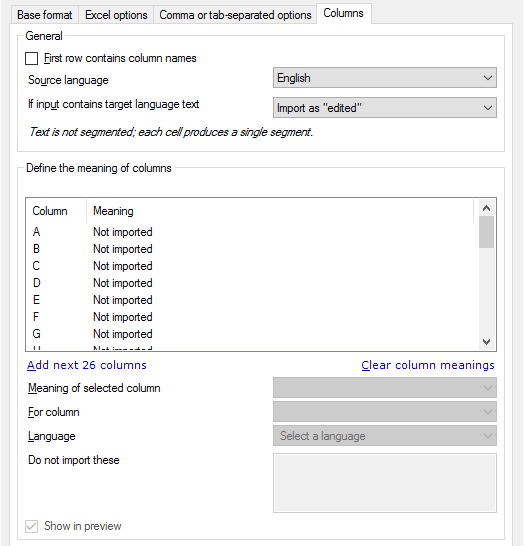
- Choose the status of segments that already have translations. Normally, it's edited, but you can choose another status in the If input contains target language text drop-down box.
To ignore target text that's already there: From the If input contains target language text drop-down box, choose Do not import.
Cells are never segmented. If a cell in the table contains several sentences, those will be imported in a single segment.
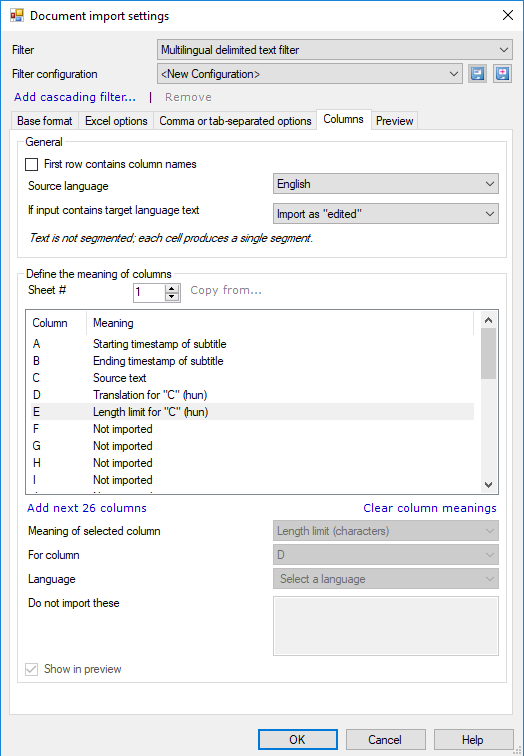
To set up columns:
memoQ lists all the columns from your file, and sets their meaning to Not imported. In the beginning, the first 26 columns are listed only. To see more, click the Add next 26 columns link.
To set a column as source text:
- Select the column in the list.
- In the Meaning of selected column drop-down box, choose Source text.
If a source cell in a row is empty or contains spaces only, memoQ won't import that cell, its translations, or its contexts or comments.
If your customer asked you to overwrite the source text:
- Select the column in the list.
- In the Meaning of selected column drop-down box, choose In-place translation.
memoQ will export the translation to the same column, replacing the source text.
To set a column as translation in a target language:
- Select the column in the list.
- In the Meaning of selected column drop-down box, choose Translation.
- In the For column drop-down box, choose one of the columns that are already marked as Source text. If there is only one column that has source text, the list will contain that column only. For example, this could tell memoQ that column B has translations for the text in column A.
- In the Language drop-down box, choose the target language of the column. You can choose any language that memoQ supports. But if the project doesn't have that language, the column won't be imported.
If you don't choose a language: The column will be set to In-place translation. memoQ imports this column as source text, and replaces this source text with the translation.
To set a column as context for matching:
- Select the column in the list.
- In the Meaning of selected column drop-down box, choose Context.
- memoQ uses the cells in this column as matching context for all source-text cells that are in the same row.
You can choose several context columns: In this case, memoQ will append them together, and use the result as the context.
To set a column as comment:
- Select the column in the list.
- In the Meaning of selected column drop-down box, choose Comment.
- From the For column drop-down box, choose which column this comment belongs to. You can also choose All: memoQ imports this comment for every cell in the same row.
You can import a different comment for every source and target column.
If you don't want to import all rows from the file, set up conditions:
- In the list, select the column that has the condition values.
- In the Meaning of selected column drop-down box, choose Condition.
- From the For column drop-down box, choose which column this condition belongs to. You can also choose All: then the condition allows or prevents the import of the entire row.
- In the Do not import these box, type words or expressions (one in a row). memoQ won't import a row if the condition cell contains one of these expressions.
To use length limits:
The file may have length limits. This means that there is a column with numbers which mean that the translations mustn't be longer than the number in there. To set this up:
- In the list, select the column that has the length limits.
- In the Meaning of selected column drop-down box, choose Length limit (characters).
- From the For column drop-down box, choose which column this length limit belongs to. If you choose a target column, memoQ uses the limits for those cells. If you choose a source column, memoQ uses the limits for all translations that belong to that source column.
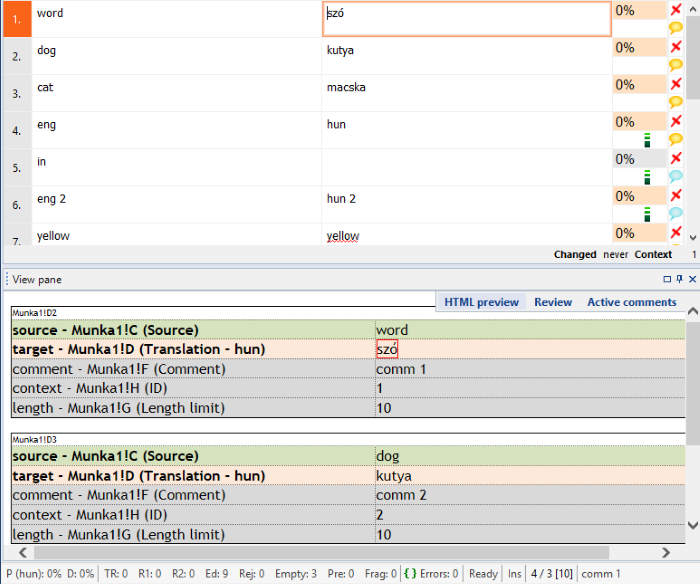
Normally, memoQ shows every meaningful field in the preview. If you want to hide a column or two from the preview: Select the column in the list. Then clear the Show in preview check box.
The result will look like this:
Start just like with a truly multilingual file (see above).
To set a column as source text:
- Select the column in the list.
- In the Meaning of selected column drop-down box, choose Source text.
If a source cell in a row is empty or contains spaces only, memoQ won't import that cell, its translations, or its contexts or comments.
To set a column as translation in a target language:
- Select the column in the list.
- In the Meaning of selected column drop-down box, choose Translation.
- In the For column drop-down box, choose one of the columns that are already marked as Source text. If there is only one column that has source text, the list will contain that column only. For example, this could tell memoQ that column B has translations for the text in column A.
- In the Language drop-down box, choose the target language of the column. You can choose any language that memoQ supports. But if the project doesn't have that language, the column won't be imported.
If you don't choose a language: The column will be set to In-place translation. memoQ imports this column as source text, and replaces this source text with the translation.
To set a column as start or end time for the segment:
- Select the column in the list.
- In the Meaning of selected column drop-down box, choose Starting timestamp of subtitle or Ending timestamp of subtitle, as needed.
To set a column as length limit:
- Select the column in the list.
- In the Meaning of selected column drop-down box, choose Length limit (characters).
-
From the For column drop-down box, choose which column this length limit belongs to. If you choose a target column, memoQ uses the limits for those cells. If you choose the source column (it has "(all translations)" next to it), memoQ uses the limits for all translations.
It is important to know how much text you can put on the screen at once. Change the value of the Line length limit (characters) field as needed.
Density means how much text is on the screen over time. You can set limits for Words per minute and Characters per second - the two most common measurements.
No warnings in memoQ itself during translation: when you confirm a segment, memoQ does not warn you if you are over these limits. You see which lines are longer than the limit only when you export the file.
However, the memoQ video preview tool shows all three values in real time when playing the video.
To tell memoQ where to find a video online: Enter the URL into the Base URL for preview text box. If this address is in the Excel file, you can also enter here the cell where it is, for example: E2 or Sheet2!A3.
When you finish
To confirm the settings, and return to the Document import options window: Click OK.
To return the Document import options window, and not change the filter settings: Click Cancel.
If this is a cascading filter, you can change the settings of another filter in the chain: Click the name of the filter at the top of the window.
In the Document import options window: Click OK again to start importing the documents.
Can be chained: